It's 1517 on 21 February 1942, and Captain Moon's platoon had almost got away. They'd had to halt in order to force a crossing of the river to the east, and while they'd pulled that off with only a few casualties, the halt allowed Japanese patrols pursuing form the north to close in. This is the last game of a four fight operation played out in 15mm using Eureka Minis (plus a Peter Pig Japanese MG team) and Ivan's "Five Men at Kursk" rules. The games were all solo fights, and the action all happens within a 20 minute timespan as the Marines fight for their lives against superior numbers of enemy forces.
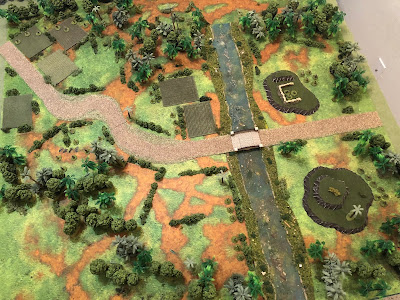
Overview of the entire battlefield, north is up. This is a 4' x 4' table, but each of the four fights will be fought out separately on a little piece of the above table. Here's the lowdown: at left center is Sgt Carlson, the porters, and the wounded, sitting tight, while Cpl White and the base of fire team is at center top, looking to lay down fire on the Japanese MG position (just right of the river and above the trail, at top right), while Captain Moon and the assault element (center bottom) has moved up and is ready to cross the river. But the first fight happens as they cross; they didn't have time for a proper reconnaissance, so they moved up to the river unaware a Japanese squad was patrolling on the other side of the nearby knoll (far right), and Cpl White's base of fire element didn't know the Japanese MG position contains more than just the MG team, there's another five Japanese riflemen behind them, just waiting to make life more difficult. And once the fighting breaks out, the noise draws Japanese from the north out of the woodwork, and they begin moving up the trail (top left), closing in on Sgt Carlson, the porters, and the wounded.
In the first fight, Captain Moon signaled Cpl White's team, then assaulted across the river and took the knoll, losing one man (Pvt McNair) to a wound in the groin. They are now forming up on the hill at bottom right to assault the Japanese machine gun position. As soon as Captain Moon signaled, Cpl White and his men opened fire on the Japanese MG position to keep it pinned down, or at least distracted, so Captain Moon and his boys could cross the river and flank it.
In the second fight, Cpl White and his base of fire element opened up on the Japanese machine gun position, but were surprised when enemy rifleman tried to flank them on the left. They put up a spirited defense in the river and the jungle nearby that saw them stop the enemy push cold, but at the cost of losing Pvt Jennings and having Pvt Cofer badly shot up. The remaining three Marines took cover and plinked away at the Japanese MG team to keep their attention while waiting for Captain Moon's assault element to flank the enemy gun.
In the third fight, Captain Moon and his assault element moved up and made quick work of the Japanese machine gun team, taking the position in close combat without suffering any casualties. But just as things were looking up, trouble presented itself in the Marine rear.
At far right, Cpl White was anxiously watching the small battle going on at the Japanese machine gun position (off camera to far right), and when the Marines there were victorious, Captain Moon quickly signaled for the rest of the platoon to grab the wounded and move up, across the river. Cpl White faced about to make sure Sgt Carlson (bottom left) received the signal; he was happy to see the Platoon Sergeant smile and wave as Sgt Carlson's group began picking up the casualties, but then suddenly the Sergeant's demeanor changed; "Japs, to the north!!!" (top left)
At far right you have Cpl White, Pvt Allen, Pvt Irvin, and the badly wounded Pvt Cofer. At bottom left, from left to right, you have: Cpl Bussey, Pvt Mathews, Sgt Carlson, and Pvt Mitchell, with more Marines behind (below) them. Behind the Platoon Sergeant you have Cpl Duncan, PFC Seals, Pvt Fontes, and Pvt Rozier, taking care of the wounded: Sgt Spielman, Pvt Sanders, Pvt Skow, and Pvt Roberston.
"Dammit Sarge, they're coming, and they're coming quick!" said Pvt Mathews (center bottom, with Sgt Carlson below him), "whaddawegonna do?" "We've got to get the wounded here; you, me, Mitchell, and Cpl Bussey will hold, everyone else grab one of the wounded and get to the bridge!" The Japanese broke out of the treeline, closing in (top).
Mitchell (left), Sgt Carlson (center), Mathews (bottom center), and Cpl Bussey (far right) got ready to fight as Cpl Duncan led the group of porters and wounded (top left) toward the bridge.
With Sgt Carlson and his men preparing to fight (top right) and his wounded moving east (top left), Cpl White (center bottom, with Pvt Allen) ordered Irving to carry Cofer to the bridge (bottom left)…
Then he and Allen (center, moving up towards the Japanese at top left) set out to get in on the delaying action (Irving is carrying Cofer at bottom center).
Sgt Carlson (center left) checks his men, and is happy to see Cpl White and Pvt Allen (top right) moving up to support them.
Sgt Carlson (bottom center left, with Mathews to his left and Mitchell above him) watches as Cpl White and Allen tuck themselves into the jungle in an enfilading position (top center, Japanese off camera to top left).
On the Marine far left, Cpl Bussey, the sniper that won the Navy Cross for crawling atop a Japanese tank in the Philippines, and knocking it out as it was overrunning their lines, started the fight. He (bottom left) sighted in on a Japanese soldier (top center) and fired.
Quite aggravatingly and astonishingly, the Marine (top right) missed this relatively easy shot, and the enemy (bottom left) returned fire.
Cpl Bussey was in good cover (bottom left) and the enemy's fire was ineffective, but the young Marine is feeling the heat. Figuring this is a delaying action, he moved right (bottom center, with Sgt Carlson above him and Pvt Mathews above him), looking to get moving towards the bridge (off camera to right), taking shots when he could. Mathews took a shot with his Springfield...
Also missing. The Japanese again return fire...
And Mathews is hit in the pelvis, dropping right before Sgt Carlson! The Platoon Sergeant opens fire with his Tommy Gun...
But the Marines' aren't too fond of scoring today, and he manages only to suppress a single enemy rifleman (red bead) as they continue to trade shots. More enemy riflemen open up...
Knocking Sgt Carlson down (white bead) and pinning Mitchell! Mitchell can't believe the battle has just begun and already Mathews and Sgt Carlson are down! Mitchell fires...
And drops an enemy soldier, but the wily Japanese are keeping up a devastating fusillade...
And Cpl Bussey (bottom center), who was hoping the whole team would fire and peel right, towards the bridge, watches in horror as Mitchell (top right) is hit in the right thigh and goes down, bleeding profusely.
Sgt Carlson's guys are getting shot to pieces (off camera to bottom left) as Cpl White and Pvt Allen patiently wait (far left) for the enemy to advance, and the wounded make their way to the bridge (center bottom and top right).
Things take another turn for the worse when the Japanese get their Type 96 light machine gun up and into action (bottom left).
The Japanese LMG (bottom left) pumps rounds into Sgt Carlson's defensive position (top right) as a rifleman rallies (bottom left) and the remainder push forward (center). Cpl White and Pvt Allen (just visible in the jungle at top center)…
Decide now is the time to spring their ambush. Cpl White (bottom right) opens fire with his Thompson SMG...
Felling two enemy soldiers! He yells to Allen to target the Japanese LMG...
Pvt Allen (bottom right, with Cpl White just above him, blocked by the foliage) raises his BAR and fires on the enemy light machine gun (top center)…
But his fire is all over the place! An enemy rifleman goes down (bottom left), another is suppressed (red bead at top right), and the LMG gunner (left) is pinned (Allen is off camera to top right)!
Back in the Marine defensive position, Cpl Bussey moves up to check Sgt Carlson, but he's unconscious!
As the enemy MG (bottom left) turns and fires on Cpl White and Pvt Allen (top left, with Sgt Carlson's defensive position off camera to right)…
Cpl White (left) is hit in the guts and goes down, while Allen is suppressed (red bead)!
While Marine marksmanship hasn't been up to its usual standards, the Japanese fire has been devastating...
And while the LMG (far left) is hammering Cpl White and Allen (top center), the rest of the Japanese riflemen move up (center to bottom right).
Cpl Bussey, near panic with all his buddies down and bleeding and Japanese nearly on top of him, raises up and fires his Springfield as fast as he can cycle the bolt.
A Japanese soldier (far left) goes down, and his buddy (bottom center) returns fire, missing Cpl Bussey (top right).
On the far right, Allen (red bead) is beside himself, watching his buddy (Cpl White) bleed out. He steels his mind for revenge (self rally)…
The Japanese continue to close on the Marine defensive position; Cpl Bussey spots another enemy soldier and fires...
And drops another one (on the trail, at right), drawing an immediate response from the enemy machine gun (bottom left)…
Rounds zip and snap by as Cpl Bussey checks Sgt Carlson, but he's been hit in the shoulder and is unconscious from the loss of blood. Cpl Bussey is on the verge of tears: Lord, help me! I can't hold these bastards off by myself! If Sgt Carlson was okay we could at least grab Mathews and Mitchell and get the hell outta here, but now we can't even do that! What the hell am I supposed to do!!??
And with that, Cpl Bussey grabs Sgt Carlson and falls back (top right, from bottom left), abandoning Matthews and Mitchell...
The wounded are getting closer to safety, with Cpl Duncan's men approaching the bridge and Irvin already over it, with Jamison coming out of Captain Moon's position to meet him.
The Japanese machine gun continues to fire, unaware there are no longer any active Marines in the defensive position.
With the LMG (far left) laying down fire, two enemy riflemen move up to check it out (far right) and two more move up (bottom center; I'm adding more enemy riflemen each time they suffer casualties). Pvt Allen (top center left) checks his BAR...
He doesn't know who is still in there, but he can see Marines lying on the ground, so he cuts loose on the two Japanese soldiers moving into the defensive position (top center left).
And both enemy soldiers go down (bottom left)! Maybe there is a chance to save Mathews (right) and Mitchell (off camera to right).
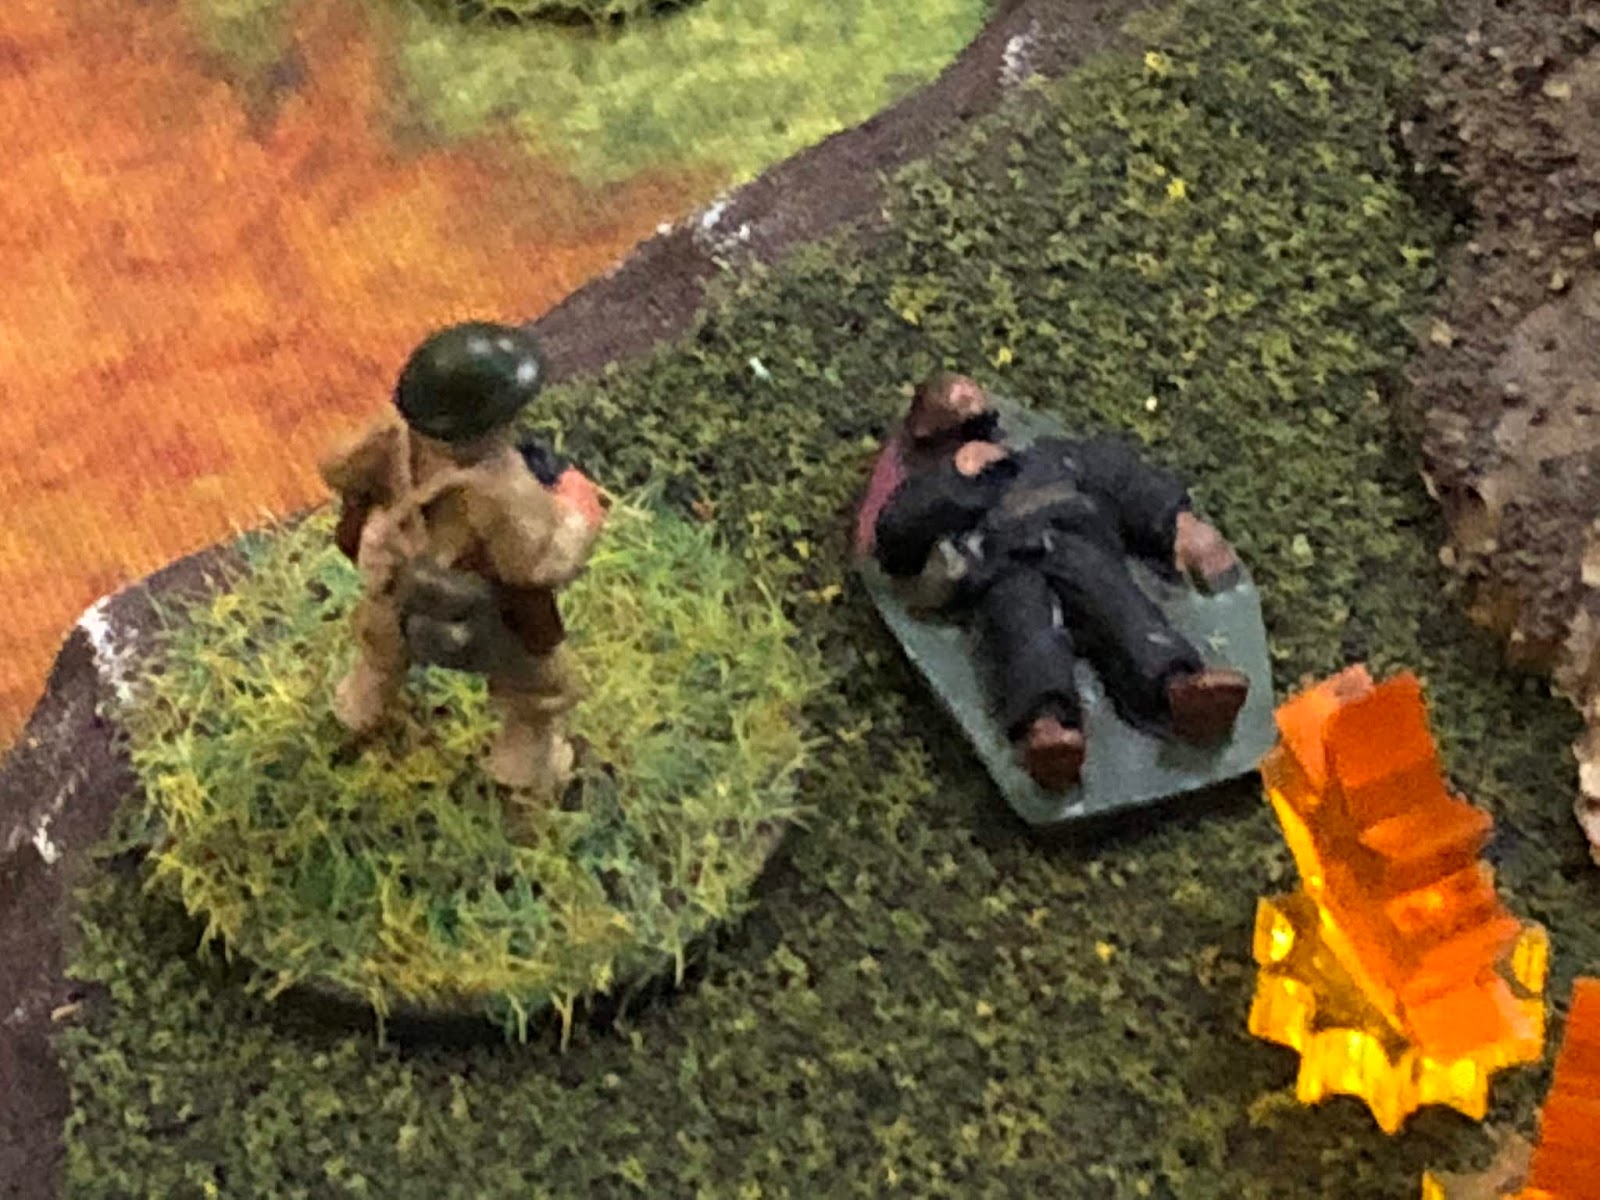
But a Japanese rifleman (bottom left) has crept forward and takes steady aim. CRACK!
And Allen (bottom center) falls, shot in the head, dead before he hits the ground. Cpl White (top left), in intense pain, barely registers his friend's violent death.
Mitchell (far left) begins to come to, looking around for help as the Japanese close in and Cpl Bussey (far right, carrying Sgt Carlson) makes his escape.
Cpl Bussey (bottom left) keeps moving as Cpl Duncan's men cross the bridge.
The Marine carrying wounded strain to reach and get over the bridge as Captain Moon's men lay down covering fire. The Japanese spread out to make themselves more difficult targets and to search the nearby area. While the Marines crossing the bridge have reached a relative safety, the Japanese quickly find Corporal White and Privates Mathews and Mitchell. Cpl White would soon die of his wounds, but Mathews and Mitchell would somehow survive and be sent to Japanese prisoner of war camps.
With Japanese hot on their heels there was no time for rest. Captain Moon pushed his men to the brink of exhaustion; they continued moving south and west to make their way to freedom. The remnants of the platoon moved for another three days straight before encountering some natives near another jungle river. These kind souls took pity on the vagabonds and took them in, hiding and caring for them for almost two weeks. It was nearly 10 March 1942 before Captain Moon got his men moving again, heading for the west coast of Sumatra. It seemed like the Japanese had lost interest, with very few sightings of enemy activity. A few days later they were able to board a fishing trawler that delivered them to Ceylon. From there, under the care of the UK/Commonwealth, they made their way to India and then, through a very circuitous and month-long route they found themselves stepping ashore in Perth, Australia!
To review, here's who finally made it to Australia in decent shape (11):
Captain Moon
Corporal Bussey
Corporal Duncan
Corporal Dishman
Private First Class Seals
Private First Class McNeil
Private First Class Jamison
Private Fontes
Private Gibson
Private Irvin
Private Rozier
They carried with them (7):
Sergeant Carlson
Sergeant Spielman
Private Sanders
Private Skow
Private Robertson
Private Cofer
Private McNair (he was carried out but was so badly wounded he was medically retired)
They lost the following men killed in action (11):
Sergeant Thomas
Corporal Brown
Corporal Moore
Corporal White
Private First Class Kozerski
Private Munoz
Private Gray
Private Light
Private Clay
Private Jennings
Private Allen
And the following men were taken prisoner (2):
Private Mathews
Private Mitchell
There they were well looked after, allowing their wounded minds and bodies to heal, moving north to Darwin to find themselves guests of General MacArthur's headquarters staff. By June 1942 they were as well patched up as they were going to be, even being reunited the two Marines wounded in the Philippines and evacuated to Australia as soon as they set foot in Java (Privates Blades and Walter)!
They were then, finally, returned to the Marines, where they were personally introduced to General AA Vandegrift, Commanding General of the 1st Marine Division. He heard their remarkable story, and they were soon outfitted with replacements, new uniforms, and new weapons, finding themselves practicing beach assaults for four days at the end of July 1942 in the Fiji Islands, in preparation for Operation Watchtower, the invasion of Guadalcanal, Gavutu, and Tulagi.
V/R,
Jack