1150
8 May 1942
Greetings, and welcome to my return to the Pacific! Both the US Navy and Imperial Japanese Navy are on the prowl in the southwestern Pacific; the Japanese have their eyes on Australia, or at least cutting off the lines of communication between the US and Australia, and the Americans are looking to not allow that to happen. On 3-4 May 1942, while fighting raged on New Guinea, the Japanese attempted secure their flank, sending an invasion fleet into the Solomon Islands to put troops ashore on Tulagi (across the channel from Guadalcanal), in order to conduct an amphibious assault on Port Moresby on 10 May.
But the Americans noted the Japanese invasion force in the Solomons, and the USS Yorktown launched strike aircraft that sunk or damaged several Japanese warships, though now the Japanese were aware the US carriers were in the vicinity, made doubly worse by the fact the Americans were shorthanded: they had only the Yorktown and the Lexington in the area because the Hornet and Enterprise had just returned to Pearl Harbor following the Doolittle Raid. These were faced by the Japanese fleet carriers Shokaku and Zuikaku, and the light carrier Shoho. The two opposing forces marshalled their troops, refueled, consolidated, and began searching in earnest for each other.
This morning, Lt(jg) Casey led the fighter escort for the Lexington strike force which, combined with the Yorktown's strike force, managed to sink the Japanese light carrier Shoho. But the Killer Pelicans' escorts had a rough go: they downed three Zeros and damaged another, but they lost one Wildcat, had the other three damaged, and five of their six assigned dive bombers were shot down, the sixth returning to the Lexington, damaged. Lt Casey scored two more kills to become a Veteran (total of four kills), but he was shot down and badly wounded, which will cause him to miss the Battle of Midway.
Both sides carried out preparation for battle throughout the night, then launched scouts shortly after 0600 the next morning, to find the other side's carriers. The Americans got lucky first, sighting the Japanese carriers at 0820, though the Japanese were only two minutes behind. Both sides hurried to turn into the wind and launch their strike groups! The Japanese launched 18 fighters, 33 dive bombers, and 18 torpedo bombers, while the Yorktown and Lexington launched a combined 15 Wildcats, 39 Dauntlesses, and 21 Devastators, though the Lexington's contingent was about 10 minutes behind the Yorktown's.
At 1055 the Lexington's air search radar acquired the inbound Japanese strike group at a range of 68 nautical miles and vectored nine Wildcats to intercept; it was 1113 local time when Lt(jg) Fitzsimmons again led the Lexington CAP into battle. And this time he found the enemy, but it didn't work out very well for the Americans. Lt Fitzsimmons and Lt Allen saw their aircraft damaged, Ens Chipman had to disengage and retreat, but that wasn't the worst of it. Three Wildcats were shot down, with Ensign Camili being wounded, but Ensigns Gordon and Mann were killed in action, while no Japanese aircraft were shot down, and enemy torpedo bombers managed to put three torpedoes into the USS Lexington.
At 1123, radar contact acquired another Japanese strike group, comprised of Val dive bombers escorted by Zeros, and vectored the Lexington's Combat Air Patrol to intercept. The six Wildcats charged headlong into the Japanese formation, suffering two aircraft lost (and one pilot KIA) and one damaged in brutal action that saw Ensign Head awarded the Navy Cross for shooting down four enemy aircraft! Lt Allen added another two kills, and Ensign Chipman added one, with the rest of the Japanese aircraft breaking off the attack, so not a single Val dive bomber was able to press home the attack. However, the Lexington is still in trouble caused by the torpedo hits earlier.
At 1130, LtCmdr Case led a four-ship escort for "Scouting Two's" SBD Dauntless dive bombers to attack the Japanese carrier Shokaku. The Japanese CAP was successful, shooting down four of the SBDs and forcing the last two to return to base, damaged, though they lost four of their own (two to defensive fire from SBDs!), with LtCmdr Case and Ens Riggins both scoring kills.
At 1140, LtCmdr Case re-formed his flight of Wildcats and had them escort Bombing Two's SBD Dauntlesses into an attack on the Japanese carrier Zuikaku. In a wild fight that saw two Dauntlesses shoot down enemy Zeros, then four Dauntlesses arrive over the target but fail to land a single bomb on the target's deck, LtCmdr Case's fighters came through unscathed while downing a single Japanese fighter.
It is now 1150 and the remaining members of the Lexington's CAP, Lieutenant (Junior Grade) Allen, Ensign Chipman, and Ensign Head, are watching as the Japanese strike group that just hit the Lexington is forming up and turning north, straight into them. Lt Allen calls "Tally Ho!" and the three Wildcats zoom in to take one last running shot at the enemy strike group.
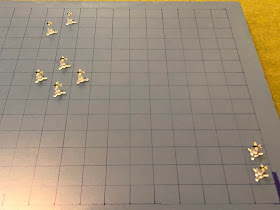
This is my arena for aerial combat; simple, yet durable and, to me, beautiful (in a simple, durable way). I'm using tiny aircraft designed by my buddy Thomaston; not sure what size they are, just that they are much smaller than 1/600. They're 3D printed models that I mounted on cut-down bases from Litko, and I'm using a very simple rules system called "Battle of Britain," which I found for free over on The Miniatures Page (I've already played a good 20 or so fights with them). Left is north, with the American CAP there, and the Japanese strike group at right.
The US CAP, from top:
Ensign Chipman, a Regular with one kill on three sorties
Lieutenant (jg) Allen, a Veteran with three kills on three sorties
Ensign Head, a Veteran with four and one half kills on three sorties
Lieutenant (jg) Allen, a Veteran with three kills on three sorties
Ensign Head, a Veteran with four and one half kills on three sorties
The Japanese strike group, from top:
Zero 01 (Veteran)
Zero 02 (Regular)
Kate 02
Kate 01 Kate 04
Kate 03
Val 02
Zero 04 (Regular)
I set it up this way because there were two Zeros and four Kates left over after fight #3, and one Val and one Zero from fight #4, with the Kates finishing (and thus forming up a bit earlier) before the Vals. So two Zeros and the four Kates are in the center, and the Val and last Zero at bottom right, a bit behind.
We fast forward through the first two turns, and now the battle is met. Let's get it on!
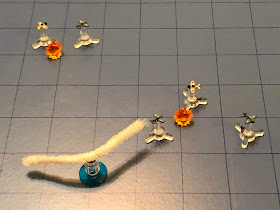
Zero 01 comes left at Ensign Chipman, but doesn't make it too far.
While Zero 02 does the same, albeit much closer to the Kates.
While Zero 04 works to catch up.
Ens Chipman cuts left, looking to put Zero 01 behind him and get after those enemy torpedo bombers (off camera to bottom right)!
While Lt Allen jinks in, defensive.
No one wants to go head to head anymore after I changed the 'to hit' values.
And Ensign Head cruises in, straight and level.
The Kates push for home.
As does the lone Val.
Zero 01 flips an Immelman to pull alongside Ens Chipman. Very fancy footwork, but perhaps a bit immature as Lt Allen (bottom center) is not actually past him yet.
While Zero 02 pulls right, lining up to meet the encroaching Wildcats.
Zero 04 keeps trying to catch up, doesn't seem to be making much progress.
Hardly able to contain his excitement at Zero 01 turning his tail to him, Lt Allen rolls hard over and lines up on the enemy's tail. His .50-cal MGs begin thundering away...
That is not helpful...
His guns jammed, Lt Allen pulls off right, attempting to clear them...
Figuring the Lieutenant has the situation under control, Ensign Chipman swoops in for a front quarter run on Zero 02. He squeezes his trigger and tracers reach out, searching for the Zero...
But not finding him, and Ens Chipman flashes past.
So Ensign Head pulls left, lining up the same exact shot...
Okay, what the hell is going on here?
Ensign Head also misses and flashes past.
As the Kates push north...
But I missed a damn picture... The move brings Kate 03 into the guns of Ensign Chipman's Wildcat. He opens fire...
And Kate 03 goes down in flames, giving Ensign his second kill of the war!
And the lone Val chases.
Zero 01 cuts hard right past Lt Allen, defensive.
As Zero 02 comes around to the right, looking to get onto Lt Allen's tail, and he's unable to get there because Zero 01's move has actually spoiled his shot!
Zero 04 decides things are getting desperate, and so he pushes his luck, coming right and going head to head with Ensign Chipman. Both pilots open fire...
And Zero 04 shoots past, damaged!
Ens Chipman pulls around right to stay in the fight.
With all three Zeros behind him, Ens Head comes right, though he cuts it a bit too close, which allows Kate 02's tail gunner to open fire on him...
The traces shoot past harmlessly, but then he does the same thing with defensive fire from Kate 04, and he's lucky to come through unscathed.
As Lt Allen gets a wild hair up his ass, and now he decides to cut right and go head to head with the damaged Zero 04. Actually, he's in big trouble with Zero 01 and Zero 02 hot on him, so he does the only he can do, he attacks. Again both pilots open fire...
And the Japanese fighter comes apart, pieces floating down to the warm blue water below!
The Kates push ahead, with Kate 02 flying right into Lt Allen's sights. He opens fire...
Damaging the enemy torpedo bomber on the way by.
The lone Val keeps pushing for home, hoping to not draw any American attention.
Zero 02 is caught up in traffic and just kinda sputters right, trying to figure out a way through.
Zero 01 mutters to himself, "fine, I'll do this myself," then then pulls left onto Lt Allen's tail and opens fire...
20mm shells rip into Lt Allen's stuffy F4F Wildcat. Smoke fills the cockpit as fire engulfs the left side and the plane rolls over, heading for the water, as Zero 01 comes by, on Ens Head's tail (far right)!
Luckily Lt Allen was able to bail out and was soon fished out of the water by one of the Lexington's escorts.
Looking to help out Ens Head, Ens Chipman cuts hard right and takes a front quarter shot on Zero 01...
This is killing me.
Ens Chipman misses and flashes past.
So Ensign Head performs a 'Split-S' maneuver, flipping the tables on his assailant.
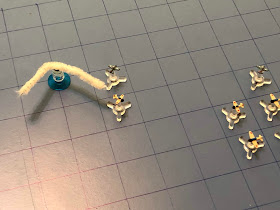
But the American fighters (far right) are finding themselves further and further from the retreating Kates.
And not even in great shape on the last Val.
Zero 01 cuts right, defensive.
As Zero 02 sputters ahead, unable to line up a shot.
Ensign Chipman cuts hard left and runs in, head to head on Zero 02. Both pilots open fire...
And Ensign Chipman cuts left, letting out a victory yell as Zero 02 flips over and noses into the ocean!
As Ensign Head cuts left, turning with Zero 01, but also getting into shape on the Kates (far left).
Well, maybe not, as they keep pushing north, getting pretty close to the exit.
And the last Val keeps humming along.
The last Zero in the air, Zero 01, cuts right, defensive, hoping to tie up the two Wildcats long enough for the Kates to make good their escape.
Ensign Chipman comes right, defensive, but maybe not as good as he was hoping, as it's very possible Zero 01 could cut left, then jink back right onto his tail, and I doubt Ens Head can do anything to help.
Nope, Ensign Head can't do anything to help. He comes right, defensive.
As the Kates near the finish line.
And the Val keeps pushing.
As predicted, Zero 01 cuts left then jinks back right, lining up a tailing shot on Ensign Chipman. 20mm shells begin slamming home...
"Mayday, Mayday, I'm going in!" screams Ensign Chipman, just before he pushes the canopy back and bails out. He, too, was quite fortunate to quickly be picked up by one of the Lexington's escorts.
Can Ens Head (bottom center) even the score?
He rolls right and gets into a perfect tailing position. He depresses the trigger...
Is this some sort of joke?
The Kates are home free.
And the Val pushes his engine for everything its got, aware that he's now the only active target for the last remaining Wildcat.
The last Zero and the last Wildcat begin a delicate dance of death, the Zero trying to make sure he and the last Val get away, the Wildcat trying to knock down the last Val without getting shot down. Zero 01 runs, trying to disengage, figuring he can outrun the Wildcat, and maybe lure him far enough away that he won't be able to catch the Val.
But Ensign Head kicks it in the ass, zooming ahead and cutting left onto the Zero's tail. "Gotcha now, @#$%," as he opens fire...
His rounds find their mark, but he's surprised to pull alongside a damaged Zero 01, still hanging around!
The Val continues to run for home.
Zero 01's pilot is still trying to get everything under control, but he needs more time, and just manages to sputter ahead, defensive.
But Ensign Head can't line up a shot, so he jinks around, waiting for the Japanese pilot to make a mistake.
The Val is nearly there.
And rather than play the American's game, Zero 01, a savvy, veteran pilot, pulls into a climb and pushes the throttle to the wall, outrunning the heavier Wildcat and reaching safety!
Ensign Head cuts left...
But it's too late, the Val makes it to safety.
Wow, that was kind of a letdown. The Americans lost two of their three fighters, while the Japanese lost two fighters and a single Kate. Ensign Head, in particular, did not perform well at all; with 4.5 kills under his belt, I thought he would become an Ace for sure in this fight, but he rolled 1 after 1 after 1, and then when he finally hit something, he only damaged the target (a fragile Zero)! The only good news is that, though shot down, Lt Allen and Ens Chipman got picked up and are okay.
Lt Allen scored his fourth kill of the war, but was shot down. He was soon picked up and is okay.
Ensign Chipman scored his second and third kills of the war, but he was also shot down, picked up, and is okay.
Ensign Head failed to score.
For the third straight fight in a row, the Americans are a bit shocked at the outcome of the fight, figuring their now experienced pilots would have a relatively easy time dealing with the three enemy fighters to clean up on the five remaining enemy bombers. Alas, 'twas not to be... The plight of Lexington's CAP in this fight was definitely rough, with results you could classify as mixed, at best. They utterly failed to keep the Japanese torpedo bombers off the Lexington (resulting in her current predicament), but had a strong showing against the Japanese dive bombers. Then, when they had a chance to be foxes in the henhouse vs the Japanese strike group trying to return home, they kinda laid an egg; despite knocking down three aircraft, they let five escape, and they lost two of their three.
In any case, low on fuel and ammunition, Ensign Head turned to return to the barn, but was told to head to the USS Yorktown instead, as damage control parties were still fighting the fires on the Lexington.
But there's one fight left: The Japanese strike group has escaped the Lexington's CAP, as they are flying back to the Zuikaku, they run into the Lexington's returning strike group, let by LtCmdr Case and his flight of escorts. Coming up next!
V/R,
Jack


Very nice and very entertaining. Thank You
ReplyDeleteThank you, Sebastian, I'm glad to hear whenever someone is enjoying my batreps, and my pleasure!
DeleteV/R,
Jack