All,
It's 0930 on 20 December 1941 and another fight is brewing for the Marines of 1st Platoon. After the fight in Dadangan on 13 December, the platoon has been on a series of marches to shore up supply lines, avoid being cut off, avoid Japanese patrols, then find and occupy a defensible position. The platoon has reached its assigned defensive position, what they're calling "Horseshoe Ridge," but as the platoon makes its approach from the east, they find it's actually occupied. The Japanese are behind them! Captain Moon and Sgt Carlson call a halt, then come up with a quick plan of attack. Sgt Carlson will take 1st Squad and move left, take up supporting positions with the MG team and mortar team, while the Captain takes 2nd and 3rd Squads right, with 3rd Squad being the assault element to take the east end of Horseshoe Ridge. Ready, break!

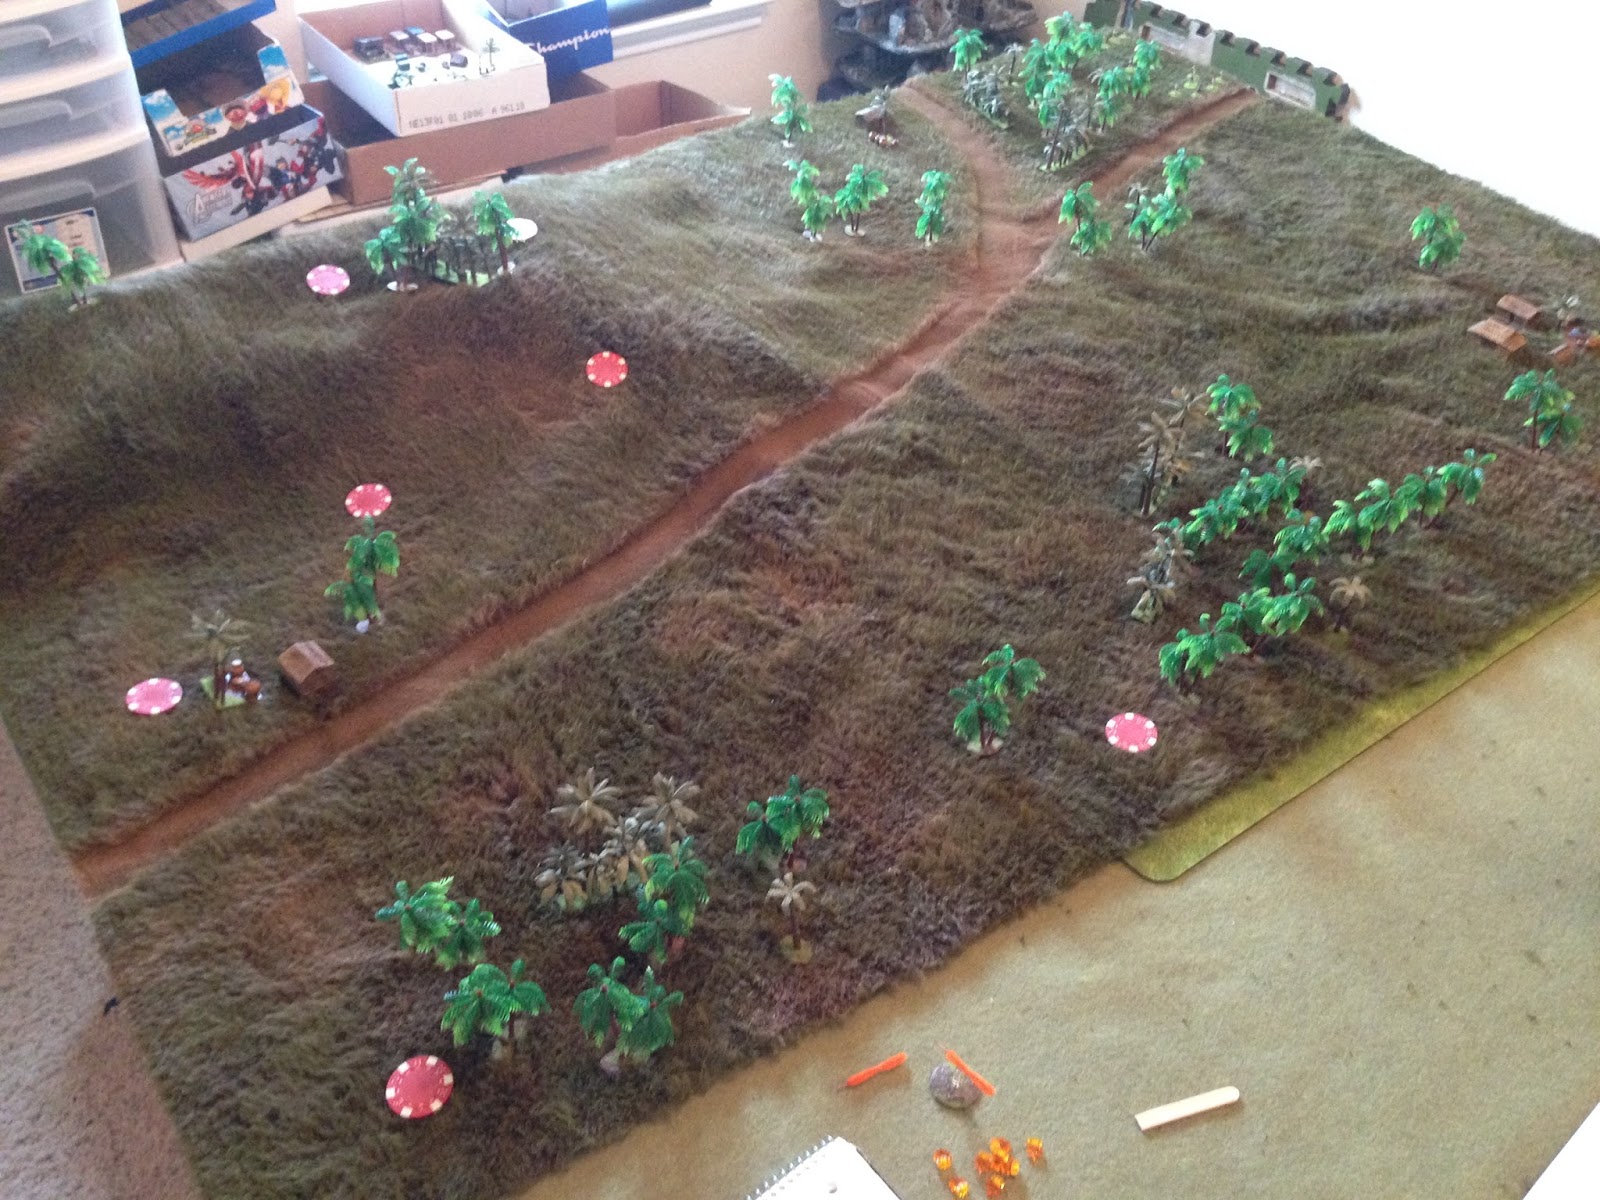
Overview of map, north is to top right. Horseshoe Ridge is at top center/top left, and the Marines are advancing from the east (right). Once again the table is 6' x 4', and my boy and are playing co-op against the Japanese in 15mm using Ivan's rules, "No End In Sight," and running the Japanese on blinds as per Joe's "Platoon Forward."
The opposing forces, with US on the right and (potential) Japanese on the left. Finally got the Type 95 tank in the picture. The US force is all from Eureka Minis, while the Japanese are Eureka except for the tank and the three Type 92 Machine Gun teams, which are from Peter Pig.
The Marine 1st Platoon, reorganized after the first fight. Still have three rifle squads, but they're down to six men rather than eight, the sniper is gone, moved over to the MG team, which only has two men rather than its normal three, and still have the three-man mortar team.
The Japanese will be on 'blinds', so I don't have any idea what's going to show up. But I know what they have available: four 9-man rifle squads (each has an LMG and a knee mortar), three 7.7mm Type 92 machine gun teams, a 70mm howitzer, two snipers, two officers (complete with Samurai swords), and a Type 95 tank. Some, none, any, or all could show up on the table, I have no idea.
Overview of the table, this time with the Marines placed (bottom right and top right) and Japanese blinds placed (left and top left).
The US left: the Platoon Sergeant, Sgt Carlson, with 1st Squad, the MG team, and the mortar team. they will move forward to 1) protect the left flank of the assault, and 2) provide a base of fire for the assault.
The US right: the Platoon Commander, Captain Moon, with 2nd (top left) and 3rd Squads (bottom right). 2nd Squad will move up (top center) into a supporting position and serve as a quasi-reserve, while the Captain and 3rd Squad move up (top right) and assault Horseshoe Ridge.
A look at the US end, with Plt Sgt, 1st Squad, MG, and mortar at top left, and the Captain, 2nd and 3rd Squads at bottom right. Horseshoe Ridge is just off camera to top right.
Looking from behind the Marine starting line, east to west, at Horseshoe Ridge (top right). The MG and mortar teams will set up at bottom left, 1st Squad at top left, while 2nd Squad sets up in the trees at center right and 3rd Squad assaults the ridge. That is, if everything goes according to plan...
Looking at the west end of the table, showing the Japanese blinds, of which there are a total of seven.
Looking northwest to southeast from Horseshoe Ridge. Marine supporting element is at top center, assault element off camera to top left.
A closeup of the Japanese center, sort of just to show the elevation and fingers/draws of Horseshoe Ridge.
Looking southwest to northeast, Marine assault element at top center and support element at top right.
One last look at the table, north is top left. Time to take the ridge!!!
Once again we plan to cycle the through activating all the US commanders, then move the Japanese blinds up until they're in positions where they would (likely) be spotted, then figure out what the blinds represent and place the Japanese forces on the table, then run through activating however many leaders they have on the table. That will conclude the first turn, then we will go to one card per leader per side, place in deck, shuffle, and draw cards to determine activation of leaders.
The game starts on the US left, where 1st Squad makes decent progress (far left), while the MG (top center) and mortar (far right) teams make great progress getting into position, but neither manages to get their weapon set up! Sgt Carlson plans to move up and help out (center), but he doesn't make it!
On the US right, 2nd Squad doesn't make great progress (top center), while the Captain and Cpl Kinard work together to motivate 3rd Squad to get up to the road and on line (far right).
A look at the US end of the table, support element on left and assault element at bottom right. Everything seems ready (the Captain doesn't know that 2nd Squad didn't get into position, or that the mortar and machine gun teams are in position, but don't have their weapons set up yet!), so...
The Captain and 3rd Squad break cover; a solitary rifle shot rings out, kicking up a puff of dirt in the street. Fight's on!
The Japanese enter the fray. The blinds are moved up until they would be spotted, then 'flipped' to figure out what's there: the Marines are quite fortunate! Five of the seven blinds turn out to be dummies!!! The two 'real' blinds are both Japanese rifle squads: 1st Squad on Horseshoe Ridge (top left), and 2nd Squad (bottom left) at the west end of the table.
Wow, this should be a pushover, right? Don't hold your breath...
The Japanese 1st Squad (bottom center/right) on Horseshoe Ridge, looking down on 3rd Squad (top left) and 2nd Squad (just visible at top center left).
The Japanese 2nd Squad at the western edge of the table, with their mates in 1st Squad at top left, and the Marine support element at top right (though currently out of line of sight).
The Japanese 2nd Squad basically has three options: 1) sit tight and wait for the Marines. Not very Samurai like. 2) Move left and reinforce the squad on Horseshoe Ridge; while Horseshoe Ridge is the objective of this fight, they figured they may make too concentrated a target if they put two rifle squads up on the eastern crest, which they'd have to do to put fire to the east, owing to the various folds in the ground atop the ridge. Sure, they could go defense in depth, backing up their 1st Squad, but with only two maneuver elements, this seemed like just waiting to be defeated piecemeal. The 2nd Squad decides to move right (south) in order to get into a covered position and support their buddies by fire.
But their initial attempt to get into position sees the squad moving in fits and starts, and not getting very far (center, from bottom left). NEIS activation rolls are great, really throw friction into the 'how far can I move my guys this turn' aspect of the game.
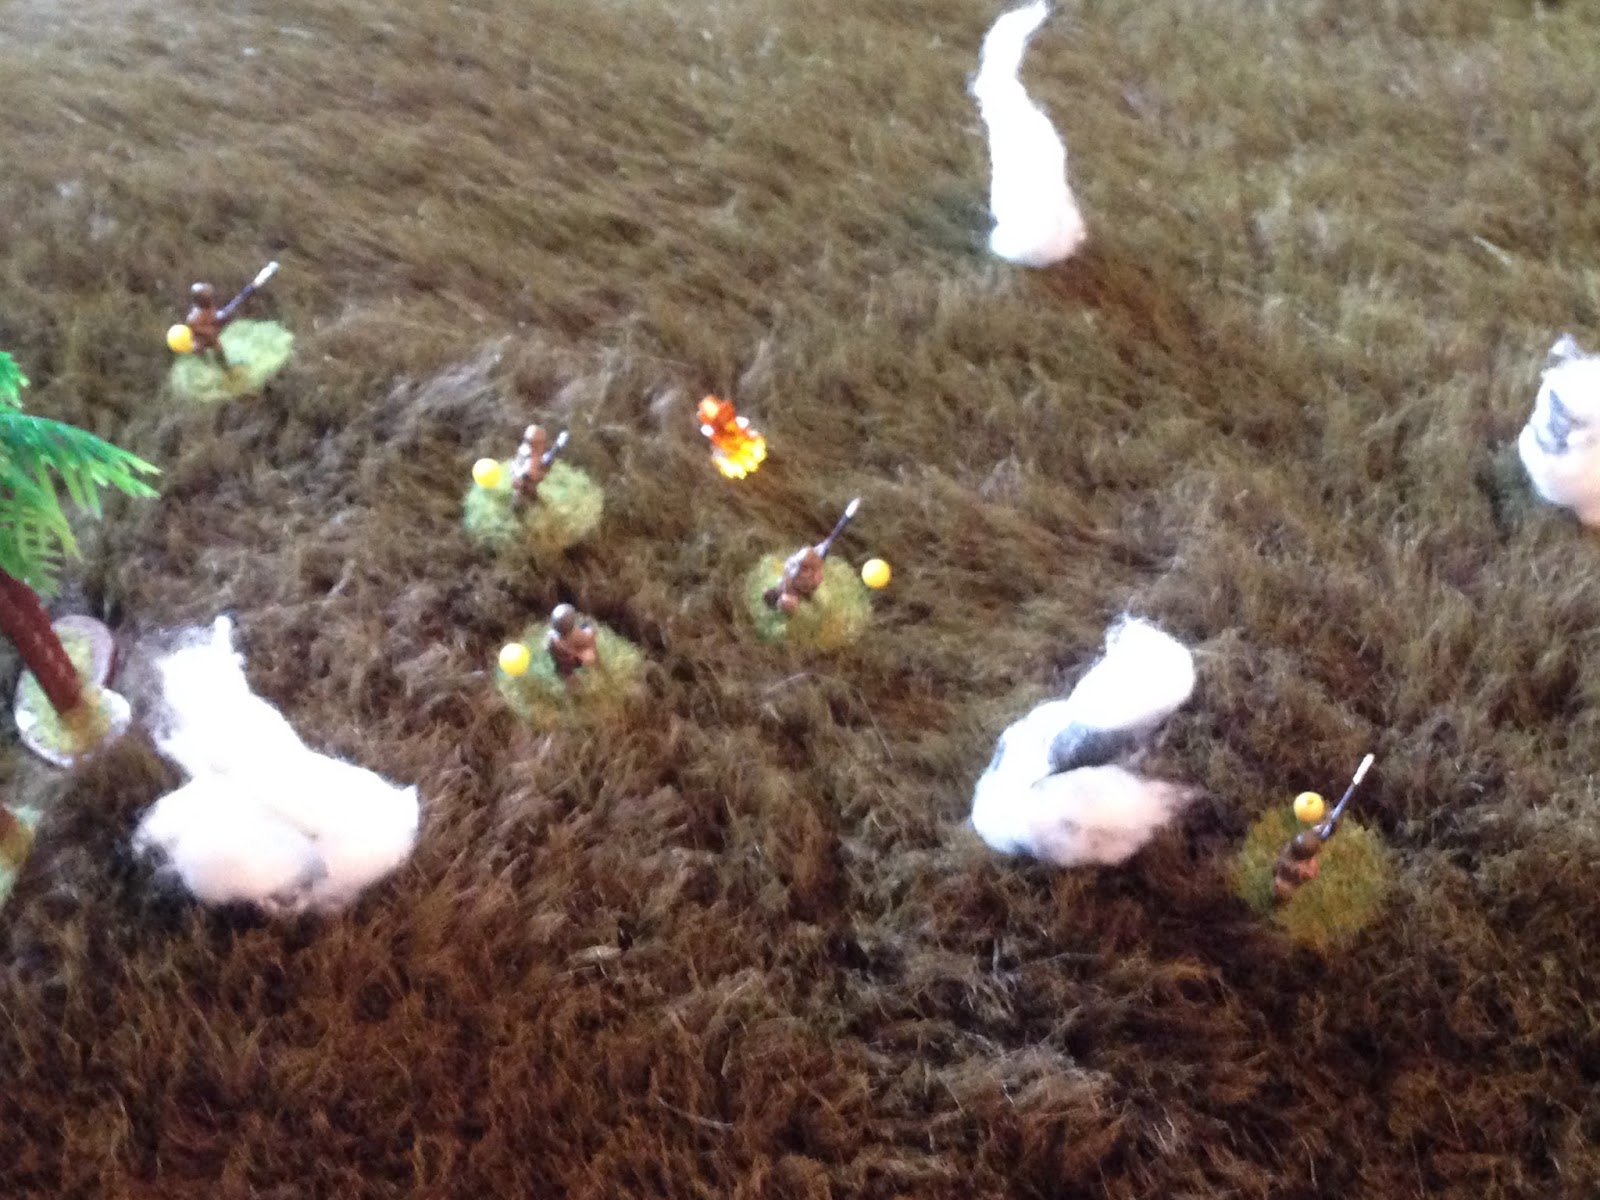
While atop Horseshoe Ridge, the Japanese 1st Squad (bottom center) opens fire on 3rd Squad (top left): Pvt Brown is hit!
And then Japanese 1st Squad's knee mortar (bottom right) pumped out two rounds at the Marine supporting element (MG, mortar, and 1st Squad, at top right, with 2nd and 3rd Squads off camera to bottom left).
One round lands ahead of the machine gun team (top right), the other between them and 1st Squad (left), but no one is hit.
And that ends Turn 1. At this point we move to cards to determine which side will activate, in which order.
PFC Brown finally gets the US .30 cal MG (bottom left) set up into action. They open fire on Horseshoe Ridge, pinning two soldiers of the Emperor.
While the Japanese defenders there (bottom right) ignore the incoming MG fire, and pour a torrent of fire at 3rd Squad (top left). Pvt Robertson goes down, while Cpl Kinard, PFC Munchak, and Pvt McNair become pinned down.
And then their damned knee mortar (bottom left) fires two more rounds at the support element (top right)! That Japanese 1st Squad is proving quite effective, an given their position on Horseshoe Ridge, will likely be quite difficult to dislodge...
Hell, the Japanese 1st Squad (bottom left) just keeps rolling along: they manage to unpin the two men affected by the US MG, and even take a potshot at 2nd Squad (top right, 3rd Squad at top center), to no effect.
Meanwhile, back with the support element, Cpl Duncan gets the 60mm mortar set up and squared away (bottom center, with MG team at top center and 1st Squad at top left).
Cpl Duncan (bottom center) sends a single 60mm round at Horseshoe Ridge (top center right).
While in the west, the Japanese 2nd Squad continues its movement to the right (south), but now it is drawing fire from 2nd Squad (off camera straight up the road to top left). A Japanese soldier falls, while another is pinned. They barely move, and are becoming strung out (note the two guys at top right, then a large gap between them and the rest of their squad).
On the US left, PFC Grimsley gets 1st Squad's butts in gear, and they double-time it forward, making good progress (far left, from bottom left, with MG at center bottom). Grimsley (the acting squad leader for 1st Squad, after their Corporal was killed in the last fight) is trying to get them into that copse of trees at top center, where they will hopefully be able to catch the Japanese 2nd Squad strung out in the open (off camera to top center).
Sgt Carlson, the Platoon Sergeant, dashes up to Cpl Duncan's mortar team, exulting them to increase their productivity! They do, and soon three more 60mm rounds are winging their way towards Horseshoe Ridge!
But now to the crux of the matter, back with the assault element, who have a lot of ground to cover.
The Platoon Commander, Captain Moon, sets himself to action. He quickly unpins Cpl Kinard, Munchak, and McNair, then moves over and checks Robertson; sadly, the Marine is hurt badly and will be out for awhile. Capt Moon directs Munchak to check on Brown, and he's okay, 'walking wounded.'
Capt Moon and Cpl Kinard then get 3rd Squad moving forward using fire and maneuver. Cpl Kinard, PFC Munchak (BAR gunner), and McNair lay down fire (bottom left) as the Captain leads PFC Hill and Brown forward (bottom center). Munchak's BAR knocks one Japanese out of the fight and pins another!
Cpl Kinard keeps up his base of fire (bottom left), pinning two more Japanese on Horseshoe Ridge. The Captain moves his guys up again, but Hill is hit by the Japanese light machine gun!
Pvt Brown moves over to check on Hill: "Sir, he's dead!"
3rd Squad continues to fire on Horseshoe Ridge and, surprisingly, its effects are quite telling. The 9-man Japanese squad has suffered 3 KIA and has four men pinned, though their LMG and knee mortar are both still in action.
The blue beads are the target points for the US 60mm mortar rounds, which will come crashing down soon.
The Captain and Brown (right) bang away at the ridge while Cpl Kinard, Munchak, and McNair move up (left).
Behind them (3rd Squad at top right), Cpl Dishman just gets 2nd Squad started moving when they take fire, pinning him down. Dammit!!! We can't get 2nd into position to support 3rd, and it will have consequences...
The Japanese mortar rounds land, very near the US MG team. Getting closer, but still no one hit. Yet.
And then the US mortars crash down on Horseshoe Ridge, killing one man.
We must take that hill!!!
Turn 3 starts with the US machine gun, bravely defying the Japanese mortars, cutting loose a long burst at Horseshoe Ridge...
Due to great shooting from the machine gun, every Japanese soldier from their 1st Squad is now either dead or pinned! We now have freedom of movement, need to get up there and unass them.
Captain Moon shouts to 3rd Squad, "Follow me!!!" He's quickly on his feet and dashing up the hill, Cpl Kinard, PFC Munchak, Brown, and McNair following. They make incredible progress (from bottom left, where you can see Hill's body, up Horseshoe Ridge at top right.
But they just crest the ridge, sky-lining themselves to the pinned Japanese, when they run out of gas!!!
Stupid!!! That wasn't the boy, who's usually the one that gets overly aggressive, that was all me! I looked at it and thought, that's too far. But then I was getting fantastic activation rolls, and I thought, "we're gonna make it." And we almost did, just needed one more activation to close with the enemy. This will not turn out well...
Sgt Carlson, with the support element, sees what's happening and dashes to the MG team: "3rd Squad is stalled just short of the objective, we've got to help them! Keep up the fire!" PFC Brown, the gunner: "they're awful close to our line of fire, Sarge." "I don't care! If the Japs recover they'll mow our boys down!"
The M1917 water-cooled .30 caliber machine gun barks out a stream of bullets, but clearly Brown is a bit nervous about firing so close to friendlies and he's shifted his point of impact to far off. The rounds dart over the ridge and land harmlessly in the jungle beyond.
Dammit!!! I was hoping to get some more pins, which would force already pinned troops to fall back down the back side of Horseshoe Ridge, make it very hard for them to rally, get back up to have LOS on 3rd Squad, then open fire.
But Captain Moon's over aggressiveness, and PFC Brown's (just to be clear, there's a Pvt Brown with 3rd Squad, and a PFC Brown with the MG team) shaky supporting fire, has consequences. The Japanese 1st Squad, whose men are putting up an incredibly dogged defense despite being pounded by the US machine gun and mortar, spring to life. They manage to unpin all five of their remaining men, though their fire is ragged and ineffectual.
With a real dookie-sandwich developing atop Horseshoe Ridge (top right), 2nd Squad is still dillying. They started the fight by not getting into their start position on time, and they've barely moved since. Their Squad Leader, Cpl Dishman, was quite effective in the first battle, but is performing less than impressively today. Once again he only started getting his squad moving when they took fire and went to ground, getting almost nowhere (bottom center).
Look at it this way: 2nd and 3rd Squads started in parallel positions, but now 3rd Squad is atop Horseshoe Ridge and 2nd isn't even up to the crossroads. Now that's friction...
With the MG team firing haltingly (bottom center), PFC Grimsley keeps 1st Squad double-timing up the left side, with the lead element getting into the trees (top center).
And with the Captain and 3rd Squad atop Horseshoe Ridge, the mortar team (bottom left, with MG team above it and 1st Squad at center, just above the orange tracer) turns its sights on the Japanese 2nd Squad (top center). The mortar team is able to get three rounds out.
The Japanese 2nd Squad tries to get in gear: they unpin a soldier and begin moving up, but US react fire drops another one of their men! You can see the blue beads marking the US mortar target points. A confrontation is brewing as the Japanese and 1st Squad both draw near the copse of trees at top right.
Just then the US mortars impact around the Japanese 2nd Squad, but no one is hit.
Moving to Turn 4.
PFC Brown (bottom center) stands on his triggers, sending machine gun rounds at Horseshoe Ridge in support of the Captain and 3rd Squad. Sgt Carlson screams at them to keep up the fire, but only a single Japanese soldier is pinned!
I activated the MG team, then used the Plt Sgt to keep them going, for a total of four rounds of fire, but all we got was a single pin!!!
On the crest of Horseshoe Ridge, Captain Moon and the Marines of 3rd Squad pour fire into the Japanese, killing one and pinning one. The Captain is about to scream "Charge!" but he loses his footing and falls...
Three rounds of fire using the Plt Cmdr and Squad Leader, 1 kill and 1 pin, which is okay, but then I fail the roll to get them to charge. Incredible...
On the US left, PFC Grimsley leads 1st Squad into the trees, where they immediately draw fire from the Japanese 2nd Squad (top center).
PFC Grimsley gets the squad into a skirmish line (top left) and they return fire, pinning three Japanese.
In the US center, Cpl Dishman finally gets his men moving, and they reach the cover of some trees and form a skirmish line (bottom center), though Japanese fire pins their BAR gunner, Pvt Harris.
Finally in position, 2nd Squad (bottom center) opens fire on Horseshoe Ridge, pinning one man.
With 2nd Squad finally in position and hammering away (center right), Cpl Duncan and his mortar team (bottom center) pop three rounds out in support of 1st Squad (top left).
But then the hammer drops...
Back on Horseshoe Ridge, the Japanese 1st Squad is down to four men, three of which are pinned. They quickly rally themselves back into action, then fire on 3rd Squad, which misses. But then...
BANZAI!!! Captain Moon and 3rd Squad cuts loose with defensive fire, but only manage to pin one Japanese soldier.
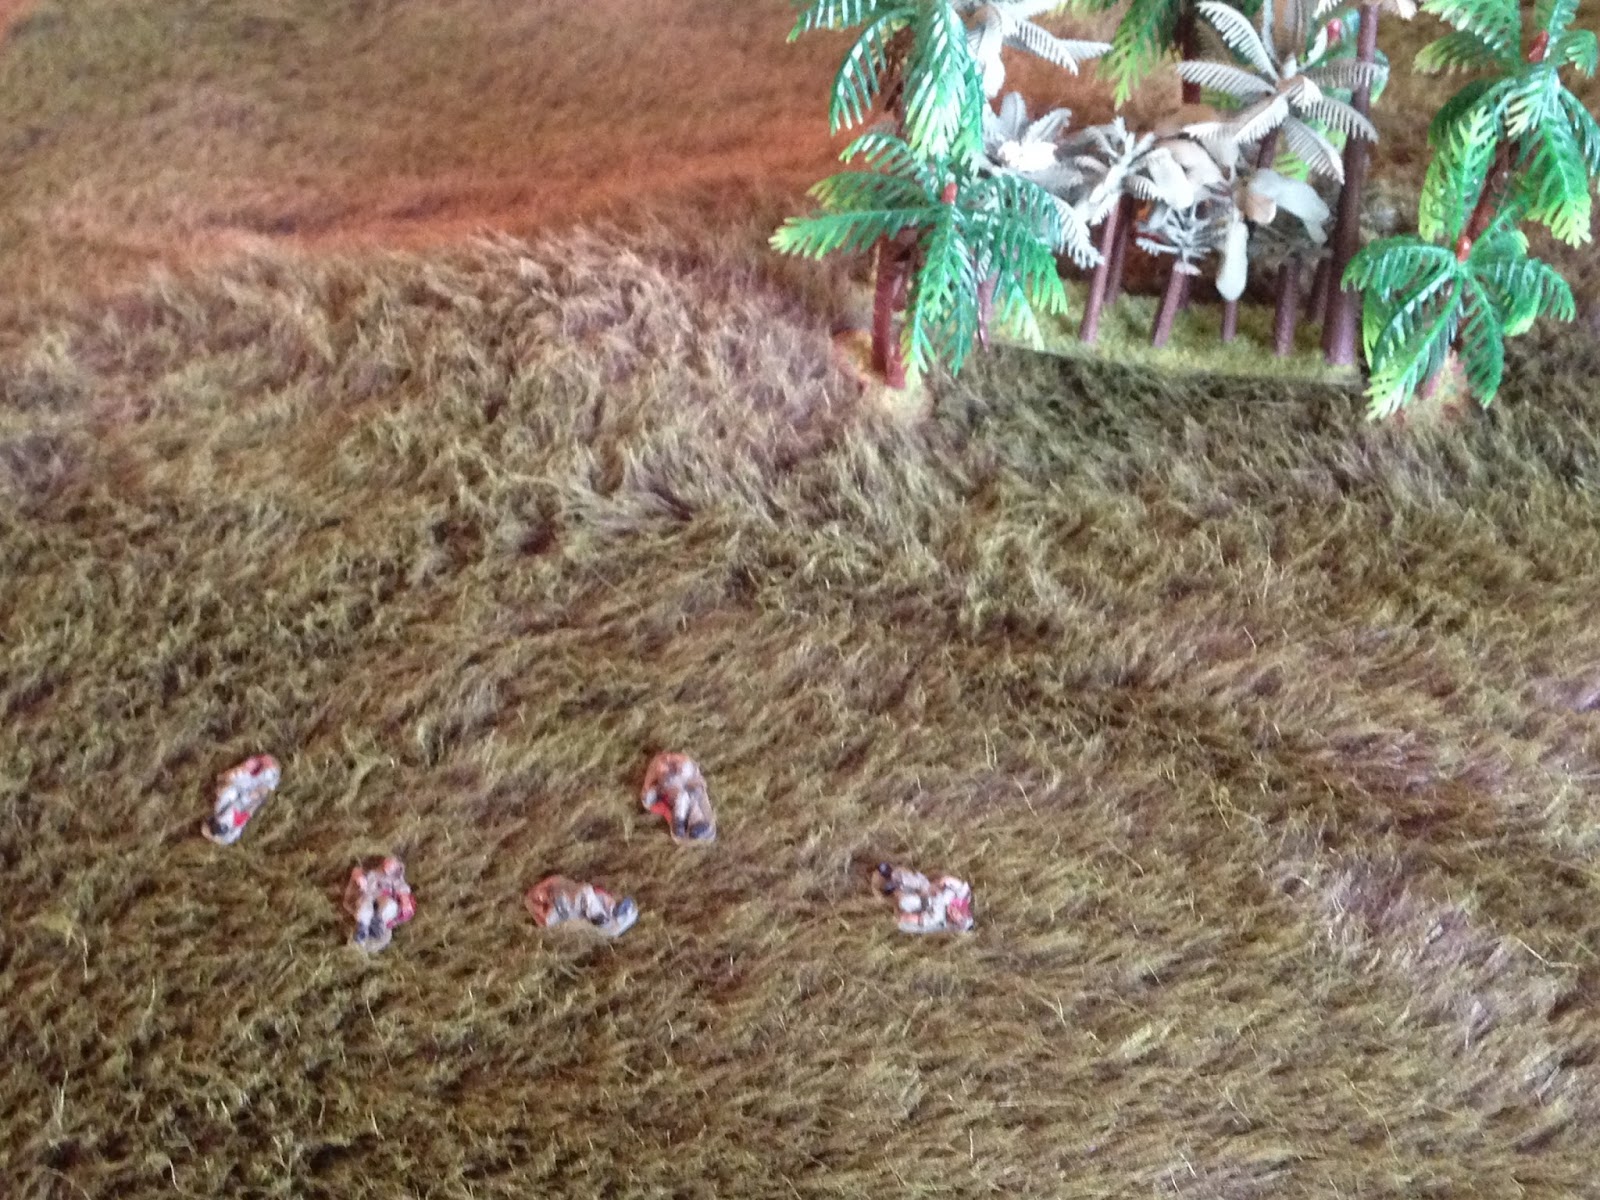
The two sides clash in brutal hand-to-hand combat, which sees another Japanese soldier go down, but also the Captain, Cpl Kinard, PFC Munchak, Pvt Brown, and Pvt McNair!!!
What!!?? We had a perfect plan, and execution was going okay until I pushed 3rd Squad too far too soon. Shoulda waited for 2nd Squad, shoulda given Horseshoe Ridge another round of mortar fire, shoulda charged with 3rd Squad instead of firing (first, hoping to get another round of orders to charge but then failing), shoulda, should, shoulda.
Now our ability to take Horseshoe Ridge is in doubt. Still possible, but in doubt. Meanwhile, the war continues.
Back on the US left, the Japanese 2nd Squad spends activations to unpin three men, then pushes two men forward (center and bottom left), but react fire from 1st Squad (off camera to top center) guns both of them down!!!
The Japanese get another three rounds of fire off, but manage only to pin the squad leader, PFC Grimsley.
The remaining three troops from the Japanese 2nd Squad dash ahead to join the two from the previous picture (top right). The Marines fire on them, but fail to score any hits.
The Japanese 2nd Squad is proving incredibly motivated; they fire again on 1st Squad (top center), hitting Pvt Highsmith.
Just then, the US mortars fall on the Japanese 2nd Squad, killing one.
We now go to Turn 5.
The Japanese 2nd Squad continues to push its luck, fighting like fanatics. Two men dash forward, but one (top center) is gunned down.
But the last three Japanese of their 2nd Squad open fire again, pinning PFC Pinkett and Pvt Glanville, and dropping Pvt Childress. All of a sudden, the Marine 1st Squad has three men pinned and two down!
With 1st Squad fighting for its life at top left, PFC Brown, manning the machine gun (bottom center), sees the Japanese 1st Squad overrun the Captain and 3rd Squad on Horseshoe Ridge (top right). He slapped a fresh belt in; Sgt Carlson actually started to yell 'cease fire,' afraid Brown might hit some of the Marines up there, who might only be wounded, but it's too late. Brown squeezes off a long burst...
Which kills two of the Japanese (top right), and causes the third to fall back (bottom left).
At this point the Japanese only have four men on the board, but 1st Platoon is quite beat up as well. I figured in real life, where you don't know what else is out there, the Platoon would have called it quits, both sides falling back. So we ended the fight here, the rest is just narrative fluff to set the next scenario up.
Cpl Duncan's mortar team pounds the hell out of the Japanese 2nd Squad, and the three remaining troops fall back (bottom left).
Sgt Carlson dashes up to 1st Squad, helping them rally, reorganize, and check the wounded. Highsmith is okay, walking wounded, but Childress is killed in action.
On the right, Cpl Dishman and 2nd Squad cautiously break cover, moving towards Horseshoe Ridge. "Hey, everybody down. What the hell is that sound?"
Uh-oh.
2nd Squad rapidly falls back beyond the crossroads, grabbing the wounded Robertson, and Hill's body.
While 1st Squad and the Plt Sgt fall back to the MG and mortar position, carrying Childress' body.
They rally at the supporting position; "what are we gonna do, Sarge?"
"I dunno. Dammit, we gotta get outta here, fall back!"
"No! The Captain and 3rd Squad's laying up there on that @#$% ridge!"
"I know, I know! We'll come back for them, I swear. But we got wounded men that need attention, and we got nothing to stop that tank! Now move out!"
Atop Horseshoe Ridge is a grim scene, and the Marines of 1st Platoon will not leave their comrades there.
Once away at a safe distance, Sgt Carlson takes stock of the situation, and it ain't good. The platoon is down to 17 able-bodied men (some will return after their wounds are sufficiently healed up), and five of their men are still lying up on Horseshoe Ridge. The Japanese lost a total of 14 men, but the Marines suffered:
Pvt Highsmith - Still walking wounded, despite receiving his second wound in as many fights
Pvt Robertson - WIA, out six days, return to duty on 26 Dec 41
PFC Hill - KIA
Pvt Childress - KIA
Five men MIA (I already conducted the casualty rolls):
Captain Moon - Walking wounded
Pvt McNair - Walking wounded
Cpl Kinard - WIA, needs to be evacuated
PFC Munchak - WIA, needs to be evacuated
Pvt Brown - WIA, needs to be evacuated
Sgt Carlson: "Alright, here's what we're gonna do. We're gonna wait 'til it's nice and dark, then we're gonna go get our men. We'll set the gun and Cpl Duncan's mortar into the same exact positions, and I'll take 2nd Squad up the ridge. 1st Squad stands by down below, just in case. We go up, grab our guys, then get the hell outta dodge. If any shootin' starts, I want the mortar and MG to open up. I want a wall of fire between the eastern side of the ridge and the west, keep the Japs from getting at us."
Next fight, coming right up.
V/R,
Jack


Ha ha. Internally I can imagine you thinking "only 2 rifle squads. Wish a few more had turned up as it might not be the most exciting game. It could not be too bad, unless the dice rolls go the wrong way. Although it has ended badly before, hopefully not this time.".
ReplyDeleteAll that carnage from 2 rifle squads...and an ambitious charge!
Shaun,
ReplyDeleteYeah man, I was definitely a bit overconfident when I saw all the Japanese had to oppose me. And I should have halted just below the crest, let the MG team beat up on them for another turn, then close assault them, but I was soooo close. NEIS can have you falling in love with yourself when the die rolls are going well ;)
V/R,
Jack