Greetings, and welcome to my return to the Pacific! Both the US Navy and Imperial Japanese Navy are on the prowl in the southwestern Pacific; the Japanese have their eyes on Australia, or at least cutting off the lines of communication between the US and Australia, and the Americans are looking to not allow that to happen. On 3-4 May 1942, while fighting raged on New Guinea, the Japanese attempted secure their flank, sending an invasion fleet into the Solomon Islands to put troops ashore on Tulagi (across the channel from Guadalcanal), in order to conduct an amphibious assault on Port Moresby on 10 May.
But the Americans noted the Japanese invasion force in the Solomons, and the USS Yorktown launched strike aircraft that sunk or damaged several Japanese warships, though now the Japanese were aware the US carriers were in the vicinity, made doubly worse by the fact the Americans were shorthanded: they had only the Yorktown and the Lexington in the area because the Hornet and Enterprise had just returned to Pearl Harbor following the Doolittle Raid. These were faced by the Japanese fleet carriers Shokaku and Zuikaku, and the light carrier Shoho. The two opposing forces marshalled their troops, refueled, consolidated, and began searching in earnest for each other.
Yesterday morning, Lt(jg) Casey led the fighter escort for the Lexington strike force which, combined with the Yorktown's strike force, managed to sink the Japanese light carrier Shoho. But the Killer Pelicans' escorts had a rough go: they downed three Zeros and damaged another, but they lost one Wildcat, had the other three damaged, and five of their six assigned dive bombers were shot down, the sixth returning to the Lexington, damaged. Lt Casey scored two more kills to become a Veteran (total of four kills), but he was shot down and badly wounded, which will cause him to miss the Battle of Midway.
Yesterday evening,
Lt(jg) Fitzsimmons led aloft the Lexington's Wildcats to intercept a Japanese strike group that was searching for, but not locating, the US carriers. Lt Fitzsimmons got separated and never found the enemy force, leaving a bevy of rookie Ensigns to do battle alone, and it did not work out well. Four of the six Wildcats were shot down, and the other two damaged, with the Americans managing to shoot down only three of the ten enemy aircraft.
Both sides carried out preparation for battle throughout the night, then launched scouts shortly after 0600 the next morning, to find the other side's carriers. The Americans got lucky first, sighting the Japanese carriers at 0820, though the Japanese were only two minutes behind. Both sides hurried to turn into the wind and launch their strike groups! The Japanese launched 18 fighters, 33 dive bombers, and 18 torpedo bombers, while the Yorktown and Lexington launched a combined 15 Wildcats, 39 Dauntlesses, and 21 Devastators, though the Lexington's contingent was about 10 minutes behind the Yorktown's.
At 1055 the Lexington's air search radar acquired the inbound Japanese strike group at a range of 68 nautical miles and vectored nine Wildcats to intercept; it was 1113 local time when Lt(jg) Fitzsimmons again led the Lexington CAP into battle. And this time he found the enemy!

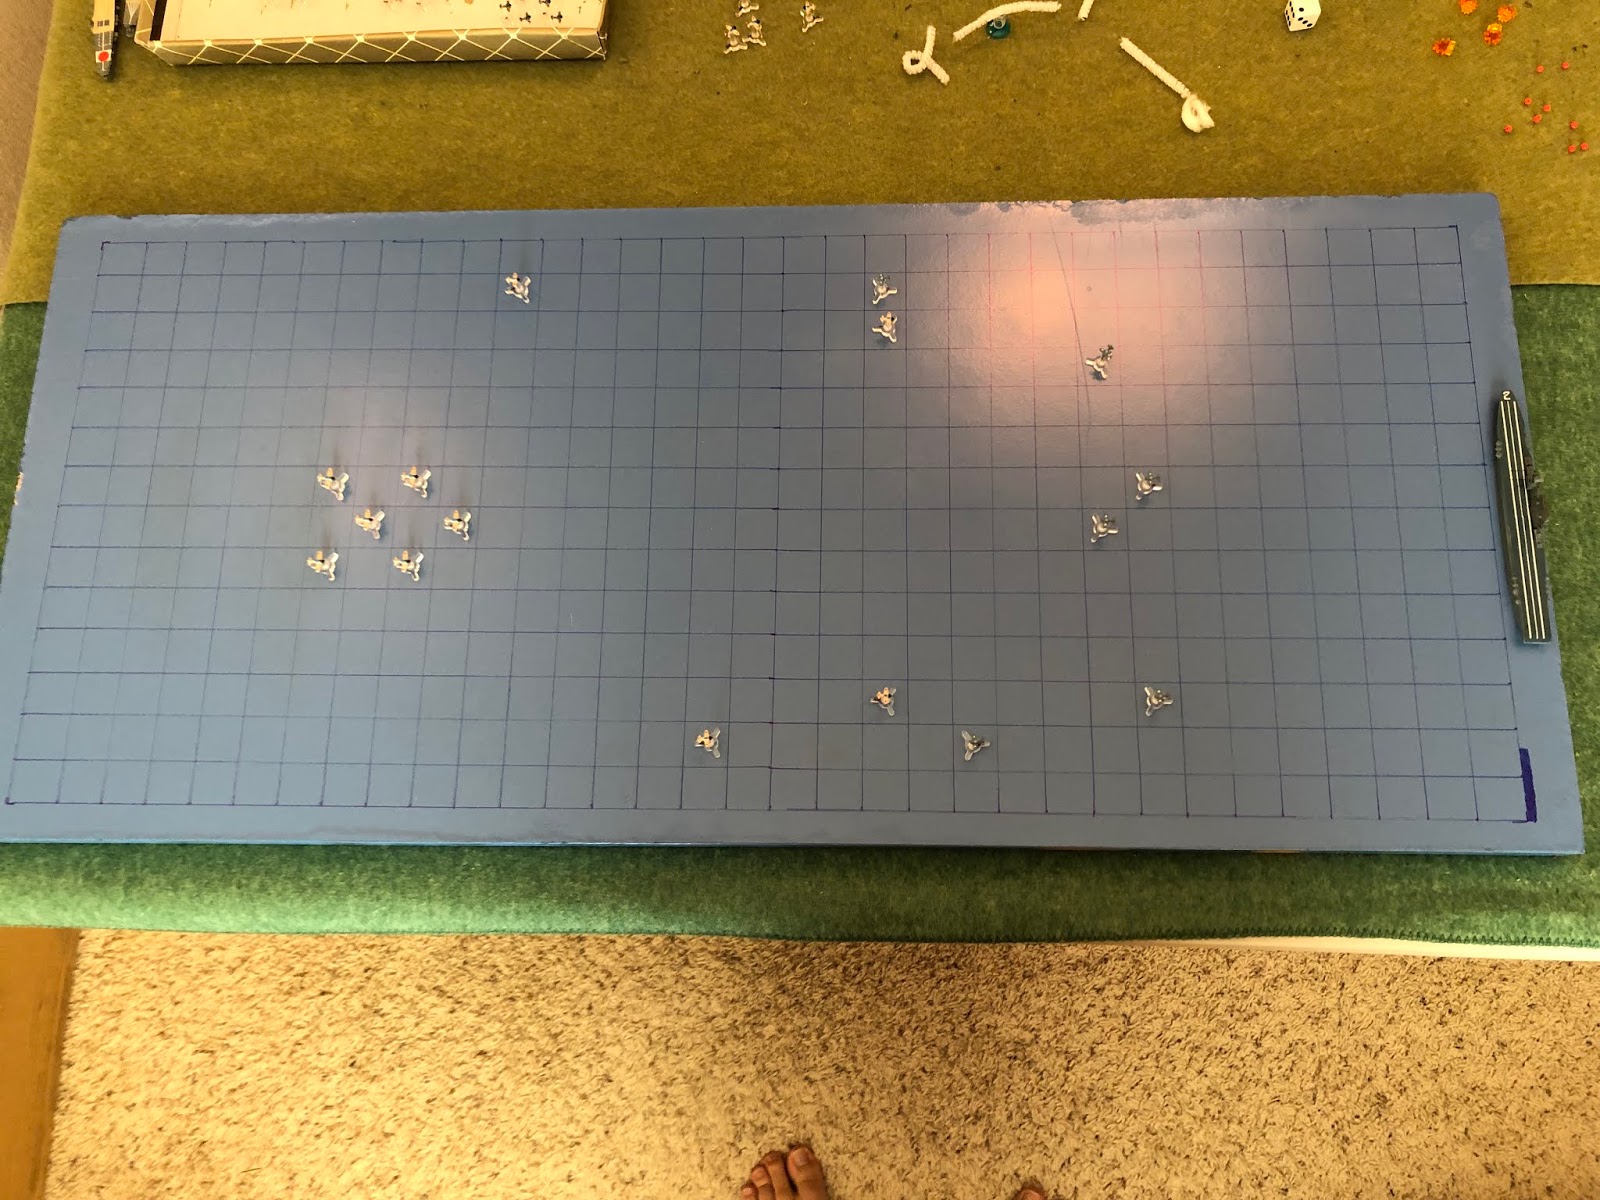
This is my arena for aerial combat; simple, yet durable and, to me, beautiful (in a simple, durable way). I'm using tiny aircraft designed by my buddy Thomaston; not sure what size they are, just that they are much smaller than 1/600. They're 3D printed models that I mounted on cut-down bases from Litko, and I'm using a very simple rules system called "Battle of Britain," which I found for free over on The Miniatures Page (I've already played a good 20 or so fights with them). Left is north, with the Japanese strike group there, and right is south, with the American CAP and the USS Lexington there.

The US CAP, from top:
Ensign Gordon, a Regular with one kill on one sortie over the Dutch East Indies
Lt(jg) Allen, a Regular with one kill on one sortie over the Dutch East Indies
Ensign Mann, a Rookie on his first hop
Lt(jg) Fitzsimmons, a Veteran with three kills (and a Navy Cross!) on his one sortie over the Dutch East Indies
Ensign Camili, a Regular with no kills on one sortie over the Dutch East Indies
Ensign Chipman, a Regular with no kills on one sortie over the Dutch East Indies
So, as you can see, not a lot of combat experience on the part of the Lexington's CAP; at least it's not almost all rookies, like the last fight. Please feel free to contrast with the Japanese pilots...

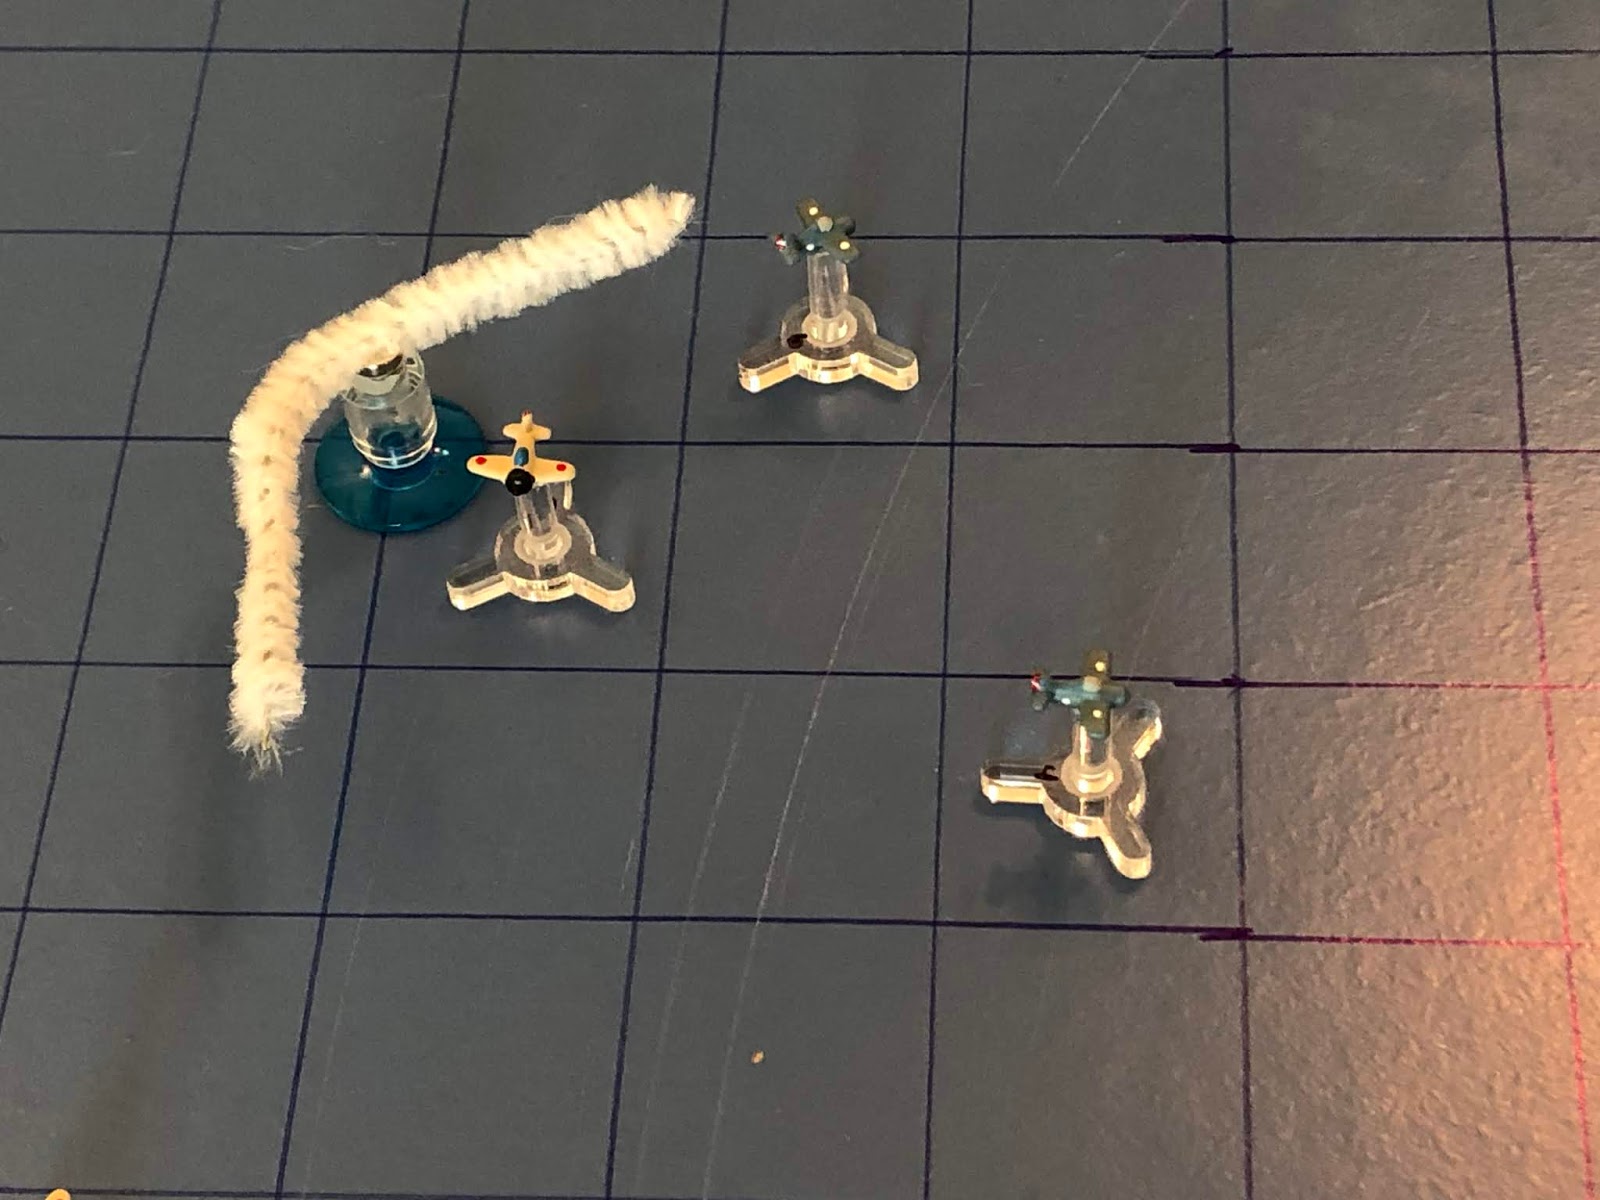
The Japanese Strike Force, looking to locate and attack the US carriers. I'm still sticking with the big mistake of listening to Thomaston, using the Japanese pilot experience, which is vastly greater than the young Americans. To refresh your memory, pilot experience goes: Rookie, Regular, Veteran, Ace, and Natural Born Killer. Based on the fact that some of these Japanese pilots have been flying, and fighting, for years, I rolled it so that a pilot had about an 8% chance of being a Rookie, and it went up from there, all the way to Natural Born Killer. So, here we go, from the top:
Zero 02: Rookie
Zero 01: Natural Born Killer
Kate 02 Kate 05
Kate 01 Kate 04
Kate 03 Kate 06
Zero 03: Ace
Zero 04: Regular
Perfect, right? The Japanese Zeros are already getting a +1 for being superior (in terms of maneuverability and climb) to the F4F Wildcats, and now the pilots are markedly better in terms of quality.
Please note, the Japanese strike aircraft are all Kate torpedo bombers; actually, no need to note it, I forgot to penalize them! I let them move 3 squares each move, just like the Vals, not the 2 squares they were supposed to move for being so slow...
Anyway, time to fight!
The fight begins with the rookie Japanese pilot, Zero 02, trying to catch up, but he doesn't make very far. No worries, his section leader, the Natural Born Killer (far right, with Ens Gordon just above him) has got this under control.
Zero 01 zooms past Ens Gordon (top left), then jinks into a frontal attack on Lt Allen. 20mm tracers zip by Lt Allen's cockpit...
But miss, and the Japanese flashes past, cursing his own complacency.
While on the American left, the Japanese Ace, Zero 03, pulls exactly the same maneuver, just from the other side. He depresses his trigger...
But this time the Japanese cannon rounds strike home, damaging Lt Fitzsimmons' Wildcat! The Japanese Ace smiles to himself as he shoots past Ens Mann's Wildcat, until he looks back and sees the plucky, tough Wildcat smoking, but still in the air!
Zero 04 bides his time, cutting right, defensive, putting a bad angle on Ens Chipman, daring him to attack.
Up top, Ens Gordon watched the hotshot Japanese pilot zoom past, into the center of the American formation. This, combined wit the fact he still had a Zero (Zero 02) in front of him, caused him to be indecisive, and he just sort of sputtered to the right, defensive...
But Lt Allen is game: he cuts hard left, around Zero 01, and takes a full deflection shot on Zero 03, though he fails to calculate the lead angle properly and the .50-caliber tracers arch and fall away harmlessly behind the nimble Japanese fighter.
Lt Fitzsimmons at first thinks he's alright after having his aircraft riddled by 20mm and 7.7mm rounds from Zero 03. He scans his gauges and thinks 'twenty-three skidoo, I'm okay,' but just as he thought that, his engine started coughing, the manifold blew open, throwing oil all over his windscreen, and oil pressure dropped to zero. "This is Pelly 01, my chicken's been beat up, oil pressure zero, returning to base."
*He failed his 'stay in the fight or go home after you get damaged' roll, and just like that, the only US Veteran in the fight is no longer in the fight...
The Rookie, Ens Mann, cuts right, defensive.
While down at the bottom, the US has the advantage: Ensigns Camili and Chipman vs Zero 04, a Regular. Piece o'cake, right? Ens Chipman cedes the initiative to his partner: "Go on in, Pelly 06, I've got your 6." Meanwhile, Ens Camili is thinking, 'why didn't that joker just charge in and go get that guy?"
Nevertheless, Ens Camili feels up for the challenge. With his wingman covering his tail, he jinks over and takes a frontal shot on Zero 04, but he misses.
The Japanese torpedo bombers push south.
Zero 01 performs a Split-S, reversing his direction and scanning for his next victim.
As does Zero 03, though this places him right in the guns of Lt Allen, who takes a shot but, of course, misses, just as the overconfident Japanese Ace figured...
Up top, the Japanese rookie, Zero 02, jinks over and takes a shot at Ens Gordon...
But he misses and zooms by.
While at the bottom, Zero 04, outnumbered facing Ensigns Camili and Chipman, cuts left, defensive.
Lt Fitzsimmons pushes for safety, almost there.
Ensign Gordon suddenly finds himself a beneficiary of his own indecisiveness, with all the Japanese fighters past him, he cuts left, heading for the Japanese torpedo bombers. But even this he does half-assed...
While further back, Ens Mann cuts right, defensive against Zero 01 (top center, with Lt Allen just below him), but what he doesn't realize is he's now dead meat for Zero 03 (bottom right)...
Lt Allen wants to help, but he can't line up a shot, so he cuts left, between the two Zero super-pilots.
*He couldn't help because you have to move at least one square before you're able to fire, and he's already adjacent to Zero 03.
Down at the bottom, Ens Camili is forced past.
And Ens Chipman is so scared he just shoots straight past. Later he would claim he though Ens Camili had a superior position and thus had Zero 04 in the bag, so he was going for the Kates (top left), but that seems rather unlikely...
The Japanese torpedo bombers continue their march on the Lexington.
The funny thing here is that Ens Mann (center) didn't even have to worry about Zero 03 (off camera to bottom right), because the Japanese rookie, Zero 02, quickly cut right and took a frontal aspect shot. 20mm rounds shake Ens Mann's Wildcat...
And it plunges into the warm, south seas, taking its pilot to Davey Jones' Locker...
*Even their rookies are better than my rookies ;) Scoring on deflection shots, no less...
Zero 01 pushes straight past, back north, in pursuit of Ens Gordon (far left), surveying the flotsam and jetsam remaining on the surface of the ocean after Ens Mann's crash.
With support from Zero 02 (top left), Zero 03 immediately flips a U-turn to tail Lt Allen, who promptly urinates himself...
And at the bottom, Zero 04 pulls an Immelman and rolls out behind Ens Camili, recently abandoned by his wingman, Ens Chipman, who not two minutes earlier had assured him he was watching Ens Camili's tail.
Ens Gordon cuts left, worried about Zero 01 (far right) and thus still unable to focus and make an attack run on the Japanese torpedo planes...
Down below, Ens Chipman basically does the same thing, cruising straight and level, actually floating past the Japanese strike formation!
Leaving Ens Camili to pull hard right into Zero 04, defensive.
Lt Fitzsimmons finally makes it to safety on the other side of the Lexington.
As Lt Allen pulls hard left into Zero 03, defensive.
The Japanese Kates push south.
With Ens Gordon lollygagging, Zero 01 jinks right, taking his time, working into perfect position to get on his tail.
Zero 03 cuts hard left with Lt Allen, happy to be patient and let Zero 02, his new wingman, work his way into the fight.
And he does, but the Japanese rookie is a bit overeager, zooming straight in, but getting too close to Lt Allen, particularly without being able to line up a shot, which just could allow the Yankee sky pirate to escape.
Meanwhile, Zero 04 jinks around Ens Camili (far right) and right onto Ens Chipman's tail. The Japanese aviator lines up a perfect shot, but then can't help but throw a quick glance back over his shoulder to make sure there wasn't a Wildcat there, but it was enough to throw off his aim and he missed!
Ens Camili can't help Chipman, doesn't have the power to reverse and get onto Zero 04's tail, so he does what he can, cutting left into the Japanese torpedo bombers and firing on Kate 02. His .50-cal MGs roar, and he walks the tracers onto the broad-winged Japanese airplane...
But he only manages to damage it, and he flashes through the enemy formation, ending up behind them (top left).
As Ens Chipman cuts hard right, defensive.
And Ensign Gordon finally, FINALLY, decides to get into the fight. He kicks his Wildcat hard left, sliding in behind Kate 03, which was really a bad idea! As he presses the trigger and tries to move his tracers onto the Kate's tail, he's frustrated by the Kate's tail gunner zipping his own tracers past Ens Gordon's head. And then, as if that wasn't enough, the pilot of Kate 06, behind him, opened fire, too!
Inevitably, everyone misses!
While in the rear, Lt Allen is still facing off against Zeros 02 and 03. With the Japanese fighters so close in on him, he could really stand to kick it in the ass, power dive away to pick up speed and disengage from these two, but he's too jammed up with them right on top of them, and he barely manages to cut right, between the two Japanese, defensive.
*These might be the poorest activation rolls I've ever seen.
Damaged, Kate 02 turns about, heading back north to the Zuikaku.
While her comrades push south.
Zero 01 has waited long enough: he cuts hard left and takes a frontal aspect shot on Ens Camili's Wildcat. 20mm shells begin to find their mark, and pieces of his airplane begin to fly off...
Until Ens Camili has no choice but to bail out. The young Ensign unbuckles from his parachute harness and inflates his life raft. At that point he realized he'd suffered some shrapnel wounds, bad enough to keep him out of action for about a month, once he was picked up by one of Lexington's escorts a couple hours later.
Zero 04, in a truly masterful maneuver, pushes ahead hard, then cuts back, performing a Split-S to reverse course, having given himself enough room so that he was now actually in a tailing position on Ens Chipman.
Further south, the rookie, Zero 02, flips an Immelman, putting him in great position on Lt Allen's tail, and able to again work with Zero 03 to box the American in.
And then Zero 03 pushed ahead (to bottom right) to open up some space, then pulled an Immelman as well, giving himself plenty of space to work with, not allowing the American to hug his belt any longer. He and Zero 02 are slowly playing hammer and anvil with Lt Allen, knowing his Wildcat isn't going to outrun them.
*These Japanese activation rolls have been stupendous, regularly rolling 6s, which an Ace or NBK bumps up +3, almost enough to do TWO Immelmans in a single turn!
Ens Chipman, tears in his eyes from having let down his wingman (thinking the worst, that Ens Camili was dead), rushes straight in on the enemy Natural Born Killer! Ens Chipman and Zero 01 squeeze the triggers, sending streams of large bullets out to meet their foe...
But both miss, and Ens Chipman cuts right, past! Meanwhile, Ens Gordon is anxious and nervous, targets in front of him, an extraordinarily deadly enemy behind him...
Ensign Gordon charges straight in on Kate 06. He opens fire at the same time the torpedo bomber's tail gunner does...
Several .50-cal rounds stitch the Kate, damaging it, but a 7.7mm machine gun round pierces the Wildcat's windscreen, hitting the poor American pilot. Ensign Gordon clutches his chest as his Wildcat flips over, streaming a thin trail of smoke, and plummets into the clear waters below...
*Need I say anything more about the travesty that is my dice rolling this evening?
Of all the damn things, Lt Allen actually gets a good activation roll (my first '6' for the Americans in this entire game), so not only does he run from Zero 02 (far right) and Zero 03 (off camera to right), he struts straight in on Kate 03, guns blazing, defensive fire coming back at him...
The Japanese pilot misses, while Lt Allen's rounds cut through the torpedo bomber, damaging it (red bead at far right). The Japanese have two 'RTB/Stay in the Fight' rolls to make; Kate 06 turns around and heads for home, but Kate 03, the one Lt Allen just shot up, decides to stay!
And the Japanese torpedo planes push south, their target clearly in sight at this point.
Zero 02 pulls straight ahead, staying on Lt Allen's tail, though he can't line up a shot because of the torpedo bombers in the way.
But no matter, Zero 03 comes zooming in from halfway across the Pacific, into a perfect tailing shot on Lt Allen. Japanese guns blaze...
And Lt Allen's Wildcat gets chewed up, but remains aloft! Zero 03 curses and cuts left. Damn, these Wildcats are tough!
*Not really, it's just the only luck I've had is with some of the damage rolls. But not others; witness the two KIA pilots...
Zero 01 cuts hard left around Ens Chipman, taking a good look at the young American pilot that actually had the temerity to go head to head with him!
Zero 04 cuts left to help...
But Ens Chipman pulls hard right in a brilliant maneuver that puts him defensive with Zero 01 (center), but allows him to line up a shot on Zero 04. The Wildcat's machine guns roar... But miss...
Lt Allen's Wildcat is damaged and he pulls around, heading for safety.
Two Japanese torpedo planes head back north, looking to return their damaged aircraft to their carrier.
While the remaining four push inexorably towards the Lady Lex...
Zero 02 hesitantly pushes straight in, trying to help out with Ens chipman, but at the same time stay out of Zero 01 and 04's way.
But Zero 03 has no such reservations: he cuts hard right and charges straight in, taking another of the Japanese' ubiquitous frontal aspect shots. He misses because he is only able to squeeze off a few rounds before he realizes Zero 01 is in his line of fire, just beyond the American Wildcat!
Zero 03 cuts right, disgusted.
Zero 01 pulls hard right, even with Ens Chipman, aggravated with the American, but downright pissed at his glory-seeking countryman!
As Zero 02 flips an Immelman, staying centered in a very congested plot of airspace...
It is at this point that Ens Chipman realizes he's all alone, that Ensigns Mann and Gordon are dead, Ensign Camili is floating in the ocean somewhere below, and Lieutenants Fitzsimmons and Allen have both turned their damaged aircraft around, heading to the safety of the far side of the Lexington. He cuts hard left, taking a frontal shot on Zero 02...
Of course he misses, and zooms harmlessly by...
Being the only Wildcat left in the air, facing four Japanese Zeros, the Kates almost to their launch point, Ens Chipman decides to disengage, so he dives to the deck to pick up speed and pulls away.
*This is not part of the game, I just decided to let Ens Chipman escape, rather than keep him in the fight and get killed facing four Zeros by himself.
So Lt Allen reaches safety (far right) and Ens Chipman is working on it (top left), as the Japanese torpedo bombers form up to attack.
They split into two sections, one heading to the far side of the Lexington then turning back in, executing a textbook 'hammer and anvil' torpedo attack. The Kates drop their torpedoes...
Then cross past the Lexington as their torpedoes strike home, crippling the American carrier!
What a utter failure, in what was probably the least fun wargame I've played in my life. Sorry to keep whining, but I just couldn't get anything done. No Japanese aircraft, including the six dreadfully slow Kates, were shot down. Hell, only two three were even damaged, while the Zeros literally flew circles around the Wildcats, shooting them up or shooting them down, seemingly at will. And yes, the Japanese had more experienced pilots than the Americans, and yes, the Zero was much better than the Wildcat in several important respects, but lets not forget that the US Navy pilots gave a very good account of themselves in the Pacific, even in the Wildcats (and the Marines, too, looking at Wake Island and Guadalcanal), with the likes of Butch O'Hare, Jimmie Thach, Jimmy Flatley, Joe Foss, Hank Elrod, etc... having extraordinary success (and I'm sure I'm forgetting some).
My issue is not one of tactics; this is a very simple dogfighting game. My issue is with results; this horrendous defeat was not all down to the dice rolls. With the changes I made, the table is definitely tilted in favor of the Japanese. I was having much more fun when the aircraft were equal in capability and so were the pilots (see the Chickenhawks dogfights in DEI and Darwin). So, I know I want to differentiate between aircraft and pilots, but I think I've exaggerated the differences too much, and now I'm not having much fun.
In any case, here's the toll:
Ensign Gordon, shot down and killed
Lt(jg) Allen, aircraft damaged, retreated behind the Lexington
Ensign Mann, shot down and killed
Lt(jg) Fitzsimmons, aircraft damaged, retreated behind the Lexington
Three Wildcats shot down, two pilots killed, one wounded, two Wildcats damaged. Not a single Japanese aircraft shot down. Several torpedoes put into the Lexington.
Out of the frying pan, into the fire: the FDO comes on the radio to rally all airborne Wildcats, vectoring them onto a new radar contact believed to be the Japanese strike group's Val dive bombers, following the torpedo bombers in to strike the Yorktown and finish off the Lexington.
And that's the next fight.
V/R,
Jack


No comments:
Post a Comment