All,
1130
8 May 1942
Greetings, and welcome to my return to the Pacific! Both the US Navy and Imperial Japanese Navy are on the prowl in the southwestern Pacific; the Japanese have their eyes on Australia, or at least cutting off the lines of communication between the US and Australia, and the Americans are looking to not allow that to happen. On 3-4 May 1942, while fighting raged on New Guinea, the Japanese attempted secure their flank, sending an invasion fleet into the Solomon Islands to put troops ashore on Tulagi (across the channel from Guadalcanal), in order to conduct an amphibious assault on Port Moresby on 10 May.
But the Americans noted the Japanese invasion force in the Solomons, and the USS Yorktown launched strike aircraft that sunk or damaged several Japanese warships, though now the Japanese were aware the US carriers were in the vicinity, made doubly worse by the fact the Americans were shorthanded: they had only the Yorktown and the Lexington in the area because the Hornet and Enterprise had just returned to Pearl Harbor following the Doolittle Raid. These were faced by the Japanese fleet carriers Shokaku and Zuikaku, and the light carrier Shoho. The two opposing forces marshalled their troops, refueled, consolidated, and began searching in earnest for each other.
Yesterday morning, Lt(jg) Casey led the fighter escort for the Lexington strike force which, combined with the Yorktown's strike force, managed to sink the Japanese light carrier Shoho. But the Killer Pelicans' escorts had a rough go: they downed three Zeros and damaged another, but they lost one Wildcat, had the other three damaged, and five of their six assigned dive bombers were shot down, the sixth returning to the Lexington, damaged. Lt Casey scored two more kills to become a Veteran (total of four kills), but he was shot down and badly wounded, which will cause him to miss the Battle of Midway.
Both sides carried out preparation for battle throughout the night, then launched scouts shortly after 0600 the next morning, to find the other side's carriers. The Americans got lucky first, sighting the Japanese carriers at 0820, though the Japanese were only two minutes behind. Both sides hurried to turn into the wind and launch their strike groups! The Japanese launched 18 fighters, 33 dive bombers, and 18 torpedo bombers, while the Yorktown and Lexington launched a combined 15 Wildcats, 39 Dauntlesses, and 21 Devastators, though the Lexington's contingent was about 10 minutes behind the Yorktown's.
At 1055 the Lexington's air search radar acquired the inbound Japanese strike group at a range of 68 nautical miles and vectored nine Wildcats to intercept; it was 1113 local time when Lt(jg) Fitzsimmons again led the Lexington CAP into battle. And this time he found the enemy, but it didn't work out very well for the Americans. Lt Fitzsimmons and Lt Allen saw their aircraft damaged, Ens Chipman had to disengage and retreat, but that wasn't the worst of it. Three Wildcats were shot down, with Ensign Camili being wounded, but Ensigns Gordon and Mann were killed in action, while no Japanese aircraft were shot down, and enemy torpedo bombers managed to put three torpedoes into the USS Lexington.
At 1123, radar contact acquired another Japanese strike group, comprised of Val dive bombers escorted by Zeros, and vectored the Lexington's Combat Air Patrol to intercept. The six Wildcats charged headlong into the Japanese formation, suffering two aircraft lost (and one pilot KIA) and one damaged in brutal action that saw Ensign Head awarded the Navy Cross for shooting down four enemy aircraft! Lt Allen added another two kills, and Ensign Chipman added one, with the rest of the Japanese aircraft breaking off the attack, so not a single Val dive bomber was able to press home the attack. However, the Lexington is still in trouble caused by the torpedo hits earlier.
It is now 1130, and Lt Case is leading a four-ship escort for "Scouting Two's" SBD Dauntless dive bombers to attack the Japanese carrier Shokaku.
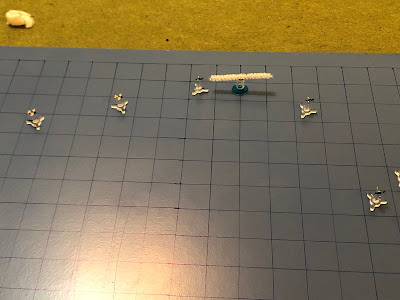
This is my arena for aerial combat; simple, yet durable and, to me, beautiful (in a simple, durable way). I'm using tiny aircraft designed by my buddy Thomaston; not sure what size they are, just that they are much smaller than 1/600. They're 3D printed models that I mounted on cut-down bases from Litko, and I'm using a very simple rules system called "Battle of Britain," which I found for free over on The Miniatures Page (I've already played a good 20 or so fights with them). Left is north, with the Japanese carrier Shokaku and her six-ship CAP, while the American strike group is at right.
And I've made some more adjustments. I took away the Zero's +2 bonus, it's now +1, just like the Wildcat, though pilot rating is still a factor. But I changed the Zero's movement capability:
1 1 1
2 2
x 4 x
As you can see, much more maneuverable than the Wildcat:
2 1 1
3 3
x 5 x
But I also changed the firing 'to hit' numbers. For Zeros:
6 5+ 6
- -
4+ 3+ 4+
For the better trained (with regards to gunnery) Wildcats:
4+ 4+ 4+
5+ 5+
4+ 3+ 4+
And I didn't do it in this game, but I'm about tired of the ridiculous advantage that goes to the attacker in a head to head attack (attacker hits on 4+, but target only hits on 6), so I'm about ready to change it to 'both hit on 4+'.
The US strike group, from top:
Ensign Riggins, a Regular with one kill on one sortie
LtCmdr Case, an Ace with seven kills in two sorties (and winner of the Medal of Honor!)
D02 D05
D01 D04
D03 D06
Ensign Dahlgren, a Regular with one kill on one sortie
Ensign Warren, a Regular with no kills on one sortie
D01 through D06 are SBD Dauntlesses, a dive bomber, each carrying a 500-lb bomb it's hoping to plant smack on the deck of the Japanese carrier. The Dauntless has three MPs per turn, and can fire defensive fire to its 12 o'clock (front) and 4 to 7 o'clock (rear quarter).
The target, and the Japanese Combat Air Patrol, consisting of six A6M Zeros. From top:
Zero 02: Veteran
Zero 01: Natural Born Killer
Zero 03: Regular
Zero 05: Veteran
Zero 04: Ace
Zero 06: Regular
Yeah, a pretty talented flight roster...
We fast forward through the first two turns, and now the battle is met.
Ensign Riggins pushes his aircraft forward, dangerously close to the Japanese super ace.
While LtCmdr Case cuts left, defensive.
While at the bottom, Ens Dahlgren cruises ahead.
And Ens Warren pulls up on his wing.
Zero 02 pulls even with his flight leader.
But the Japanese "Natural Born Killer" ain't waiting around for his wingmen, he jumps straight into the fight, with both feet! He cuts right, then back left, lining up a front quarter shot on LtCmdr Case, pumping a few 20mm rounds into the Navy Wildcat, damaging it!
Before flashing past, intent on getting at the American dive bombers.
Zero 03 is a bit too much in awe of his flight leader and doesn't really get anything done.
While a similar situation plays out on the bottom half, where Zero 05 pulls up next to his Ace flight leader...
But the Ace doesn't hang around, he charges straight in, going head to head with Ensign Dahgren. Both pilots squeeze their triggers, tracers flashing dangerously past their heads...
But both miss, and the two birds streak past each other.
While Zero 06 sputters ahead, content to watch the show.
And the Dauntlesses push north.
Up top, Ens Riggins charges straight in on Zero 02, going head to head, with both pilots firing...
But both miss and pass each other.
And then LtCmdr Case, nursing his wounded aircraft, tries the same maneuver, going head to head with Zero 03...
But, for the third straight time, both pilots miss, and they zoom past each other.
Absolutely atrocious dice rolling, and now the Wildcats have three Zeros running wild between them and the Dauntlesses they're supposed to be protecting. Oh, and yes, I'm still doing the 'return to base' dice rolls to see if a damaged aircraft stays in the fight or goes home. LtCmdr Case is an Ace and easily passed.
Realizing that, Ens Dahlgren cuts hard right, pulling east to go help the Dauntlesses.
And Ens Riggins does the same, though his immediate concern is his own survival, not the dive bombers'...
Zero 02 breaks for the American dive bombers.
But then Zero 01 becomes a bit anxious about Ens Dahlgren's sudden arrival, so he pulls right and cross the American dive bomber formation, putting a bit of distance between himself and the Wildcat (far left).
But then Zero 03 cuts right and takes a front quarter shot on Ens Dahlgren...
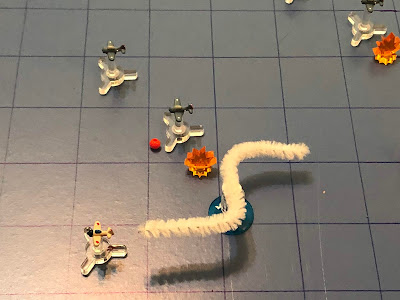
The Wildcat is damaged (red bead) and Zero 03 flashes past, dodging defensive fire from D01 and D04.
But not as well as he had hope! How embarrassing (for both sides), the first fighter kill is by a dive bomber! D04 gets credit for the kill, using his forward firing .30-cal MG. Perhaps he missed his calling as a pilot? Need to get him in a Wildcat.
Zero 05 pushes ahead very cautiously.
While Zero 04, keeping an eye on Ensigns Dahgren (top left) and Warren (bottom left) stalks his prey, also very cautiously.
And Zero 06 rounds out the cautious trio's movement this turn by cruising ahead straight and level.
The Dauntlesses push north, except D05, he has to cut right to avoid Ensign Dahgren's damaged Wildcat. Nice job by Dahlgren to break up his own dive bomber formation...
Ens Riggins comes slight left in a slight attempt to get back into the fight.
While LtCmdr Case cuts a little harder.
Luckily Ens Dahgren's aircraft isn't too beat up and he is able to stay in the fight! But he's still struggling with getting the wounded bird under control and just sputters ahead, which could be a death sentence with a Japanese NBK and an Ace nearby...
So his wingman, Ensign Warren, does what he can to help out: he's pulls of a super move to jink right, over and in behind Zero 04, for a pretty damn near perfect tail shot. He pulls the trigger just as he sneezes onto his windscreen, obscuring his gunsight, causing hit machine guns to miss their target...
Shocked awake by Ens Warren's (bottom right) near miss, the Japanese Ace driving Zero 04 kicks it into gear and gets onto D05's tail. He opens fire...
But defensive fire from the dive bomber's twin .30-cal MGs make him miss, and he cuts left to get clear of them!
Well, turnabout is fair play, I guess. Both sides have now missed a perfect shot...
But then the Japanese super-Ace pulls around to the right, laughs off some defensive fir from D03, lines up his shot, and lays into the SBD Dauntless with his 20mm cannons...
Sending the American plane careening into the warm, blue sea...
Zero 01 continues to press home his attack, now lining up a tailing shot on D01...
Damaging the Dauntless, then cutting right, past the US formation.
The Japanese fighter pilots smell blood in the water: Zero 02 runs straight in on D02, guns blazing...
But he misses, then comes left alongside D04.
And then Zero 05 finally gets in the fight: he kicks it in the ass, zooming straight in on Ens Warren's tail. The Japanese Zero opens fire and Ens Warren squinches down in his seat, eyes closed tightly shut, but the rounds pass close by without striking him!
Zero 06 comes left and cuts loose, taking a front quarter shot on D06, but he also misses.
Okay, that's a tough shot, but a second tail shot miss by the Japanese? Wowsers...
D01 is badly damaged, so the pilot spins the aircraft around and heads for home.
As the three remaining SBD Dauntlesses in formation (D02, D04, and D06, with D05 at top right) continue to push north.
And D05 cuts left and takes a full deflection shot on Zero 01, the Japanese Super Ace, and he scores a hit, damaging the enemy plane!!!
Ensign Warren nurses his damaged Wildcat back to the south, heading for the barn.
Ensign Riggins comes left, looking to get back in the fight, as LtCmdr Case (far left) says "watch this!"
The US Navy Ace wings over and zooms straight in for a high side, full deflection run on the damaged Japanese Super Ace. The American .50-caliber rounds find the unarmored Zero...
And pulverize it, pieces falling like confetti as the engine and cockpit slam into the warm waters below!!!
Ensign Dahlgren lets out a whoop, then cuts left, defensive, aware there are still two Zeros, including a Japanese Ace, in the immediate area.
And the Japanese Ace immediately gets to work, cutting left and dodging defensive fire as he lines up a tail shot on D06...
20mm cannon shells send the Dauntless into the drink, as the enemy Ace pulls left into the 6 o'clock position on D04. Both aircraft fire, tracers reaching out for their adversary...
But both miss, and Zero 04 cuts left to get away from the tail guns!
That is three times the Japanese have missed a tail shot (and once for the Americans)! He's an Ace, so he only needed a 2+ to hit, but he blew it, rolled a one!
Zero 02 deftly pulls an Immelman, a very clever maneuver that keeps him right in the thick of the fight.
And Zero 05 pulls hard left, trying to get to the American bombers (top left).
As does Zero 06.
D01 pushes for home.
And the three remaining SBDs of Scouting 2 push for the Japanese carrier. Still a long way to go...
Ensign Warren reaches safety in his damaged aircraft.
Ensign Riggins comes right and takes a front quarter shot on Zero 02...
And he scores, knocking Zero 02 out of the fight!
Ensign Dahlgren comes left and tries his own front quarter shot on Zero 06, but he misses.
And with all that traffic crisscrossing right in front of him, LtCmdr Case just kinda cruises ahead, straight and level. A travesty, really, for an Ace to just putter around like that, taking himself out of the fight...
Which allows Zero 06 to charge straight in on D05. Both planes open fire...
But both planes miss, and the Japanese pilot swings left to keep position.
Another missed tail shot for the Japanese, absolutely terrible die rolling...
The Japanese Ace, Zero 04, comes right, braving defensive fire in order to take a tailing shot on D04...
Several 20mm shells slam home, damaging the Dauntless, and then the Japanese Ace jinks left, getting away from those guns.
And then Zero 05 comes left, going head to head with Ensign Riggins. Both pilots begin firing...
But both pilots miss, so Zero 05 rolls left, onto D05's tail. He opens fire as defensive fire from the American twin .30-cal MGs begins streaming past...
But D05 wings over and plummets into the ocean.
Dauntless 01, damaged, pushes for home.
And then there was one. The pilot of the recently damaged D04 checks his aircraft: his gunner is hit, oil is leaking, losing manifold pressure, time to take this baby home...
So D02, the sole remaining Dauntless in the fight, presses home his attack, though he may have just outrun his fighter cover.
Not his fault, they just haven't done a very good job of keeping on his wing.
LtCmdr Case cuts left, but he's too far away to be useful...
And Ens Dahlgren comes right, trying to get into position, eyeballing the Japanese Ace, Zero 04 (left center bottom, with the last US dive bomber at far left).
And Ensign Riggins comes right, to finish off this round of futility...
The Japanese Ace immediately rolls in on D 02's tail. He screams 'Banzaiiiiiiiii!!!!" as he opens fire, tracers snapping past his head from the American tail guns...
The two aircraft are hit, shudder, and then collide, before dropping in a tangled, fiery heap, into the Coral Sea!!!
And that's how it ends, the Japanese Ace shoots down the last US dive bomber, and the last US dive bomber shoots down the Japanese Ace, incredible.
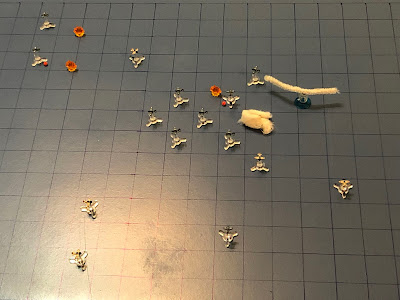
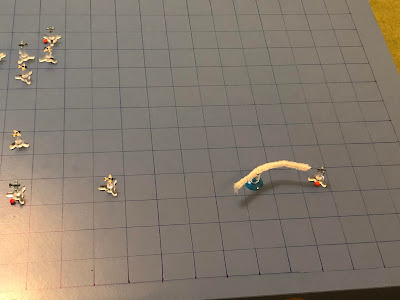
The Japanese CAP from the Shokaku, despite losing four of their six aircraft (two to dive bombers, with another damaged and finished off by a US fighter!), did their job, keeping the US dive bombers off their floating home, knocking four of them from the sky and damaging the other two badly enough that they were forced to jettison their bombs and return home.
LtCmdr Case, was damaged, but managed to rack up his 8th kill of the war
Ensign Riggins, got his second kill
Ensign Dahlgren, was damaged but still in action, though he failed to score
Ensign Warren, didn't score either, and was damaged and forced to return to the Lexington
The Americans are a bit shocked at losing the entire formation from Scouting Two, but they don't have time to fret, there's more work to be done! LtCmdr Case immediately ordered the Wildcats to reform, and they climbed to join the SBD Dauntlesses of Bombing Two, where they were also joined by Ensign Didier in his Wildcat.
Coming up next!
V/R,
Jack


No comments:
Post a Comment