All,
The (Naval) Battle of Balikpapan
It's 0245 on 24 January 1942 and things are not going the Allies' way. On 11 January 1942 the Imperial Japanese Navy landed troops on the island of Tarakan, only a few miles off the east coast of Borneo, and the Dutch forces were quickly forced to capitulate. The Japanese then began eyeing Borneo-proper, and so they landed troops near the Dutch city of Balikpapan during the evening of 24 24 January 1942, with its oilfields being secured almost immediately. American-British-Canadian-Dutch-Australian (ABDA) Command immediately dispatched a division of US destroyers to the area to ambush the Japanese troop transports.
It was too late to affect the landings and fate of Balikpapan, but a naval fight was stirring nonetheless. The is the first of a series of games I intend on doing in support of my US Marine saga in the Pacific during World War II. I'm not sure how far I'll go with this, how long it will last, but it enjoy it for now ;) I had missed Mr David Manley's initial post, but caught it in a re-post by my buddy Jim ("Boggler"); 6 August is "International Naval Wargames Day," and I was sufficiently inspired to give it a shot, actually getting three games in.
There is a new set of rules out and, as always, I'm busy modifying them to suit my purposes. I'll drop a few hints, let's see if you figure it out ;) All three games were played with this new mish-mash of rules, though I did change some things in the third game from the first two.
Overview, north is up, with the Japanese force at top left and the ABDA force at bottom right. The table is 3' x 3' and ugly (I apologize, but it's good enough for my purposes). That's part of Borneo, with the city of Balikpapan up there at top. The Japanese force is three patrol boats (former US WW I-era destroyers and five troop transports (there were more transports/merchant ships there in real life, I've only got five so these will have to do), while the ABDA force is four US destroyers.
The Japanese patrol boats are there to protect the troopships, which are still offloading troops and supplies, while the ABDA force is after those transports and merchantmen. Earlier in the day there were strong Japanese surface forces in the area, but they'd pulled back after Dutch bombers arrived and bombed the task force. The ABDA ships want to get in, hit the transports, and escape before the Japanese surface force (with lots of heavy and light cruisers) returns.
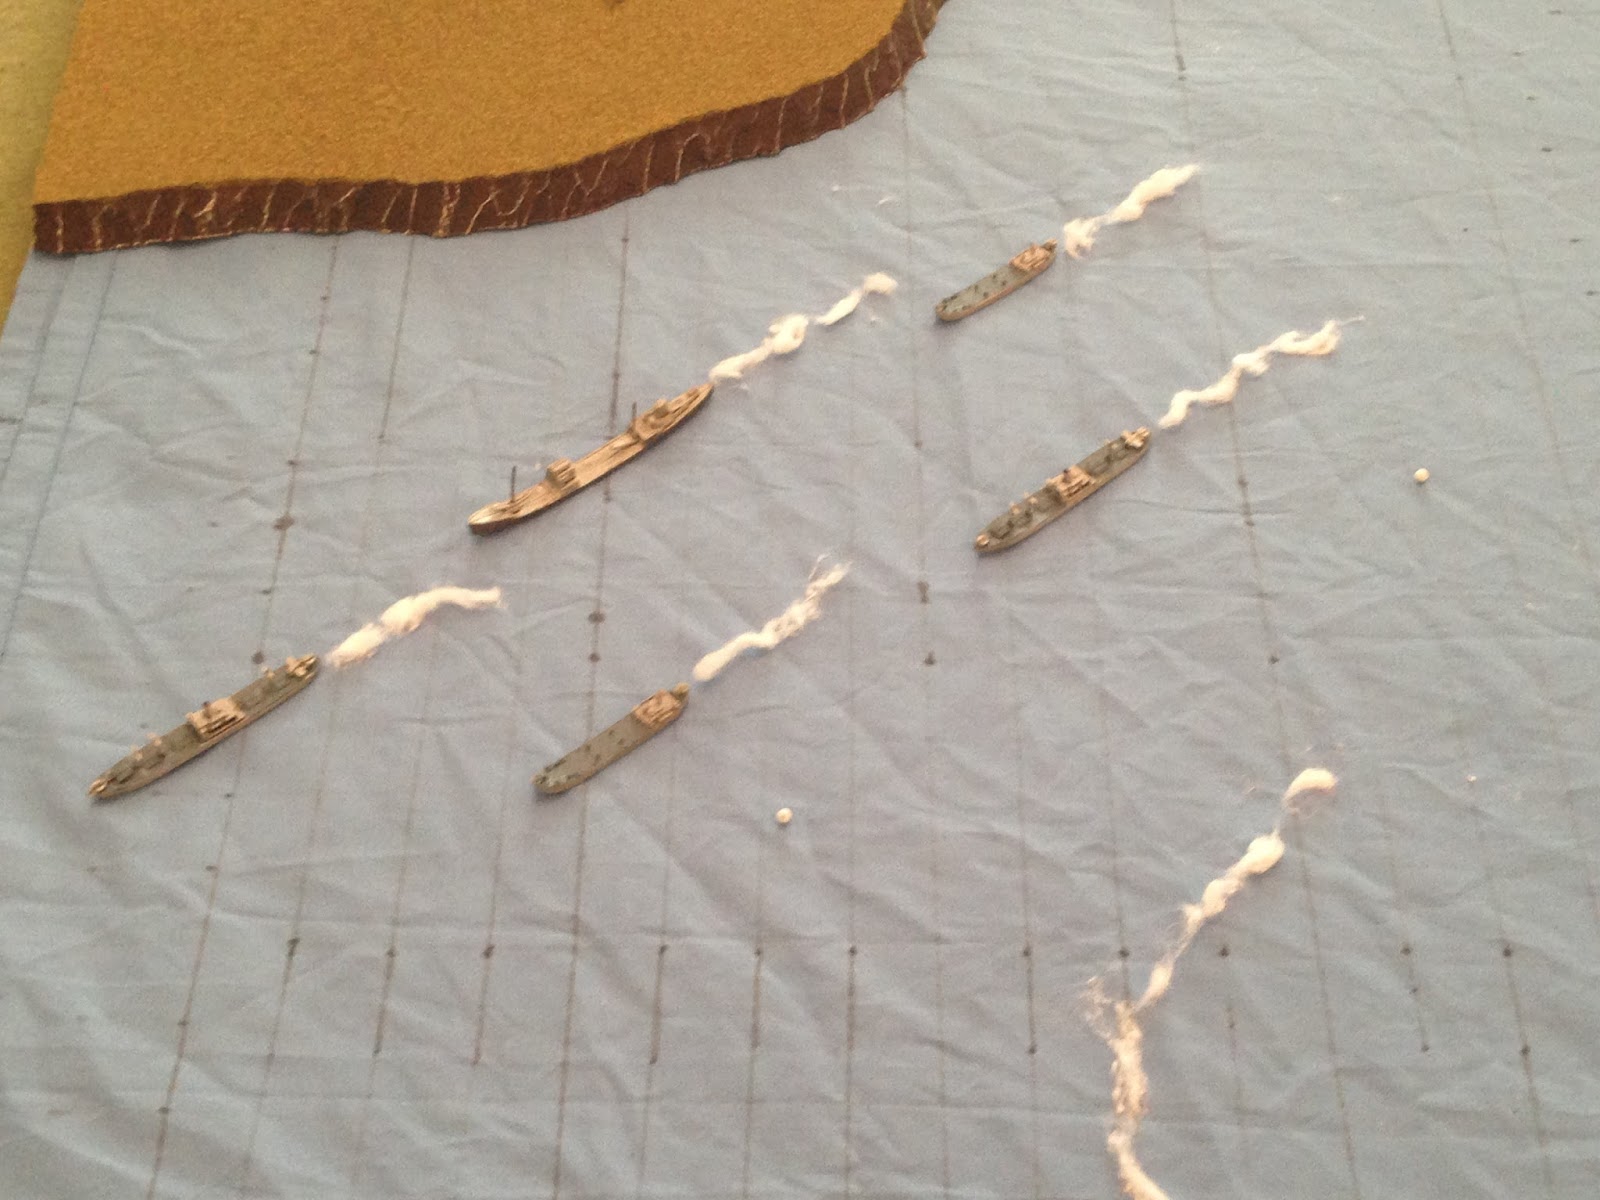
The Japanese force, with five troop transports (left to top center) lying at anchor, disgorging their supplies, and the Japanese patrol boats covering them (bottom center to right). From left to right: P-36, P-37, and P-38.
The ABDA force in line astern, from top left to bottom right: the USS Ford, USS Pope, USS Parrott, and USS Jones.
As it turns 0245, the USS Ford leads the way ahead (center, with Japanese at top left and ABDA at bottom right)...
When its (center right) eagle-eyed scouts spot enemy ships against the coastline (bottom left)! USS Ford turns hard to starboard (that's 'right,' for you landlubbers). The Japanese patrol boat P-38 moves up (left center top), closing the distance.
I just came up with this idea of using cotton to show ships' wakes. Let me know what you think.
P-38 takes a shot at the Ford, but the salvo is off target.
With the Ford (center) under fire, Pope cuts inside of her (right, with Parrott and Jones at bottom right).
USS Pope's gunners line it up and take their shot at P-38 (right center top, with USS Ford at top left, P-36, P-37, and the troopships at top center). Their aim is true and P-38 is damaged by a 5" round.
Parrot (center) dashes up in trace of the Ford (center top).
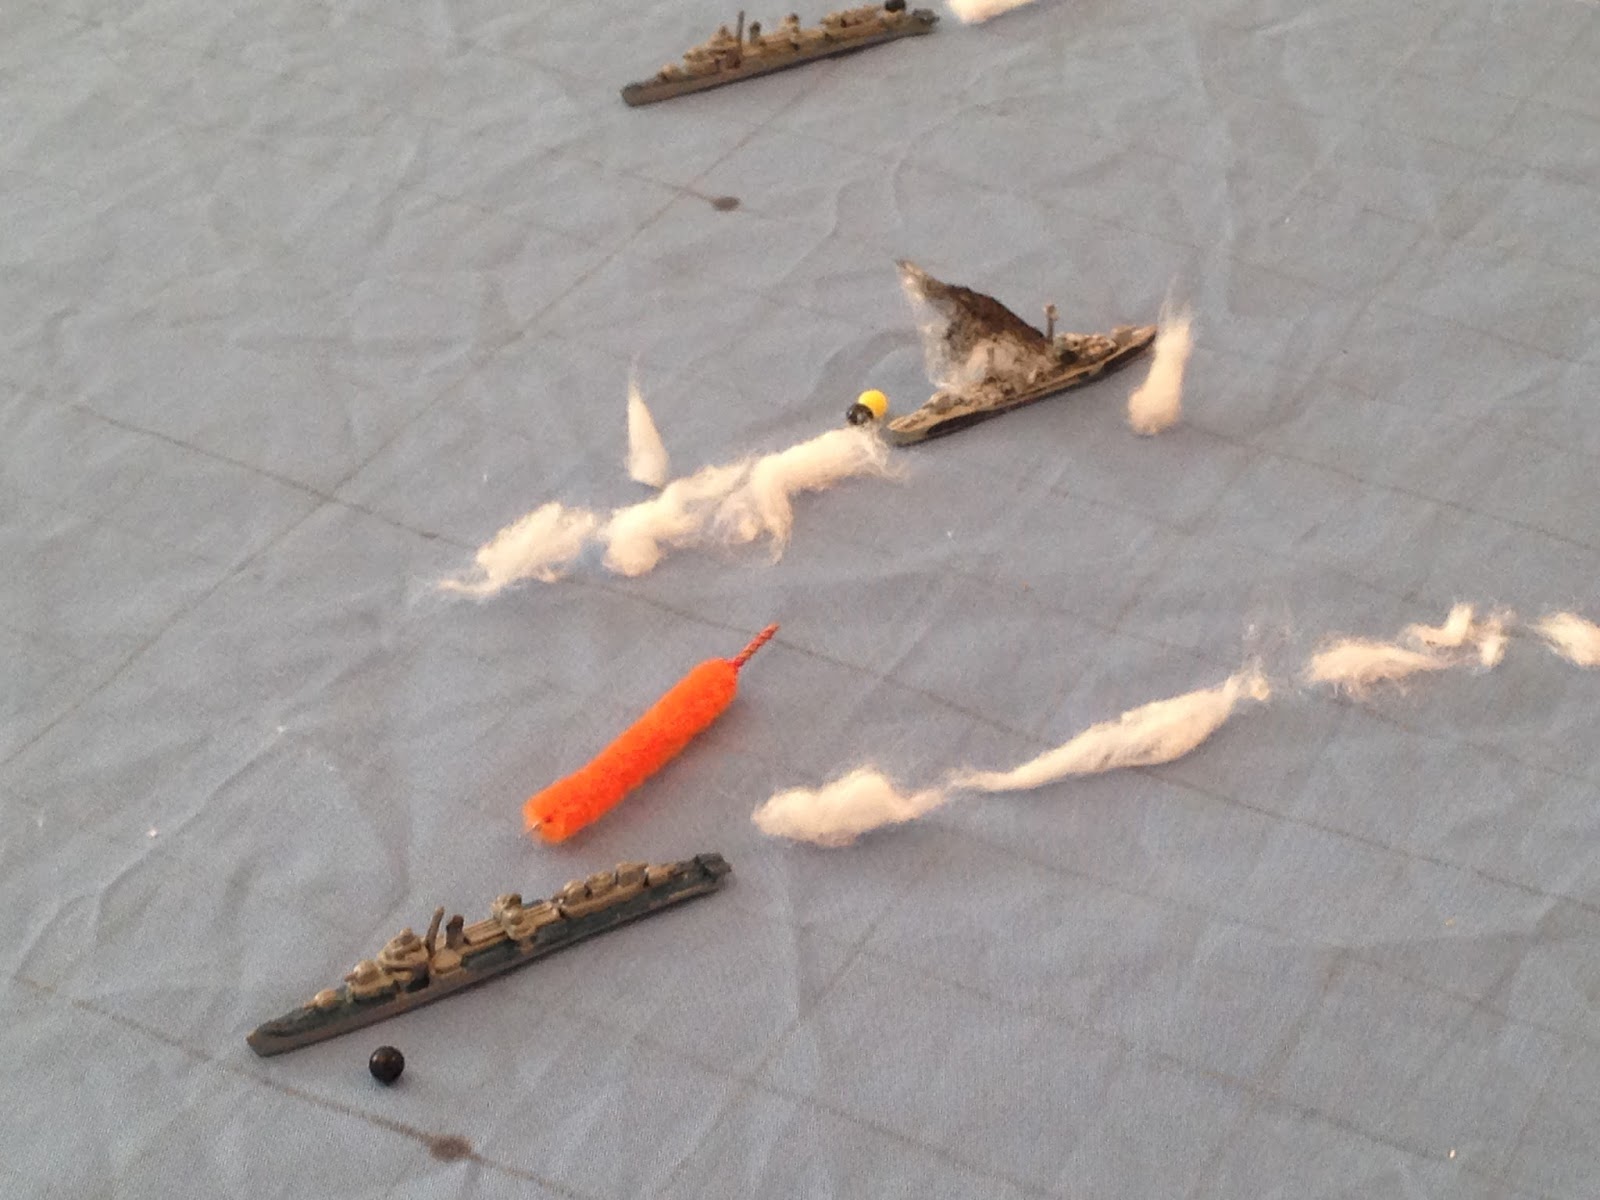
While P-37 (left center) moves up and launches its torpedoes (white bead at center left) at the USS Ford (center right top, with Pope above it, Parrott to its right, P-38 at top left belching smoke, and P-36 at bottom left).
And then P-37 cuts hard right (you can still see the white bead marking the torpedoes at center left, P-37 has now cut across to right center, with P-36 at bottom left center).
P-36 (left center) follows its sisters into the fight.
Lining up a shot on the USS Parrott (top right, with Ford at left and P-37 at bottom center), but missing.
The USS John Paul Jones (center bottom) dashes up right behind the Parrott; she'd love to fire her torpedoes, but must save them for the Japanese merchants (top left).
It's the end of the turn, so I clean up all the wakes and start over.
Time on deck is 0250, and the P-36 cuts hard right (center), mirroring the P-37 (just below it, with the Ford just above it, Pope at top center, Parrott and Jones at top right, and the damaged P-38 at top left).
The P-37 fires on USS Parrott, but the salvo is off target.
This is immediately followed by P-37 turning up the heat, cutting hard to port ('left' for you landlubbers, ship at right bottom center) and cutting the distance to Parrott and Jones (top right).
P-37 fires its 4.5" deck guns, but miss!
The Japanese patrol boat P-38 is already hit and belching smoke (center right) as her sisters P-36 and P-37 are maneuvering wildly in the south (top), and things look like they're about to get worse for P-38: USS Pope fires up the boilers and cuts hard to port (bottom left center), closing the distance.
Pope's guns roar, but they, too, miss!
P-38's (bottom right) damage control party gets to work but can't make any headway (it's very difficult, you need to roll a '6' on 1D6 to remove damage), so she limps forward.
Back in the south, Ford (right) and Jones (bottom left) look on as the Parrott's skipper has apparently lost his mind! He orders up flank speed ahead and then makes a hard turn to port (top left), cutting between the P-36 and P-37!!!
The Parrott's gun crews train their weapons on the P-36 and rake the Japanese ship's stern, damaging it.
Back in the north, P-38 is belching smoke at center, with Pope having already closed the distance (top right) and fired a salvo to no effect; the USS Ford turns to port (left) and comes broadside at point blank range with the P-38...
But with all the smoke from P-38's fires and the geysers thrown up by Pope's shell splashes the Ford's (bottom left) gunners can't connect either!!!
Looking east to west at the battle area, you've got the Ford (right) and Pope (just off camera to right) skirmishing with the P-38 (far right), while the Parrott (top left) is in a knife-fight with the P-36 and P-37 (top left). The only US skipper to keep his eyes on the prize is on the USS Jones; he orders flank speed ahead and the ship lunges northwest (center left top) towards the enemy troopships (top right).
On the way by, the Jones takes a shot at P-37 (with Parrott above it and Pp-36 at top left), but at with all the pitching due to being at flank speed, they don't score. They do, however, shock the crew as the shells bracket the enemy patrol boat.
In these rules ships get affected by damage, with three damages sinking them, and the crew gets affected by shock, with three causing its Captain to decide to leave the fight.
But then disaster strikes as P-37's torpedoes arrive: only one manages to connect, but it slams into the USS Ford, causing two levels of damage and leaving the ship dead in the water!
The enemy troopships are now awake and alert to the danger: they immediately suspend ship to shore operations and get their boilers lit.
Time on deck is 0255 as the skipper of the P-37 (bottom center right) manages to rally his crew and pull his ship even with the Parrott (bottom right, with blue deck)...
The P-37 opens fire at point blank range, damaging the vessel and shocking the crew (that's P-36 damaged and shocked at top center).
I'm marking damage with smoke on the ship (as you see above with Parrott and P-36) and shock with yellow beads.
The enemy Captain of the P-36 can't get his crew rallied and his damage control party can't get anything done as the ship limps along (top right, with Parrott at center and P-37 at bottom left).
Back in the north, USS Pope again fires on the damaged P-38, with the crippled USS Ford (top right) lying nearby. The P-38 receives a second shock and a second damage, and she, too, is left dead in the water.
Having crippled the P-38 (bottom left), the Pope's skipper remembers why they're here: the transports (top right), and so he pushes his ship northwest (center bottom, with the crippled Ford lying just to port, the Jones just above her, and P-37 at top left).
The P-38 manages to get its engines restarted, though damage control is having a helluva time getting anything done. The Japanese skipper decides he needs to get to safety, so he pushes the stricken ship hard to depart the battle area (top right, with Pope at far left, the crippled Ford at center left, and Jones at bottom left).
It was a weird situation: the ship was dead in the water and rolled snake-eyes on its morale roll, which is 'run away.' With the ship dead in the water, I suppose I should have made the crew abandon ship, but was feeling generous so I allowed them to get the engines back online and make a run for the table edge.
If it happens to the USS Ford I will make them abandon ship: the Japanese ship had only taken "regular" damage, while the Ford had taken "catastrophic" damage.
Speak of the devil: the Pope (top left) looks on as the Ford's skipper gets his crew to work. He's able to rally off one shock, and the damage control party is even able to remove one of the damage levels, though the boiler are still out and the ship is just drifting. They'll have use an action and pass a 'task' test to relight the boilers to get the engines running again.
And the USS Jones (bottom right) charges in on the Japanese merchant ships and launches her torpedoes (white bead).
Having done their job, the Jones turns hard to port (center left) and looks to come around to help her sister, the Parrott (just off camera to bottom center), busy dealing with the P-36 and P-37.
The Parrot's skipper rallies off their shock and orders the crew to open fire on the P-37; their close enough to practically launch boarding parties, standing toe to toe, slugging it out. The P-37 is damaged and its crew shocked!
The enemy merchants heave to, spinning around to try and hide in the safety of the bay, knowing they can't get speed up quick enough to have any chance of escaping east, out to sea.
Time on deck is 0300, and the Jones has come back around to get its nose (center right bottom) square in the middle of the fight with P-37 and P-36 (just above the Jones and at top right, with Parrott at far right).
The Jones' gunners open fire, putting a second damage on the P-37 (Parrott at right and P-36 at top right).
The P-36's Captain is able to get his crew back in fighting shape, if not the ship; they press ahead and then turn hard to port (top right, with the damaged and escaping P-38 at top center, the crippled Ford at far left, and the P-37, Parrott, and Jones at bottom center).
The Japanese skipper of the P-37 (center right) is able to rally off two shock, but the damage control party is unable to do anything about the two damage markers. And while doing all this, the P-37 has moved dangerously close to the Parrott!
I rolled to see if there was a collision, but they missed. I figured this early in the war the Japanese weren't
trying to ram their enemies.
The screw of the P-36 (bottom right) looks on as the P-38 (top right) leaves the battle area (Ford and Pope at top left); very disconcerting!
But through my first three games I consistently (that is, every single time!) forgot about checking morale. I ought to give the morale stuff a try...
In the southeast, though damaged, the Parrott (bottom center) and the Jones (top left) have the P-37 in a very tight spot. The Parrott's gunners again blaze away at point blank range...
Holed multiple times below the waterline by point blank 5" and 40mm fire, the P-37 (center right) slowly sinks beneath the waves as the Parrott swings to starboard (bottom left), closing with the enemy troopships (top left).
The crew of the dead-in-the-water Ford (bottom left) looks up from their damage control efforts to cheer the Pope (bottom center) as she charges in and launches torpedoes!
The Pope, having delivered the mail, cuts to port (center).
The Japanese merchantmen finally get moving west, towards the safety of the bay.
As the USS Jones' spread of torpedoes comes in, though it only scores on hit, damaging a cargo ship (bottom right).
Time on deck is now 0305 as the Jones pushes back south (far right, with Parrott beginning its torpedo run at bottom right, P-36 at top right, and the Ford still dead in the water at top left), sliding past the debris and survivors of the P-37 (center right ball of smoke).
The USS Jones trains on the P-36, but misses!
In the east, the Pope heaves alongside the crippled Ford.
While in the west the USS Parrott (center bottom, with the Pope and Ford at top right) charges in and delivers, fish in the water!
With the Jones (bottom right) giving chase and already beat up, the skipper of the P-36 decides discretion is the better part of valor (top right) and turns to starboard to exit the battle area.
No use getting killed, we already failed and let the Yankees get to the merchants, he thinks to himself...
The Ford (far left, with Pope standing to) again tries to get its engines running, and again fails...
The merchants push west (left) towards safety...
As the USS Pope's torpedoes arrive! A troopship is stricken amidships, practically picking it up and tossing it back down in the water! The ship is dead, it just doesn't know it yet, but the crew and passengers do, and they scramble over the sides!
I screwed up, rolling armor saves on 6 when the 'impact' rating for the torpedoes is three. I scored five hits, but then he actually saved two of them, which shouldn't have happened.
Time on deck is 0310, and back in the southwest the P-36 (top right) is in trouble. The ship has suffered quite a bit of damage and is taking on water, significantly slowing the patrol boat. The Japanese Captain was elated when the Jones' (center right) long distance volley missed, but now the Jones has her speed up and simply runs the P-36 down...
The American gunners riddle the Japanese vessel, ceasing fire as enemy sailors begin tossing themselves over the gunwales, abandoning ship.
For a third time, the USS Ford's crew attempts to get the boilers re-lit and fails, but the Pope's crew manages to pass a line...
And she begins towing the Ford (top center) out of the battle area.
Having fired its torpedoes (white bead at left), the USS Parrott swings around to starboard (center, with Pope towing Ford at top right), looking to exit the area before Japanese reinforcements arrive.
The Japanese merchants continue their westward march, with the first of their number escaping into the shelter of the bay. The bottom left ship is damaged by Pope's torpedoes, and the top right ship is burning and abandoned thanks to the Jones' torpedoes.
And now the Parrott's torpedoes slam home, detonating stores of ammunition and blowing the ship sky-high!
The ABDA force retires (Jones at top center, Pope towing the Ford at top left, and the Parrott bringing up the rear. Time on deck is 0315.
One last look at the Japanese merchants: two escaped Scot-free, one was damaged but escaped, one sunk with all its equipment and supplies but its infantry passengers largely escaped, and one was blown up.
I think the ABDA force won, though I think the 'real-life' ABDA troops did better. In real life the US destroyers sunk four merchant ships and the P-37, and damaged two more merchant ships, for the cost of only the USS Ford damaged. Here we sunk two merchant ships and one patrol boat (the P-37, just like real life), and damaged another merchant ships and the other two patrol boats, but at the cost of damage to the USS Parrott and severe damage to the USS Ford.
Well, I had a great time, I hope you did too! I'll be the first to admit I have precious little knowledge of naval warfare or wargaming, but that was a rip-roaring fight from start to finish. I liked how the command and control/activation system worked, I just need to tighten up some things with torpedoes and damage control, and remember to use the damn morale checks when a buddy/leader sinks or leaves the fight. Also, I may have movement ranges too long; I'll try it again this way, then make a change for the third game, if I need to. Happy International Naval Wargames Day!
V/R,
Jack


Great report Jack. Lovely looking game, like the wakes.
ReplyDeleteThanks buddy, I'm glad you enjoyed it. More to come!
DeleteV/R,
Jack
Wow! You have ships too :-) I should have known. I have no idea what the rules are - I only own one set of WW2 Naval rules, and I got them with a Wargaming Magazine in the 80's!
ReplyDeleteIt does look like a great game and it does sound like you had fun. I did not know about International Naval Wargaming day until the 7th. I may have been tempted to play my Medieval Warfare in the Channel rules. Maybe next year.
Shaun,
DeleteYeah buddy, I'm like a Swiss Army knife, all kinds of stuff going on here ;) The rules are homegrown, modifications from something totally unrelated, but I was struck by the arrow of inspiration, and they were a blast!
Whatever you choose to do, I look forward to it. Just make sure it's not next year ;)
V/R,
Jack
Excellent, cheers Jack. Both reports have been inspiring (literally!)
ReplyDeleteThanks man, glad you like them. And you say literally, does that mean you've been struck to play some naval wargames?
DeleteV/R,
Jack