All,
It's 0900 on 14 February 1942, and Captain Moon's platoon of cooks, bakers, and candlestick makers is in Palembang on the island of Sumatra, in the Dutch East Indies. Having made good on their escape from the Philippines, the platoon passed through Tjilatjap, a major naval base, on its way west to Sumatra. While there they came across the USS Marblehead, a US Navy ship damaged in the Battle of Makassar Strait. The Marblehead was in a bad way and needed repairs desperately, thus it was preparing to leave the area immediately. But before it did, Captain Moon ran into an old friend in the ship's company, and seeing as how quite a few of the Marines on the Marblehead were itching for a fight, Captain Moon was able to secure enough replacements to bring his depleted platoon back up to strength.
For a couple weeks things were pretty peaceful, the Marines relaxing and recuperating as they watched their comrades of the VMF-343 "Dirt Divers" take to the air to battle the Japanese. But the happy times had come to an end; the past few days there had been a series of alerts and otherwise dire warnings, and the Marine ersatz-infantrymen did their best to improve the defensive positions around the airfield. But at 0800 this morning the alarms went off and a large flight of Japanese bombes were soon overhead, plastering the airfield and nearby areas. Though none of the Marines were injured, they were not happy that all the Wildcats and British Hurricanes had scrambled off earlier. Little did the Leathernecks know, the flyboys were busy doing their best to tear up an inbound Japanese troop convoy destined to put a whole lot of Japanese infantry ashore nearby. But with all the Allied fighters away, the Japanese carpet-bombed the airfield and, very soon after, the alert went out...

Japanese paratroopers were landing!!! As might be imagined, the sudden appearance of an unknown number of enemy troops at various points of the compass threw the Allied command into confusion and hysteria. Local Dutch Army troops were dispatched to and fro to locate the encroaching Japanese, and several small but fierce firefights broke out in various locations.
Captain Moon and his platoon were still dug in on the south side of the airfield, when locals came rushing in to report there were Japanese soldiers just across the runway, near one of the rubber plantations. Captain Moon turned to his Platoon Sergeant, Sgt Cody Carlson: "Cody, you sit tight here with 2nd squad, Cpl Bussey (the sniper), and our mortar team. I'm going to take the machine gun team and 1st and 3rd Squads up to take a look. I'll let you know as soon as I know something, but be prepared for anything; if Japanese paratroopers really have descended upon us, Lord only knows what else may pop up."
"Aye-aye, Sir, and you be careful up there. If you get in a bind, just give a holler and I'll come running."
Captain Moon pushed his helmet back and gave his trusty Platoon Sergeant a grin, then wiped his brow, his mind turning to his lovely wife back in the States. "Cody, you know, today is Valentine's Day..."
"Yes Sir, I love you too, but you'd better get moving." "Cody, that's actually not where I was going with... you know, sometimes you're a real bastard..."

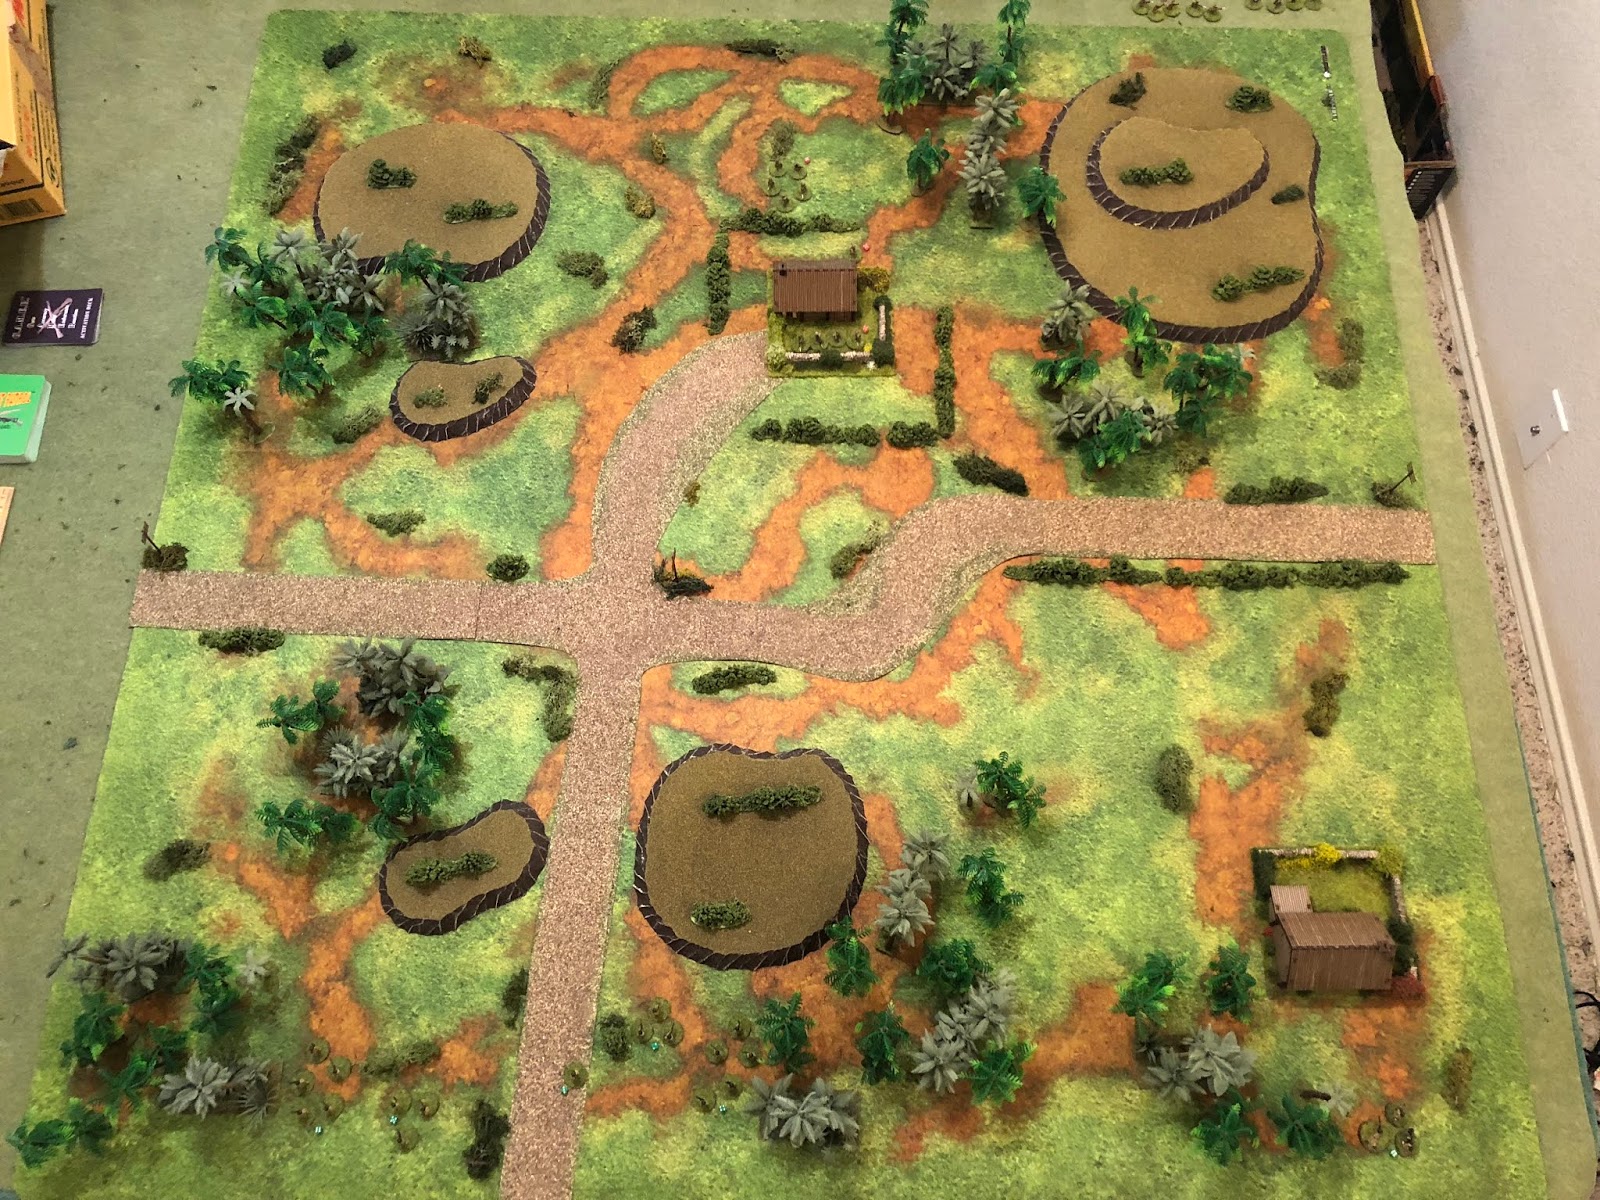
Overview, north is up. The objective building is at center top, an outbuilding for a nearby rubber plantation, and there's another in the southeast (bottom right). There's a crossroads at center left for a pair of dirt roads running north/south from the airfield and east/west around its perimeter. Other than that there are a few knolls and patches of jungle.
The opposing forces, with Americans at left and Japanese at right. Each side has a platoon commander and two squads, and the Marines have a machine gun. The figures are 15mm from Eureka Miniatures, the Marines wearing pie-plate helmets and armed with Springfield 03s, very cool.
This is my first ever game of Buck Surdu's rules, Combat Patrol. I wasn't really looking for a new set of rules, but my buddy Joe Legan has constantly been running his mouth about how great they are, then I watched the videos, and thought they looked pretty cool, so here we are. I'm playing the introductory scenario out of the rulebook; the table is set up as close as I could get it, though I threw in a lot of scrub brush to dress it up a bit, though it doesn't affect movement or provide cover. The forces are not exactly out of the book, because I didn't want to risk getting all my entire force knocked out in the first fight. My platoon of Marines is pretty much out on their own, can't really expect reinforcements, so where the scenario calls for three US rifle squads vs 2 enemy rifle squads, I went with two squads and an MG team vs two squads, holding out the Marine Platoon Sergeant, sniper, 60mm mortar team, and the remaining rifle squad, to make sure I had enough forces to at least play another couple fights ;)

The Marines: here we've got 1st Squad under Sgt Thomas, 3rd Squad under Sgt Spielman, and the machine gun team led by Cpl G. Brown, all personally led by the platoon commander, Capt Moon. Each rifle squad is eight men: a five man maneuver element led by the squad leader and a three-man fire element led by the assistant squad leader. The maneuver element has a Thompson SMG and four rifles, the fire element a BAR, Thompson SMG, and a rifle. The MG team is an M-1917 water-cooled weapon on a tripod, with a gunner, assistant, and ammo carrier, and the Captain has only his trusty M-1911 .45 caliber automatic pistol.

The Japanese have two rifle squads, each of nine mine, and their platoon leader, with Nambu pistol and sword. The squads have nine men in two elements: a base of fire element with a Type 96 LMG, a knee mortar, and two Arisaka rifles, and a maneuver element led by the squad leader, which has five Arisakas. The Japanese will begin with their platoon leader and one squad on the table, with the second squad arriving as reinforcements in turn three.
The table, now with troops. The Marines are spread across the south end of the table (bottom), while the Japanese are clustered at the out building in the north (center top) and their reinforcements are on the way in the northeast (top right), just off table.
Looking at the Marine left: Captain Moon is at center right, on the road, with 1st Squad on his left and 3rd Squad on his right. Sgt Thomas leads the maneuver team at bottom left, with his assistant, PFC Kozerski, leading the BAR team just to his right. Sgt Spielman is leading his maneuver team at far right, with his assistant, Cpl Moore, leading the BAR team just to his left.
While on the Marine far right, Cpl Brown is leading the machine gun team up, looking to get into cover and get the gun set up as quickly as possible.
The Japanese have their base of fire element in the outbuilding's perimeter (the roof doesn't come off that building, so they're behind the wall), while their platoon leader is right behind the building, and the rifle team is at top left, sort of in a reserve position, ready to react to Yankee Imperialist aggressions.
In the northeast, the Japanese 2nd Squad is hustling from off table to come and reinforce their comrades.
The fight is on! The game begins with Captain Moon (top right) ordering PFC Kozerski to get his BAR team (bottom left) into action (he swapped command dice with them so they could go first).
Pvt Munoz (bottom center) has no sooner got 1st Squad's BAR into action, firing on the enemy-held outbuilding (top center), then it jams, as Sgt Thomas gets the rifle team moving up (just visible at bottom left).
Kozerski curses Munoz and Munoz curses his luck (bottom center left) as the rifle team makes good progress (top left).
While on the far right, the MG team moves up, but Cpl Brown can't quite seem to get them in gear and they ended up at the near wall... Which really sucks as we need to get them on the other side of the building, then it takes a minute (a turn) to get the gun set up and into action.
With the Japanese base of fire team in the outbuilding (far left) suffering from the odd, angry shot (as opposed to heavy, accurate fire from the BAR), the Japanese rifle team spotted Sgt Thomas trying to flank them and dashes right (center right, from center left).
Munoz gets 1st Squad's BAR unjammed and back into action (bottom center) and resumes firing, but he's unable to deliver effective fire on the Japanese outbuilding (top center).
1st Squad's BAR (bottom left) continues laying down fire as Sgt Spielman moves 3rd Squad's rifle team up (top center, with his BAR team below them, and Captain Moon still on the road, just below them).
And they are joined by their BAR team (top center, from center bottom).
Then the reshuffle card comes out, ending Turn 1.
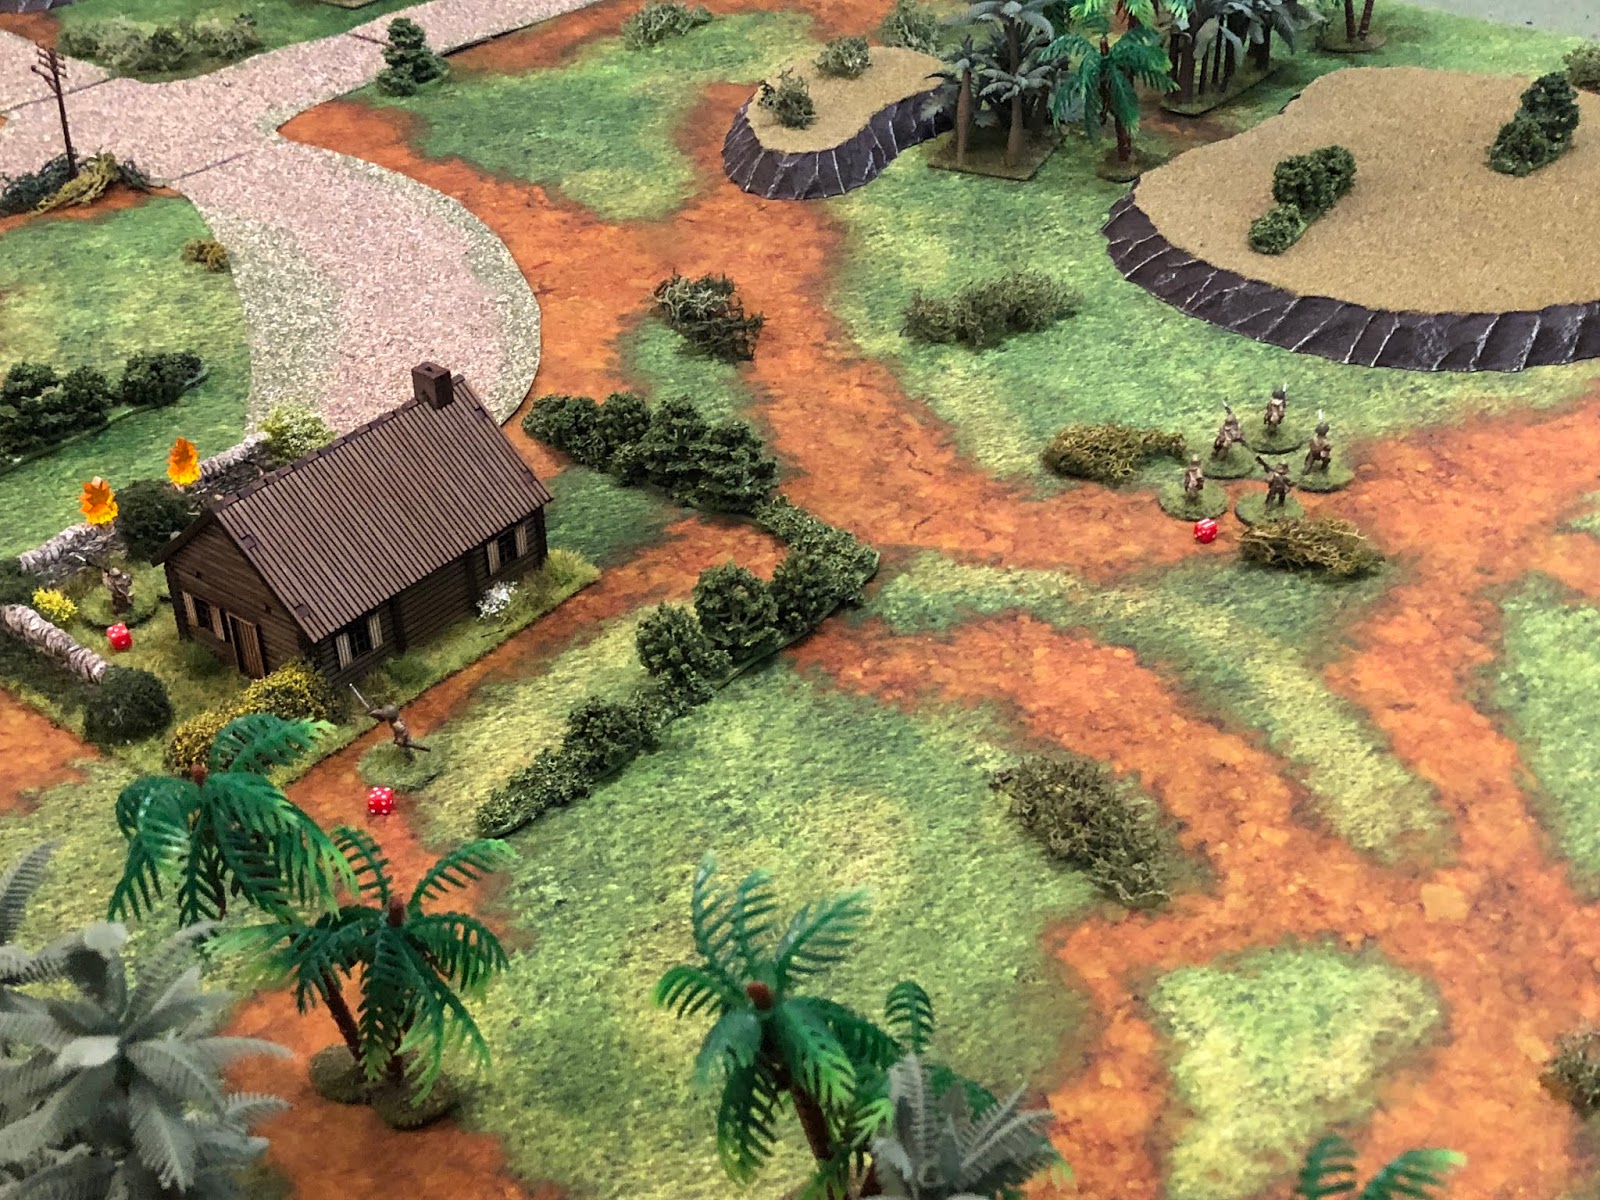
Back at the outbuilding, the Japanese knee mortar (bottom right) pops a grenade towards Kozerski's BAR team (top left)...
WHAM!!! Kozerski's BAR team (center bottom, with Captain Moon at top right) flinches at the enemy round lands short (top left).
While the rest of the enemy base of fire element (bottom right) fires on Sgt Spielman's rifle team (top left)...
Sgt Spielman is struck in the pelvis by a .25-caliber round and goes down, out of the fight! Pvt Jennings, one of the old hands from the Philippines, takes command of the rifle team (center).
*To be honest, I know there are supposed to be penalties if the leader goes down, but I'm not sure what's supposed to happen... From my standpoint, if a leader goes down, it's next man up, so that's what I'm rolling with, I'll have to look it up later.
Back on the Japanese side, things are busy at the outbuilding (bottom left), while the Japanese 1st Squad leader gets his men up onto the knoll at top right. The Japanese platoon leader is still hanging out behind the outbuilding.
*To be honest, I don't really know what I'm supposed to do with platoon commanders/leaders/ sergeants, other than use them to swap out Command Dice. I need to look that up, too.
And while that's happening (the Japanese rifle team is just off camera at top center), Sgt Thomas pushes his rifle team up to the road (left, from bottom right) on the Marine far left.
The Japanese base of fire team (bottom right) keeps pouring fire into 3rd Squad's rifle team (top left), but their LMG jams and a rifleman needs to reload!
Then the knee mortar pops another grenade at 1st Squad's BAR team (top left, with their rifle team at top center)...
WHAM!!! That round went a little long; Kozerski's team (center) needs to get the hell outta there, they've been bracketed!
On the right, Cpl Moore moves 3r Squad's BAR team up to the crest (left; that hedge is just there to mark the crest, it's not there as cover).
While on the far right, Cpl Brown gets the machine gun up into position, but it's not ready yet.
Captain Moon dashes up to 3rd Squad's rifle team (center right, from bottom left), where he begins rallying the boys, who aren't taking it so good with their Sergeant down and all...
Time to reshuffle again, now it's Turn 3 and the Japanese reinforcements are coming.
Captain Moon (center, with 3rd Squad's BAR team just visible at top left) relieves Pvt Jennings of command...
And leads 3rd Squad's rifle team off the knoll, down into the jungle (top center).
Apparently I missed a photo: on the far right, Cpl Brown's men get the machine gun set up and ready for action, and on the far left, Sgt Thomas gets 1st Squad's rifle team across the road.
While the Japanese at the outbuilding (bottom right) unjam the light machine gun and their rifleman continue firing on Captain Moon and 3rd Squad's rifle team (top left, with their BAR team on the knoll at top center), pinning Jennings.
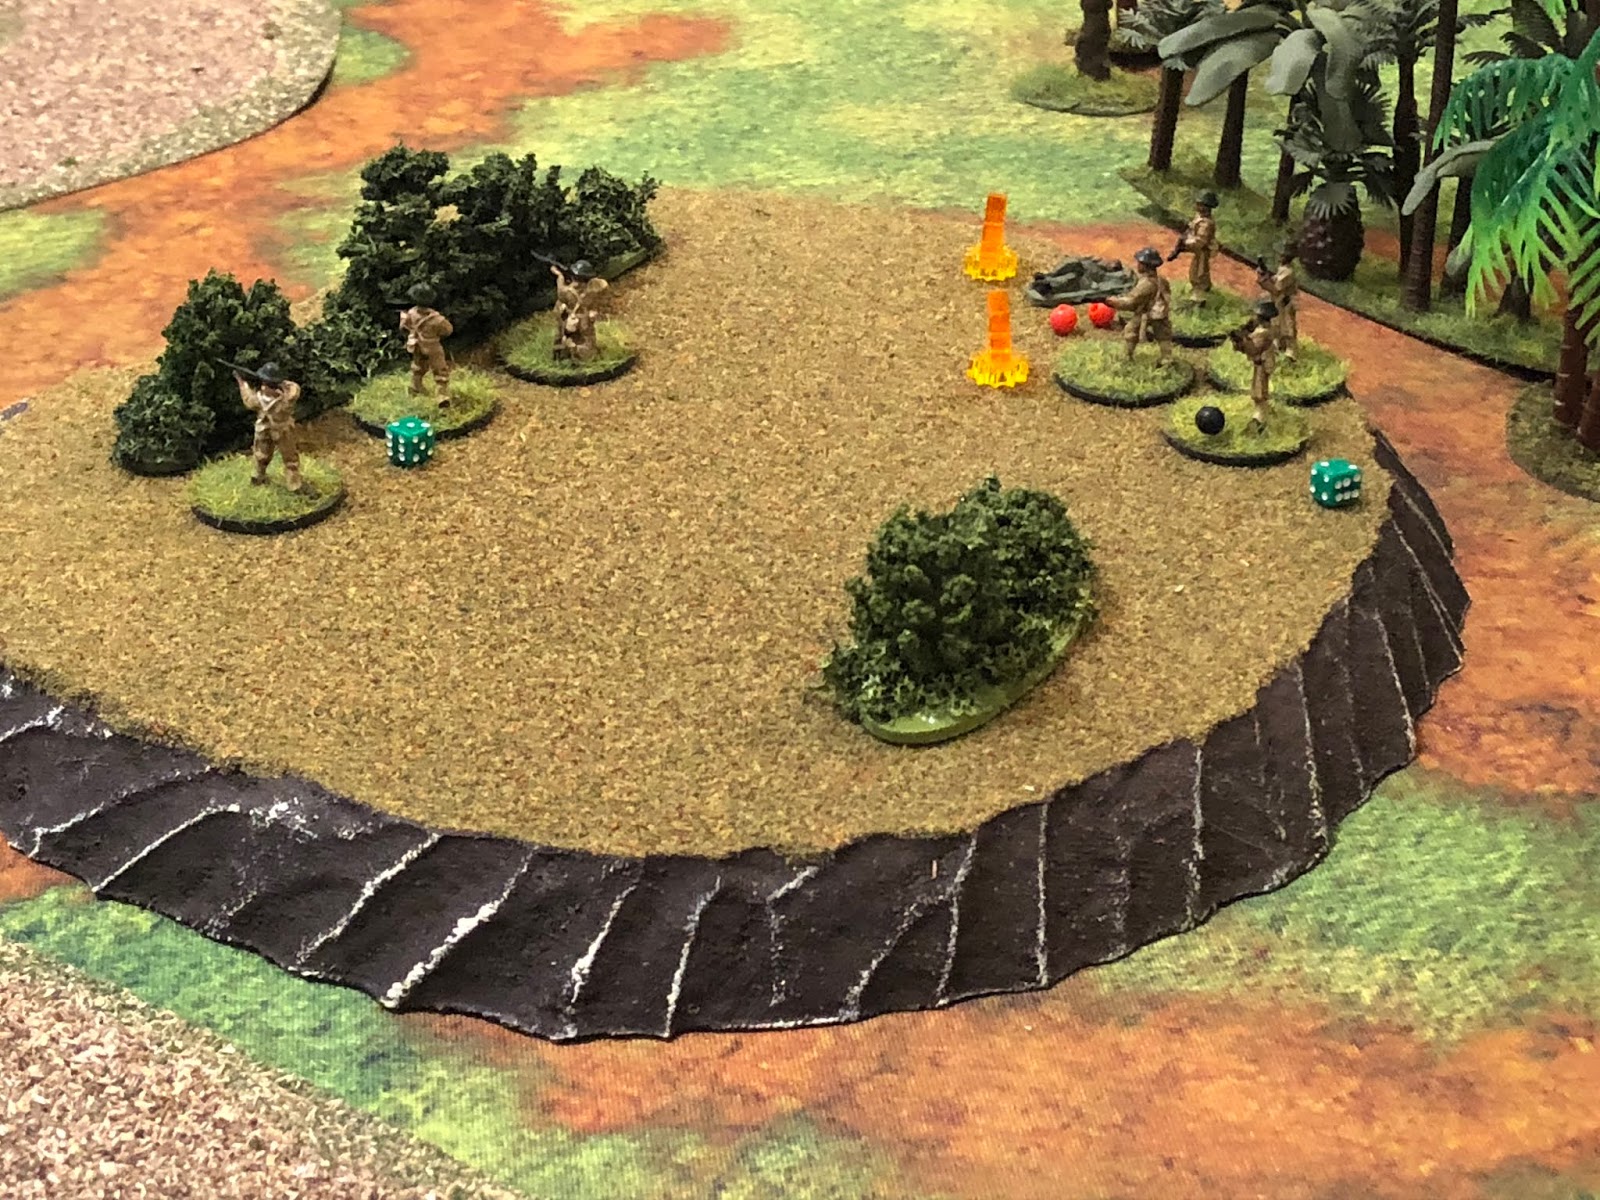
The Japanese knee mortar fires again, but it's fouled!!! There's a sick 'cough,' the round barely leaves the barrel and flops to earth 10 yards from the outbuilding. The gunner calls out 'short round' and his comrades reflexively hit the deck...
He (bottom right) immediately clears the tube and runs a bore brush through it, and he's ready to go again, as the riflemen and Type 96 shift fire from 3rd Squad's rifle team (top left) to 3rd Squad's BAR team (top center)...
Rounds snap by, pinning Cpl Moore (center) and Robertson (right), and then Cpl Moore lets out a yelp: he's hit in the right arm!
In the northeast, the Japanese reinforcements begin to arrive: under the nose of the Marine MG team (top left, with 3rd Squad at top center, the Japanese outbuilding behind the trees at far right), the Japanese 2nd Squad's base of fire element moves up (center, from bottom center).
Having been bracketed by the knee mortar (top center right) and witnessed the short round, Kozerski orders 1st Squad's BAR team to get up and sprint ahead (left, from the bush at bottom center, with 1st Squad's rifle team at top left and 3rd Squad's BAR team at far right).
On the Marine far right, Cpl Brown's machine gun (bottom center) finally gets into the fight. He rips off a long burst at the Japanese outbuilding (top center), pinning the enemy light machine gunner.
It's funny, I'm kinda scared to shoot with the damn thing, absolutely sure I'm going to get the 'out of ammo' card. Which comes up right after he shoots; the ammo carrier needs to reload.
Back in the center, Cpl Moore succumbs to his wounds (bottom center)!!! He was hit in the arm and stayed in the fight, but he didn't notice the round had severed a major artery and he bled out. Cofer rallies off his pin (right), while Cofer lets out a yell and cuts loose with the BAR (left), hitting nothing...
That was a damn dirty trick: because Cpl Moore had been wounded the team had to check morale, and the card I pulled was "It's worse than we thought, a random wounded figure dies of his wounds"!!!
The Japanese LMG gunner (yellow bead) rallies and a rifleman reloads, just in time for one of Cofer's rounds to get on target: the round hits the Japanese soldier in the head, killing him instantly!
On the Japanese far left, their 2nd Squad's rifle team moves up (top center right) to join their base of fire team.
While on the Japanese far right, their squad leader takes a calculated risk: atop the knoll at right, he wants to push his men onto the knoll at left, to cut off the approaching Americans (1st Squad's rifle team, under Sgt Thomas, visible at top left). He orders his men forward, and they go charging quickly down the hill, but they reach the bottom of the hill and the ground is broken, much rougher than they expected, slowing them down tremendously!
And is countered by Sgt Thomas taking his own calculated risk, which pays off: Sgt Thomas pushes his Marines up on top of the small knoll (left, with the Japanese rifle team just visible above them, the Japanese outbuilding is at top right)...
Sgt Thomas' boys are nose to nose with the Japanese riflemen!
With the impending showdown between Sgt Thomas and the Japanese rifle team at top left, Kozerski leads 1st Squad's BAR team forward to support (center left, from bottom left, with 3rd Squad's BAR team just visible at far right, firing on the Japanese outbuilding at top right).
On the Japanese far left, their 2nd Squad's base of fire team moves up on top of the hill (center, from bottom center). But the trainwreck on their far right will wait no longer...
Sgt Thomas and his boys open fire at point blank range! The riflemen cycle the bolt on their Springfield's as fast as they can, while Sgt Thomas' Tommy Gun hammers away, spitting .45-caliber slugs...
Two Japanese are knocked out of the fight, while the remaining three are wounded!
*Every single shot hit, not a single miss, with one man being hit twice, wounded then killed. The Japanese have racked up a slew of morale markers, but rather than make them check know, I let them do the Japanese thing. You know, CHARGE!!!
The Japanese Sergeant, though struck in the chest, screams "banzaii!!!!" and leads his men up the knoll into close combat with Sgt Thomas and his Marines!!!
Where they are quickly cut down!
*I screwed up the rules here (and in future close combats): when a guy lost a melee I put him out of the fight, when what I was supposed to do was draw a card and see what happened to him...
Unware of the calamity that just occurred on their far right (Sgt Thomas' men are on the knoll at top right), the Japanese light machine gunner in the outbuilding (bottom center) unpins and fires on 3rd Squad's BAR team (top left, with 1st Squad's BAR team in the bushes above the crossroads, top center), pinning Cofer, the automatic rifleman.
With the Japanese base of fire team (top center) occupied with 3rd Squad (off camera to far right), Sgt Thomas rushes his men down off the knoll, straight at the Japanese outbuilding (center, from bottom center)!
While on the Japanese far left, their 2nd Squad is listening to the sounds of the battle and has deduced things aren't going well on the right. They had wanted to move up (left) and engage the Yankee machine gun, but it was apparent the outbuilding (just visible above the trees, at top center) was being threatened, so both 2nd Squad teams moved right (base of fire team at center left, rifle team at far right).
In the center, the Japanese spot Sgt Thomas' Marines (top). A rifleman fires and misses while the light machine gunner moves right to engage. The knee mortar holds fast (bottom center right).
Because he's spotted Kozerski and the rest of 1st Squad's BAR team creeping around the crossroads. The Japanese mortarman pops another round off...
And this time puts the round right on the money! All three Marines are knocked silly, and all three are lightly wounded: Kozerski is hit by shrapnel in the left arm, the BAR man, Munoz, is hit in the left arm, and the assistant, Gray, is hit in the left leg.
Back at the outbuilding, the Japanese officer takes off to the right (right, from bottom center), moving on Sgt Thomas and his Marines (top center)...
The Japanese platoon leaders screams and raises his sword in a double-handed grip, dashing at Sgt Thomas...
Who calmly guns him down.
On the Marine far right, Mathews slaps a new belt of ammo into the gun and Cpl Brown depresses the trigger, firing on the outbuilding (top center), and then the gun jams...
Sgt Thomas and his men hold up and fire into the Japanese base of fire element at the outbuilding, pinning the Japanese LMG gunner and hitting the rifleman in the arm.
While back in the center, Kozerski, Munoz, and Gray snap out of their stupor, hop to their feet, and dash to the rear, diving for cover behind a nearby knoll (bottom center, from the knee mortar explosion at top center)!
Pvt Mitchell pops away at the outbuilding with his Springfield as Cpl Brown clears the machine gun and gets it back into action.
On the Japanese left, the 2nd Squad's base of fire element (far left) looks on at the action boiling over at the outbuilding (top center) as their Sergeant leads the rifle element forward (center right, from bottom center). They're desperately trying to get up to help their comrades in the outbuilding, but the three remaining Japanese soldiers there are feeling the situation is hopeless...
So they hop the wall and charge Sgt Thomas and his Marines!
Sgt Thomas (center top) puts the Japanese light machine gunner out of the fight, and Privates White and Blades (center and the guy just below him) do the same to the knee mortarman, but the Japanese rifleman, despite being wounded, rushes forward, plunging his bayonet into Walter's chest, knocking him out of the fight and driving Sanders back (top left, from center)!
Sgt Thomas moves to shore up the breach...
And ends his second banzai charge of the day.
But then the young Sergeant, his blood up, spots the approaching Japanese rifle team (top left) and makes a huuuuuuuuuge mistake! He lets out a cry of "follow me!" and dashes left (left, from bottom left), never even seeing the Japanese base of fire element at top right...
Meanwhile, in the Marine center, the remains of 3rd Squad's BAR team rallies and reloads...
As Captain Moon leads 3rd Squad's rifle team forward (center right, from bottom left, with their BAR team at bottom center and Sgt Thomas' men at top left). But that enemy base of fire element just visible on the hill at top center right, between the two patches of jungle), perfectly positioned to support their rifle element (top left, just above the outbuilding)...
Draws a bead on Sgt Thomas and his men, and opens fire into their flank...
Sgt Thomas (black bead at center top) is hit in the left arm as Sanders is hit in the chest and goes down.
Sgt Thomas grabs Sanders and they all fall back (bottom center/left, from center left), but cover is hard to come by...
Cpl Brown can see the fight has passed him by, so he packs up the gun and they dash forward (center, from bottom center, with Captain Moon and 3rd Squad's rifle team moving up at left, towards the outbuilding, top left).
On the backside of the outbuilding, the Japanese rifle team moves up over the hedge, looking to get at Sgt Thomas and his beat up team (top center)...
Sgt Thomas (blue bead) screams "up and at'em boys!" but White and Blades are a bit shaken up (yellow beads; this was the first time I tried to do reaction firing, and those two knucklheads both got 5s, meaning they not only didn't get to act, but they were now stunned!!!). Sgt White opens fire with his Thompson, but it jams!!!!
*You've gotta be friggin' #$%@ing me!!! Of course I'm not really mad, I live for this kind of crazy stuff. Now I will admit to cheating just a bit here: at this point close combat is inevitable, and, due to his prior performance this morning, I decide to give Sgt Thomas a modest +1 modifier in close combat (in addition to all the 'normal' modifiers), though I will admit to cheating a little bit more: he's got a submachine gun, which is a 'best weapon' and gets a +2 in close combat. I did give him the -1 for being wounded, but I still gave him the +2 for the SMG, even though it just jammed. In my mind he started shooting, it jammed, the Japanese kept running, and he cleared it right as the clash of bodies occurred.

The Japanese close with the worn out Marines. Pvt Blades (top center right) finds himself squaring off against two Japanese soldiers and goes down, bayoneted in the face! Sgt Thomas also finds himself (center top) facing two enemy soldiers, but he parries a bayonet and gives a Japanese soldier a burst in the chest from his Tommy Gun, dropping him and causing the other to fall back! Lastly, Pvt White (top left) is mano a mano and defeats his antagonist!
Sgt Thomas (center) and Pvt White (bottom right), bloody and exhausted, look left at the two Japanese soldiers continuing to bayonet Pvt Blades, while a Japanese soldier cowers at top center...
Sgt Thomas and Pvt White charge the two remaining Japanese!
Sgt White eliminates the enemy he was facing, while Pvt White manages to wound his opponent (I finally did it right!) in the left leg, and he fell back.
With Sgt Thomas and Pvt White barely holding on at the outbuilding (top left), Cofer gets 3rd Squad's BAR into action (bottom center) against the Japanese base of fire element (on the hill at top center right), hitting an enemy rifleman in the right arm, as Captain Moon (far right)...
Leads 3rd Squad's rifle team forward (bottom center). Their appearance is enough to convince the Japanese (top center and off camera to top left)...
To fall back (top left and top right, with Captain Moon barely visible at bottom right and Sgt Thomas and Pvt White at bottom left)!
So what can I say except, wow, what a fight!!! The rules were pretty easy to follow; I think I didn't screw too much up. I fixed the close combat casualty thing (finally), though I think I like my way better (you lose, you're out of the fight, or Incapacitated in the Combat Patrol terms). I need to look up leaders and losing leaders, and also pinning (1st Squad's BAR team was hit by the knee mortar and the morale check ordered them to fall back and be pinned). I think being pinned means you only activate on black numbers, not red numbers, and I think the only way to rally is a black 6, but I need to look to make sure there's nothing else.
Do the rules do what they say they do? Yeah, I think they do. It was a lot of fun, plenty of drama, and man was there ever friction! I had plenty of 'friction' problems. Sorry I didn't spell all of them out in the write up, but plenty: like the last Japanese charge. The Japanese move up through the hedge, I think we're going to get a shot off at them, but no, reshuffle and they activate first, so I'm stuck trying to react fire, then I get stun, stun, jam! The biggest pisser of the day was my damn machine gun, which didn't do crap the whole game. It took a lot of time just to get him set up and in the fight, then he fired and didn't do hardly anything, then it jammed, then the fight had turned and it was out of position, game over.
But the double blind activation with variable movement and the reshuffle card is crazy; I don't want to whine, but it might actually be too much friction (there are rules in the advanced section to help you back off some of the friction). I mean it's crazy, there's no telling what's about to happen, though I will say I made ample use of the platoon leader's ability to swap Command Dice out with other teams. So, after only one game, I'm not ready to start messing with the activation system yet, I'll play the 'regular' way for a bit. But I've got to figure out something else for the various leaders (platoon commander/leader/sergeant) to do other than swap out dice.
And the game is plenty violent; the platoon suffered horrendously:
Corporal Moore, shot in the arm, bled to death.
Private Blades, set upon by two enemy soldiers in close combat at the outbuilding, was stabbed multiple times in the face, neck, and chest, leaving him paralyzed on his left side, treated and medically discharged from the Marine Corps.
Private Walter, stabbed in the chest, suffered heart valve damage and was treated then medically discharged from the Marine Corps.
Private Sanders was shot in the chest and required evacuation to Australia.
Sergeant Spielman was shot in the pelvis and required evacuation to Australia.
Sergeant Thomas was shot in the arm, and PFC Kozerski, Pvt Munoz, and Pvt Gray all took some shrapnel from the Japanese knee mortar, but all were able to stay in the line and continue fighting. But for all the pain and heartache, there were also two Marines that distinguished themselves.
Sergeant Eric Thomas, of New Orleans, Louisiana, a 28-year old veteran of ten years of service, was awarded the Navy Cross for leading the assault to take the objective, withstanding three close assaults by enemy infantry, and, when his position became overextended, personally led the withdrawal in an orderly fashion, evacuating the wounded.
Private Lorenzo White, of Lansing, Michigan, a 20 year old with less than two years of service, was awarded the Bronze Star with 'V' for valor, displaying gallantry above the call of duty in the assault on the enemy held outbuilding. He was also meritoriously promoted to Corporal.
The fight was finished at approximately 0920, and not long after Sgt Carlson showed up with 2nd Squad, Cpl Bussey (the sniper), and the 60mm mortar team. "Cody, what the hell are you doing here?" "Sir, first a British Major showed up and told me to take the rest of the platoon south. I told him to stow it, I wasn't going to leave you guys hung out to dry. So then some Dutch Colonel comes by and tries the same thing, and I give him the same answer. So he tells me to get up here and join you."
Captain Moon quickly explained the situation: they'd pushed the Japanese back in the local area, but they were indeed paratroopers, and had landed all over the place. Sgt Carlson told him there was worse news: he'd overheard some of the British pilots saying the Japanese were moving barges up the river and conducting an amphibious landing. "Everybody's budding out, Sir. That Dutch Colonel told us they're evacuating to the south, gonna try to get to Java, and they need all the infantry to hold the door open as long as possible."
"Well Cody, we'll do what we can. But we didn't get bagged in the Philippines, and I have no intention of getting bagged in Sumatra, either!"
V/R,
Jack


Great game report- loved reading it. Lovely table set up too.
ReplyDeleteCheers,
Pete.
Thanks Pete, I'm glad you liked it! The next one should be posted tomorrow.
DeleteV/R,
Jack
Great report, loved following it. There did seem a lot of friction, but on the whole that was a very positive thing. The machine-gun never coming into action is just the kind of thing that can happen, on occasion - as did the unexpected bleed out. I wasn't really looking for some new rules either, but this has piqued my interest.
ReplyDeleteA half-comment / half-question: with the Japanese "Banzai!" charge, I had always got the impression that it was more premeditated than that i.e. the Japanese officer had to prepare and organize it. I wonder if it would be more appropriate for them to just freeze and fight where they are. Like I say, I am hardly an expect on this, that was just more the impression that I got. Marshall's "Sake Night" (regardless of what you think of his more controversial stuff) had a big element of this.
And I would totally have left Sgt Thomas to fight himself out of it with his bare hands (if he could)...
Excellent stuff!
John,
DeleteYes, friction galore, with more to come in the next batrep. Regarding the massed banzai charges, I know what you mean and agree, so perhaps it’s unfair to label what is happening on my table as a banzai charge.
I’m not talking about the massed, ‘everyone that can still walk’ attacks like on Tarawa or Saipan, I’m just getting at the Japanese inclination (based on their training and doctrine) to close with the enemy, close assault first and ask questions later.
And Sgt Thomas was quite a stud, wasn’t he? Well, no more than your average Marine ;)
V/R,
Jack
Oh, a very small point, but although the "marker" terrain looks really nice, I'd prefer it to be smaller so I can tell which terrain on the table is genuinely cover and which is for the aesthetic only.
ReplyDeleteYeah, I think I confused myself in some cases!
DeleteV/R,
Jack
Hello Jack,
ReplyDeleteYou play so many new rules! I have heard only positive things about Combat Patrol and it certainly sounds like it produces some good friction that drives a great narrative. As a very card driven system to drive friction, it is a bit different to something like 5MaK or NUTS! that relies on reaction to drive the narrative. At the moment sit in the middle and like card driven to help with activation - IABSM is the best example of what I like and my own activation system is based on that. But I am torn as I also really like the NUTS! reaction system (and I use the reaction driven system for my ancient rules). so for man to man (up to 10 soldiers on a side) I seem to be drawn to reactions like NUTS and for higher levels i prefer something like IABSM. I am still working in the background on how to provide limited reactions into a IABSM type game...
Shaun,
DeleteWell, not too many, the vast majority of my games are still 5Core,but now that you mention, the past couple years has seen quite an expansion: Lacquered Coffins for airgaming, some sea fights with an adaptation of Ivan’s Unity Field Agent, and then ground fights with Hell Hath No Fury and now What a Tanker, a return to Ambush Alley, then newcomers SOF Warrior, No End in Sight, and now Combat Patrol.
Oh, and a couple games of (simplified/modified) IABSM. We really enjoyed those two games, but they were so big and took so long. I really like the command and control mechanics at that level though.
But I still stand by my statement that Bolt Action-style activation (a card per unit, but not tied to units, the player decides which to activate) is just as realistic in terms of friction, it’s just a choice of how much do you want.
NUTS! Is still up there on the “an interesting concept that I need to figure out how to simplify” list.
V/R,
Jack
So you do play with quite a few rules. i must admit that after saying IABSM is the gold standard, I actually prefer it when a card indicates what side activates rather than a particular unit. So not really IABSM then....
DeleteI have NUTS Big Battles that I have been looking at recently (1 stand - 1 squad) and it is like a simplified NUTS! and could easily be used with for 1:1 games rather than the 1=1 squad. I have it on my to do list as it may be just the thing to do rather than use my own rules for 1:1 that attempted to simplify the original NUTS!
Yeah, when I counted them up it was more than I expected. We had some real fun with IABSM, but Bolt Action style is definitely my preference, and NUTS! remains an enigma, and it’s hard to force my way through it because 1) I’m not sure I’ll ever get to a truly fast (by my standards) game, and 2) there are so many other good rule sets out there it’s hard to justify spending so much time trying to figure one set out.
DeleteIn any case, ya need to get back to my email, I want to talk more about your 4 x 3 game!
V/R,
Jack
I agree on that there are so many good rules out there. You certainly do a great job in actually playing them though.
DeleteI haven't got back to your email as I am still trying to find the time to actually play a game before I respond!
Well, hurry up then!!! ;)
DeleteBut I know how you feel, no time for games the past two weekends, though, to be fair, I have gotten quite a bit of prepping and painting done.
V/R,
Jack
More brilliance Jack! A great tale, well told.
ReplyDeleteThanks man, I'm glad you liked it.
DeleteV/R,
Jack