All,
0715 local time
4 June 1942
Midway
It's 4 June 1942, the dawn of the epic "Battle of Midway," a clash of giants, three US carriers vs four Japanese carriers that proved to be the turning point of the war in the Pacific. For more information, both real-life and how I'm running this campaign, please check here:
https://oldleadbreed.blogspot.com/2019/11/battle-of-midway-campaign-plan.html
Yesterday at 0900 a US Navy PBY Catalina spotted Japanese ships 500nm west southwest of Midway; B-17s from the island were dispatched but failed to hit anything. US Navy PBYs continued to shadow the Japanese surface force, and actually attacked at 0100 this morning, scoring a torpedo hit on a Japanese merchant ship. Unbeknownst to US personnel, the Japanese carrier task force, as yet still unspotted, launched its first strike group against Midway at 0430. At 0530, the PBYs spotted the Japanese carriers, and noted their strike group inbound.
At 0610 the VMF-343 "Dirt Divers" scrambled six F4F Wildcats to intercept an inbound group of six D3A "Val" dive bombers escorted by four A6M "Zeros," but were roughly handled, having three Wildcats shot down and the other three damaged, as the Japanese lost one Zero and one Val. The Japanese aerial attack caused 18/30 damage points.
At 0625 Captain Haynes led six Wildcats to intercept an inbound group of six B5N "Kate" torpedo bombers escorted by four A6M "Zeros." Again it was rough: the Marines lost five of six aircraft, with one pilot KIA, one MIA, and two WIA, while the Japanese lost four of their six torpedo bombers, which did light damage to Midway's shore installations (26/30, total).
At 0645 Major Chandler led four Dirt Divers in escort of a flight of six TBF torpedo bombers to attack the Japanese carriers, running right into the Japanese CAP of six Zeros, and it was a debacle: the Americans lost one Wildcat and five TBFs, the last being damaged and forced to return to base without even spotting the Japanese carriers. Oh, and the Japanese did lose two Zeros, but they were both to the TBFs!!!
It's now 0715, and 2nd Lt Herman is leading a flight of four Wildcats in escort of six SBD Dauntless dive bombers from Marine Scouting-Bombing Squadron 241 (VMSB-241), up against six Zeros of the Japanese Combat Air Patrol.
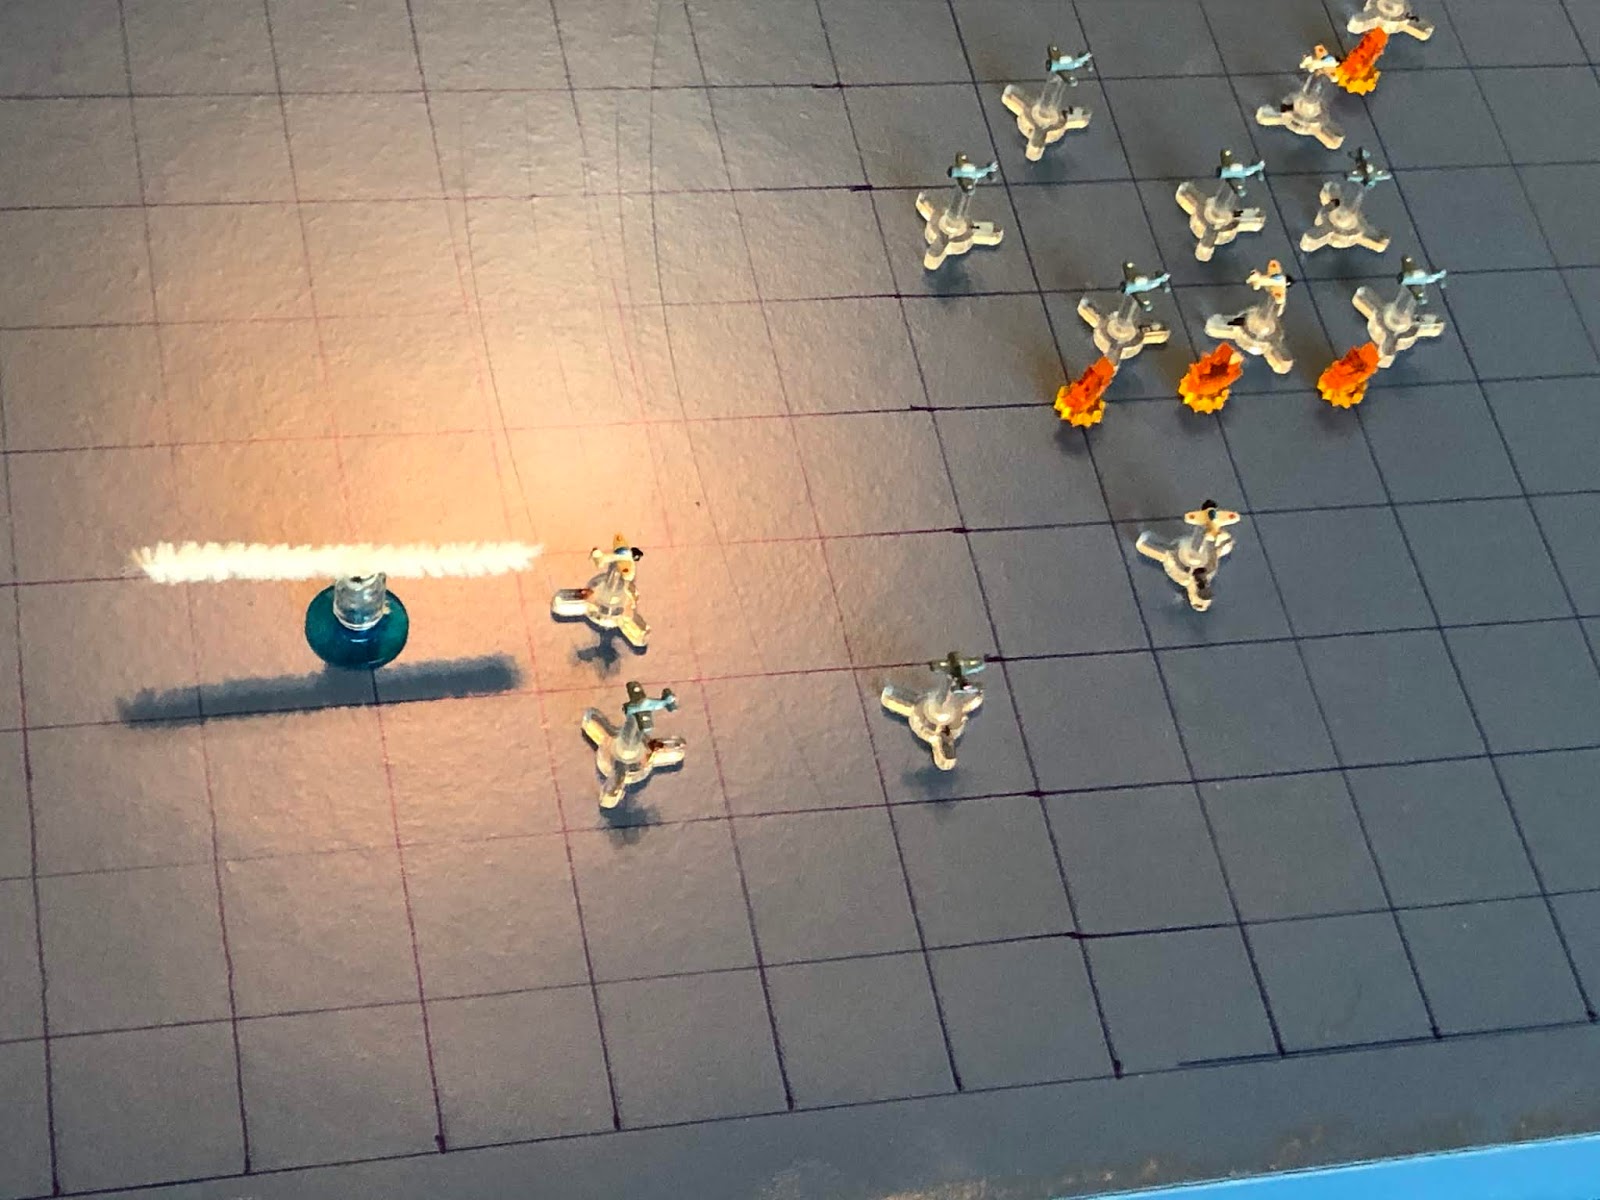
This is my arena for aerial combat; simple, yet durable and, to me, beautiful (in a simple, durable way). I'm using tiny aircraft designed by my buddy Thomaston; not sure what size they are, just that they are much smaller than 1/600. They're 3D printed models that I mounted on cut-down bases from Litko, and I'm using a very simple rules system called "Battle of Britain," which I found for free over on The Miniatures Page (I've already played a good 20 or so fights with them). Left is north, with the Japanese strike group there, and the American interceptors at right.
The US strike group, from top to bottom:
2nd Lt Stroud, a Rookie on his first combat mission
2nd Lt Herman,
a Regular with no kills on his first sortie
Dauntless 02
Dauntless 05
Dauntless 01
Dauntless 04
Dauntless 03
Dauntless 06
2nd Lt Higbe, a Regular with no kills on his second sortie
2nd Lt Cross, a Rookie on his first combat mission
My SBD Dauntlesses, so pretty. I've been in love with the shape of that aircraft since I was a kid.
The Japanese CAP, from top:
Zero 03, a Veteran
Zero 01, an Ace
Zero 02, a Veteran
Zero 06, a Rookie
Zero 04, a Rookie
Zero 05, a Rookie
Of course, I start the fight off right by missing a picture:
We fast forward through the first three turns in order to bring you straight into the action. Time to fight!
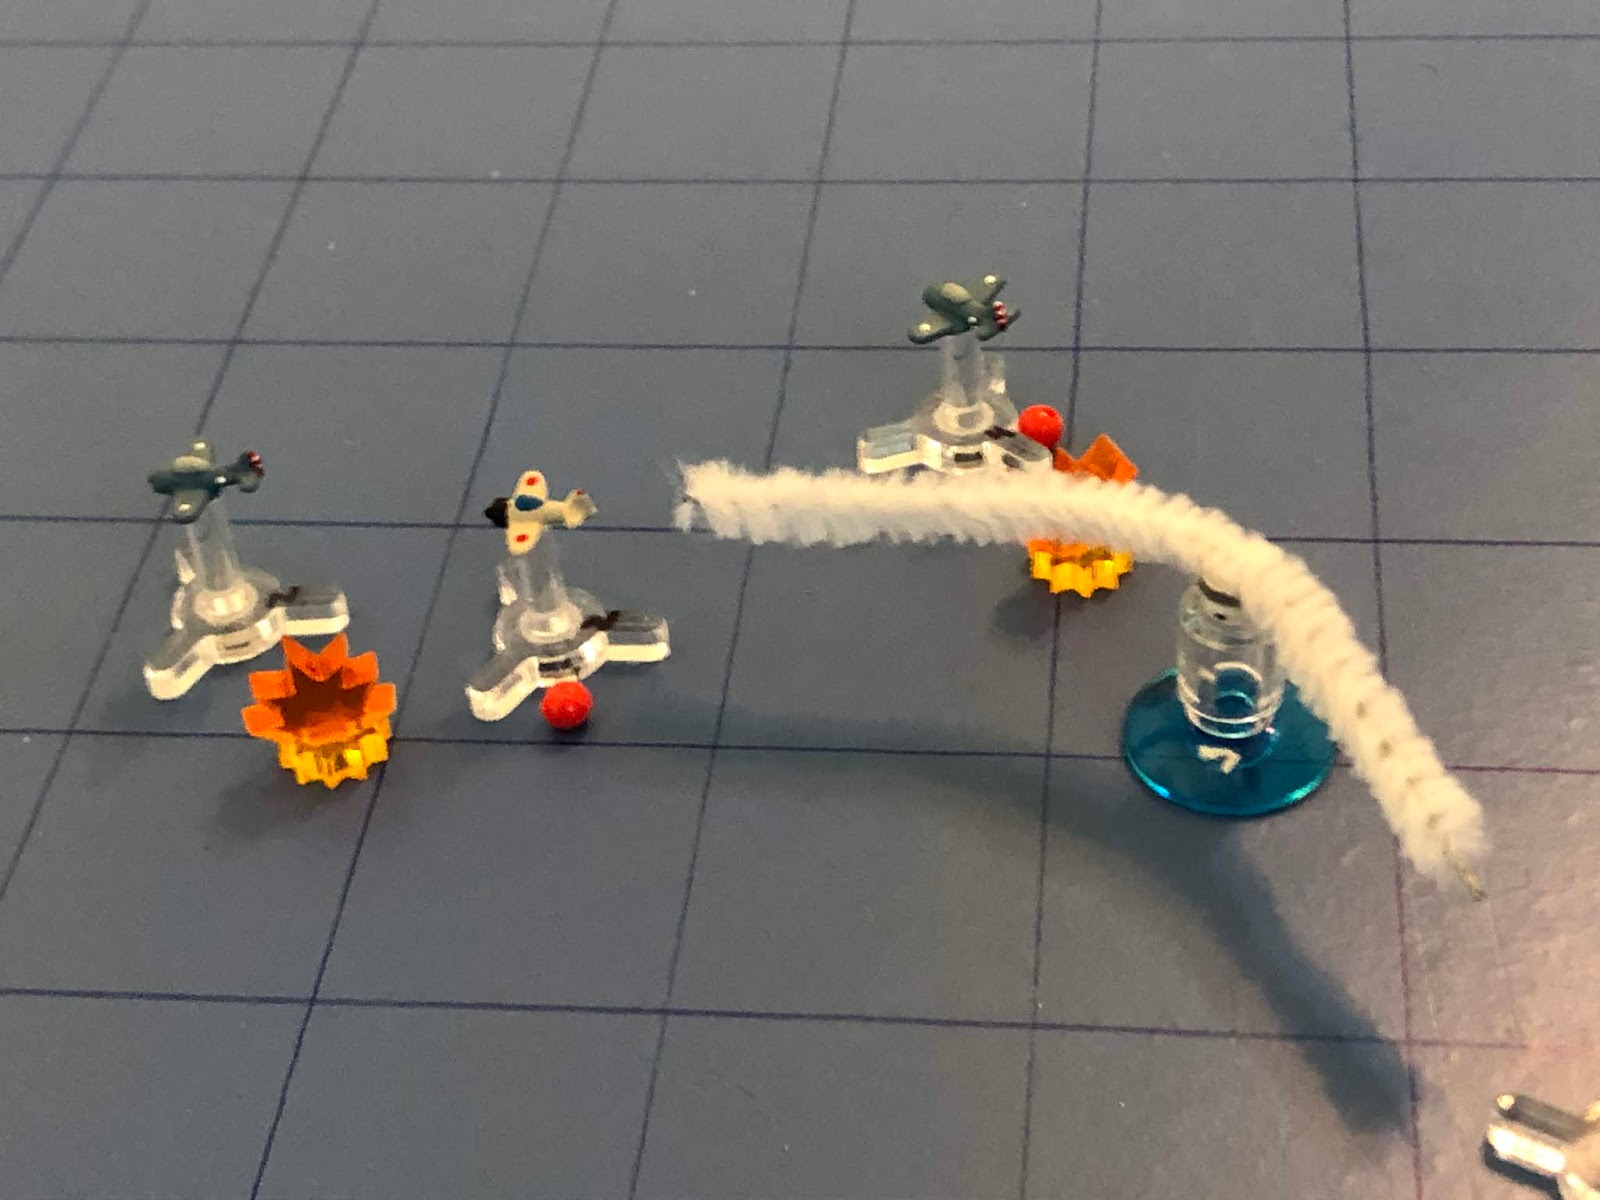
Which brings us to right here: Lt Herman loops in and takes a front quarter deflection shot on Zero 03. The Wildcat's .50-cal MGs roar...
The Zero's wing comes off and the fighter plunges into the deep, blue sea! Lt Herman pats himself on the back and comes left.
Lt Stroud pulls a lazy left to get between the Zeros and Dauntlesses, but doesn't really go anywhere...
Lt Higbe charges straight in, with two Zeros closing...
As his wingman, Lt Cross, works to catch up.
The Japanese, as usual, are extraordinarily aggressive: Zero 02 comes up, then right, and fires on Dauntless 01...
The veteran Japanese pilot misses, then cuts left and goes head to head with Dauntless 02. Both pilots fire, but both pilots miss.
Zero 01 cruises straight and level, keeping an eye on the killer, Lt Herman (top center right, with Lt Stroud behind him).
Zero 06 pulls up.
As Zero 04 loops around and takes a front quarter deflection shot on Lt Higbe, and misses.
While his partner, Zero 05, attempts the same maneuver on Lt Cross, but he misses, too!
The SBDs move up their 1st step, which sees Dauntless 01's tail gunner fire on Zero 02, missing.
And the SBDs' 2nd step sees Dauntless 05 cut right to avoid Zero 02.
*The only time bombers are allowed to maneuver is if their movement is going to have them end on a square that is occupied by another aircraft.
And the 3rd step sees Dauntless 04's tail gunner take a shot at Zero 02, but he misses also.
Lt Stroud cuts hard left and takes a full deflection shot on Zero 02...
But he misses and flashes past.
As Lt Herman pushes ahead, eyeballing the enemy Ace, Zero 01 (top left).
Lt Cross comes hard right, across Zero 04's face, defensive.
Spoiling Lt Higbe's shot on the Japanese fighter, so he pushes past, looking at Zero 06 (far left), and hoping Zero 05 (bottom right) doesn't get too infatuated with his tail.
He doesn't, he wants the bombers: Zero 05 cuts left, looking to get into position.
As Zero 04 comes left and takes a front quarter deflection shot on Dauntless 03...
The Japanese rookie pilot misses and comes right, but now he finds himself taking fire from Dauntless 03's tail gunner (left) and head to head with Dauntless 06, with tracers coming at him! He grits his teeth and squeezes the trigger, but everyone misses!
Zero 06 pulls straight in, even with Lt Higbe, defensive.
The SBDs move up, taking a couple defensive fire shots, but missing each time.
As Lt Cross gets a wild hair up his ass and cuts hard left into Zero 06, going head to head! Both pilots open fire...
And Lt Cross has his first kill of the war!
Lt Higbe pulls right around him, with Lt Cross constantly seeming to screw up his shots and maneuvers.
Lt Stroud sputters straight and level with three Zeros all over him, probably just sealed his fate.
Because his wingman, Lt Herman, is way out front, dancing with the enemy Ace, Zero 01.
But Zero 01 isn't impressed; he jinks in and opens fire on Dauntless 01, leaving Lt Herman in his dust (top left).
Zero 01 misses Dauntless 01, but cuts left and goes head to head with Dauntless 02, but somehow both pilots miss!!!
While at the bottom, Zero 02 doesn't have enough energy to get back around on the bombers (top), so he cuts right onto Lt Stroud's tail and opens fire, but he only manages to damage the sturdy Wildcat!
As Zero 05 cuts left onto Lt Cross's tail and fires him up, but he is also only damaged!
And Zero 04 comes left, but can't line up a shot on Dauntless 05.
As the Marine dive bombers keep pushing north. Dauntless 01's tail gunner (far left) fires on the Japanese Ace...
But misses, so they keep moving, and now it's Dauntless 02's turn to have his tail gunner open fire on Zero 01...
And this time the Japanese Ace is swept from the sky by the twin .30-cal MGs of Dauntless 02's tail gunner!!!
Lt Stroud's Wildcat is pretty shot up, he has to return to base.
Lt Cross, too. The Marine fighter complement just got cut in half, facing three Zeros.
Lt Herman hooks back in to help the bombers.
And Lt Higbe hooks right.
Zero 04 comes left onto Dauntless 05's tail, braving fire from its tail gunner...
But the Japanese pilot is victorious, sending the Dauntless careening into the ocean.
Zero 02 gets a little wild, coming hard right and going head to head with Lt Higbe. Both pilots open fire...
But both pilots miss, as Zero 05 sputters past them, giggling at their lack of marksmanship skills...
The Marine Dauntlesses push north, the first Japanese carrier finally coming into sight!
As the two damaged Wildcats (Lieutenants Stroud and Cross) push for home.
Lt Herman continues to take his sweet-ass time getting back into the fight. Really riding on the tails of that early kill, ain't ya buddy?
But Lt Higbe pulls a brilliant maneuver to reverse course and turn the tables on his would-be assailants.
Zero 04 sputters ahead, happy about his first kill, but a little wary of Lt Herman (top center).
Zero 05 isn't worried about Lt Higbe (bottom right), he charges right in on Dauntless 06's tail. The two exchange fire...
But no one is hit as the Zero flashes past, ending up between Dauntless 06 and Dauntless 03, taking defensive fire from both. The Japanese pilot screams as he stands on the triggers...
And Dauntless 03 goes down under the pounding of 20mm shells.
Zero 02 comes left onto Dauntless 04's tail, lining up a perfect shot. The Japanese pilot and the American tail gunner both open fire, and both aircraft are damaged!
The SBDs continue pushing north, with Dauntless 04's tail gunner firing on Zero 05...
The Japanese Zero is struck by fire from the twin .30-cal MGs and goes down, as the Dauntlesses complete their movement!
*Two games in a row where the bombers get two kills? Wowsers… Also I checked the damaged Dauntless 04 and he's okay, staying in the fight.
Lt Herman continues dancing around, not really accomplishing anything...
As Lt Higbe gives chase on Zero 02 (center, damaged with red bead), opening his tail up to Zero 04 (bottom right).
Zero 02 tests, and his aircraft is okay, he's staying in the fight! He charges straight in on Dauntless 04, both fire...
And both miss, as he pushes his damaged Zero forward, firing on Dauntless 01 as he takes defensive fire from fore and aft...
And the Japanese Veteran splashes Dauntless 01.
Zero 04 can't get a shot on Lt Herman (center) or Lt Higbe (bottom center), so he comes left, defensive.
The SBDs push north, missing some defensive fire on Zero 02 (center top). One of the Dauntlesses had been forced to break formation and has ended up all the way at the bottom (bottom center), trying his best to stay away from the Japanese fighters.
Lt Herman comes right, but he can't catch up to the damaged Zero 02 (center top), and now he's gotta worry about Zero 04 (center bottom, with Lt Higbe below him).
Lt Higbe sputters away, straight and level.
*This is patently ridiculous, both Marine Regulars have been terrible, minus Lt Herman's lucky shot right at the beginning of the fight.
Zero 04 can't reach the US dive bombers, so he cuts right and goes after Lt Herman...
Lt Herman's Wildcat is hit and damaged, and Zero 04 cuts back to the left. Not exactly sure why he did that, rather than pull straight ahead. I guess he figures Zero 02 (just above him) can get the two SBDs up there, and he can go after the one at far left.
Zero 02 comes right, taking defensive fire from Dauntless 04...
But it misses and the Japanese pilot pulls left, straight onto Dauntless 02's tail. It's a perfect shot, but Dauntless 02's tail gunner spoils it, so both miss!
The American dive bombers are almost there: Dauntless 02 (far left) will escape next turn, while Dauntless 04 (top left) and Dauntless 06 (bottom center) both need two more turns.
Lt Higbe finally decides to get his tired ass into the fight! He comes left, a perfect tail shot. The .50-cals roar...
And Zero 04 goes down in flames as he comes right, looking at the last Japanese fighter, Zero 02 (far left, below Dauntless 04, with Lt Herman at right).
Lt Herman, his intestinal fortitude bolstered by Lt Higbe's feat, jinks in on Zero 02's tail and opens fire...
Pity his gunnery skills weren't bolstered! He misses and passes on the left.
Which allows Zero 02 to run straight in on Dauntless 02's tail. The Japanese pilot and the American tail gunner open fire...
He hits, but the Japanese Veteran only manages to damage Dauntless 02, as he comes right, disgusted.
*To be fair, the Japanese fighters have missed some very easy shots this game, too.
Dauntless 02 reaches the target area, as Dauntless 04 is right on the cusp. And he'll surely make it as Zero 02 is the only Japanese fighter still in the air, and there's no way he can get into position to make a firing run on the American dive bomber.
*If you're wondering why, it's because you can't shoot at someone you're next to, you have to move at least one square before you're eligible to fire. Most of the time when I write a pilot has 'gone defensive,' this is what I mean, he's put his aircraft right next to an enemy aircraft, making it impossible for the enemy aircraft to get a shot at him, even though he's unable to get a shot at the enemy aircraft, either.
And with Zero 04 down (puff at far right), there's no way anyone is going to stop Dauntless 06, either.
Lt Herman comes right onto Zero 02's tail, to try a perfect, zero deflection tail shot. Again.
And yes, he missed, again, coming left.
Lt Higbe can't reach, so he comes left to cover Dauntless 06.
Who promptly enters the target area and begins his bombing run. The Dirt Divers managed to clear the way, delivering three SBD Dauntlesses to the enemy carriers, but not a single hit was scored.
*I didn't roll, just following history here, where the Marine SBDs didn't hit the enemy carriers.
The two Wildcats and three SBD Dauntlesses form up for the trip home, but Lt Higbe isn't done yet, he's being summoned by Major Chandler, there's more work to do! But not for Lt Herman, he's ordered to take his damaged Wildcat back to Midway.
Well, that was... something. Five Japanese Zeros were shot down, but two were killed by defensive fire from the Dauntlesses, the second game in a row where the bombers got two enemy aircraft. And the escorts did okay: they downed three Zeros, and actually didn't lose any Wildcats, just got three damaged, though they did allow the Japanese to shoot down three of their dive bombers. Here's the tally:
2nd Lt Herman got his first kill of the war
2nd Lt Higbe got his first kill of the war, too
2nd Lt Cross got his first of the war, and survived to become a Regular
2nd Lt Stroud didn't score, but survived to become a Regular
Overall, not a bad mission, the escorts did their job. I should have rolled for damage, just to see how it worked out, but with my history of terrible damage rolls, it's probably better I didn't.
In any case, as mentioned, Lt Higbe is being summoned by Major Chandler for his third straight sortie. Major Chandler is leading in a flight of four US Army B-26s armed with torpedoes, looking to give this one more shot. Incidentally, this is the last US Marine fight at Midway, before turning it over to the US Navy's "Killer Pelicans." So I certainly hope it goes well.
V/R,
Jack


No comments:
Post a Comment