It's 0800 on 15 February 1942, and Captain Moon's platoon is on the move. The Japanese attack on Palembang, home of not only Captain Moon's platoon, but also various ABDA air units, including the US Marine VMF-343 "Dirt Divers," began yesterday morning. Japanese bombers attacked the airfield at approximately 0800, and very soon thereafter Japanese paratroopers began landing at various points, followed by more Japanese troops arriving via amphibious landing (though suffering considerably to ABDA air attacks). Japanese paratroopers were spotted north of the airfield; with Dutch infantry, the only organized ABDA infantry units in or around Palembang locked in battle at various points of the compass, Captain Moon immediately led part of the platoon north to retake a building held by the Japanese, which was accomplished quickly, but at significant cost. Sgt Carlson, the Platoon Sergeant, led the rest of the platoon north a couple hours later to link up with Captain Moon.
The remainder of February 14 saw heavy fighting between Dutch and Japanese troops, while Captain Moon's men were marched too and fro to counter suspected enemy threats to the airfield that didn't materialize, until ultimately being ordered back to the airfield, where they were dragooned into assisting the various air and headquarters units make preparations for evacuating Palembang. That evening saw the ABDA aircraft depart Palembang, carrying out most of the headquarters personnel and as many of the wounded as possible. Dutch infantry and militia continued fighting into the night, though the defense of Palembang was already fractured, and not of much use in any case after it's raison d'etre (the fighters, bombers, and patrol planes) left. Captain Moon and his men found themselves west of the airfield, in a quiet sector, without orders, and so they wearily dug in for the night, posting watch and going to 50%. It seemed the fighting had moved south as Dutch units fell back, away from the coast and into the jungle, and so the Marines alternated standing watch and got some well-needed rest.
The next morning Captain Moon awoke at approximately 0630, and sat up with a start. "It's light!!!" "It's okay, Sir, been quiet for a few hours now. The Marines needed the rest. Especially now..." Captain Moon ran a grimy hand over his face: "Yes, Cody, especially now. Now that we're cut off behind Japanese lines, again." Captain Moon and Sgt Carlson got the Marines awake, cleaned up, fed most of what was left of the rations, then inventoried and surveyed the gear. It wasn't pretty: almost no chow or water, little medical supplies, no comfort/personal items, although their weapons were good and they had plenty of ammo. Captain Moon and Sgt Carlson wanted to get the Marines moving as quickly as possible to try and escape south, but they had to dispatch a patrol to find and bring back water to fill canteens. Once that was done, Captain Moon brought the platoon together and laid it out there: "we're cut off, behind Jap lines, and the only way we're getting out of here is to walk to the coast and find a boat to anywhere, just like we did in the Philippines."
But as things were being figured out in the morning, Japanese forces had moved into the area, boxing the Marines in from the west, south, and north. Captain Moon and Sgt Carlson put the Marines into a column of march and began moving, heading north, then turning east to try and move to the coast, where movement should be easier, and maybe they could flag down a friendly vessel as they moved south. They moved north for a couple hours, unsure of how far as the jungle north of the airfield was treacherous, with razorback ridges, steep hills, and dense foliage, then turned east. They called a halt, giving the Marines a ten minute break to drop their packs and guzzle some water, while Captain Moon and Sgt Carlson pulled out their map and oriented themselves to the terrain. They quickly figured out where they were, and where they were headed. A couple hundred yards east was a nasty ridge to the north, and a set of jungle-covered hills to the south, but a stream ran between them: "there, that's where we'll head. If we can get to that stream and put those ridges behind us, we should have smooth sailing all the way to the coast."
Sgt Carlson called the break to an end and the Marines slowly rose, re-shouldering their packs and checking weapons, then turning east, the column aimed at the break between the ridges. They almost made it...
Overview, north is up. The stream the Marines are looking for is running from east (far right) to north (top center), the easternmost part representing the Marines' goal, the exit between the ridge at top right and the hills at bottom right. There is a plantation house at bottom center, near a dirt road they just discovered ("how do ya like that? We bust bush for hours, then we find out there was a damn road twenty yards to our right???"). There are a few rice fields across the center, enticing the Marines to make their break, with hills and jungle everywhere else. There must be some clouds in the sky, casting shadows on the west (left) side of the board, making it look darker than the east side ;)
The opposing forces, with American Marines at top and Japanese forces at bottom. The American force is everyone that is left in Captain Moon's platoon, while the Japanese are a mix of paratroopers and amphibiously landed Imperial Japanese Army troops.
The figures are 15mm troops from Eureka Miniatures, except of the Japanese medium machine gun team, which is from Peter Pig.
The Marines: three understrength rifle squads (1st and 3rd were beat up in the previous fight, so 2nd Squad crossed bodies over to level the squads out), a HQ section of the Platoon Commander, Platoon Sergeant, and sniper, the machine gun team, and the mortar team.
The Japanese have four full-strength rifle squads (seven Arisaka bolt action rifles, a Type 96 light machine gun, and a Type 89 Grenade Discharger (AKA, the "knee mortar"), an HQ section of an officer and two snipers, and a three-man medium machine gun ("Nambu," 7.7mm) team.
This is my second game using Buck Surdu's "Combat Patrol" rules. I had a lot of fun in both these games, though this one took me about 3 1/2 hours to play, probably too many troops on the table playing solo. Each Marine squad is counted a single team for activation, while the Japanese squads are each split into a base of fire team and a rifle team. The Marine Plt Cmdr, Plt Sgt, MG team, mortar team, and Sniper all have their own Command Dice (Plt Cmdr and Plt Sgt can swap with subordinate units), while the Japanese Plt Cmdr, snipers (together), and MG team each have their own Command Dice.
Overview, this time with troops. The Marines are strung out from west (left) to east (right) across the center of the table, trying to make it off table via the stream at far right, while the Japanese have troops in all four corners of the table, trying to stop the Marines, or at least inflict as many casualties as possible. They would do a very good job of that...
The Marine column, looing west (bottom left) to east (top right). From left: 1st Squad and the sniper, Cpl Bussey, 3rd Squad, the MG team, the mortar team, and Captain Moon, and then 2nd Squad and Sgt Carlson at the point (top right).
In the top left (northwest corner), the Japanese have their MG team (far left), their leader (bottom left), and their snipers (top left; this is looking west to east).
In the bottom right (southwest) corner of the table, the Japanese have a rifle squad (looking west to east, the Japanese squad is at bottom center, with the US sniper and 1st Squad visible at top left).
Looking south to north at the bottom right (southeast) corner of the table, the Japanese have another rifle squad (bottom center, with US 2nd Squad at top center, 3rd Squad and weapons teams at top left).
Looking west to east at the top right (northeast) corner of the board, the Japanese have two rifle squads (bottom left and right). You can see the Japanese snipers at top right, and the US 2nd Squad (far left) and 3rd Squad/weapons teams (top center left).
It is time to fight, and, for many of Captain Moon's men, time to die!
In the northwest, the Japanese machine gun team moves up, taking cover in the jungle (bottom right, looking south at the US Marine main body (top center/left).
And as they do (just off camera to top right), further east, the rifle team of the Japanese 2nd Squad moves forward (center, from bottom right), looking to cut off the Marines' (top center/left) escape! Their base of fire element is at far right, while the Japanese 3rd Squad is at bottom left.
Speaking of the Japanese 3rd Squad...
Sgt Carlson (bottom center) has spotted them (top right), and orders Cpl Dishman's 2nd Squad (just above him) to open fire (the Japanese 2nd Squad's rifle team, the one that just moved up, is visible at center), lightly wounding two Japanese soldiers.
Meanwhile, further back in the column, Captain Moon (bottom center right, with his MG team to his left and his mortar team to his right), despite the firefight breaking out at the head of the column (off camera to right), has spotted the Japanese MG team (top left). He barks at Cpl Brown to halt and get his M-1917 .30-caliber, water cooled machine gun set up.
As the Marine MG team gets the gun ready (top left, with 1st Squad just below them and 2nd Squad to their right), the Japanese 4th Squad, in the southeast, is getting antsy. The rifle team holds fast (bottom right) while the base of fire team moves up a nearby hill (left), thus creating a major thorn in the Marines' side...
Back in the northeast, as the Japanese 3rd Squad is getting beat on (far left) by the Marine 2nd Squad (top left), the Japanese 2nd Squad's base of fire team moves up to join the rifle team (right).
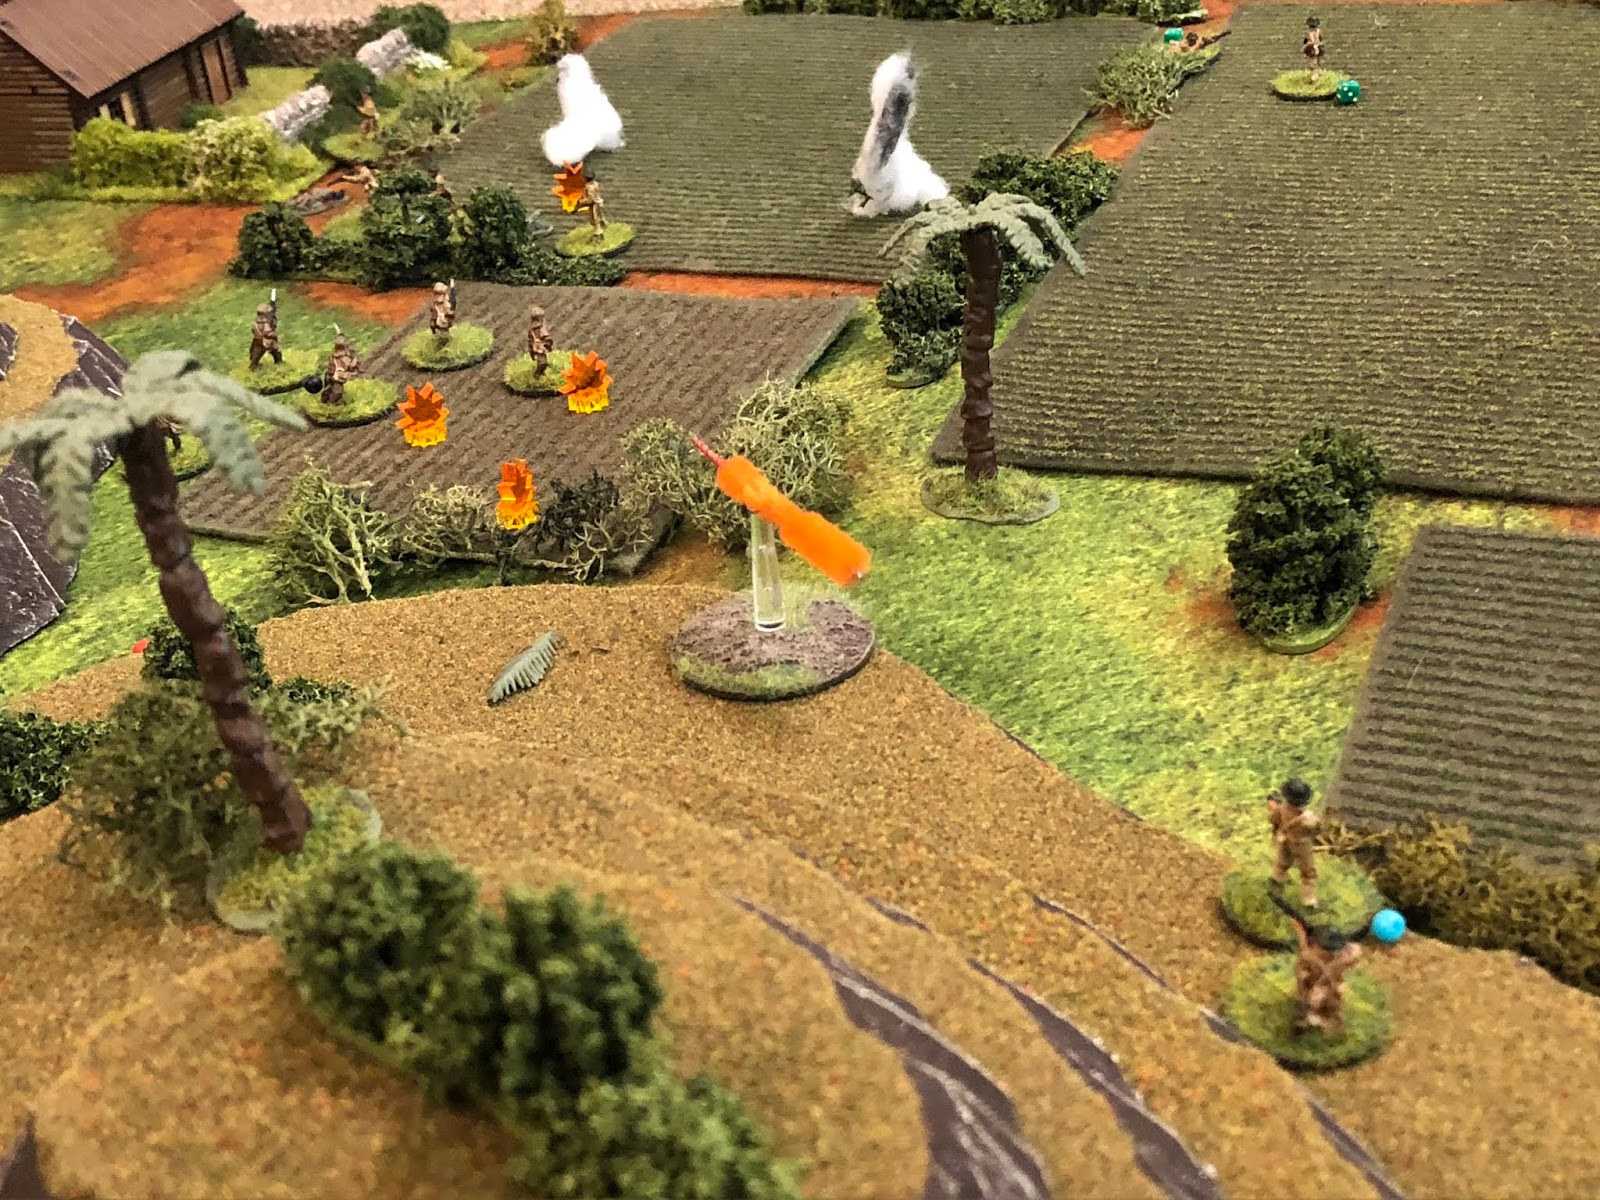
Cpl Bussey, the Marine sniper (bottom center), keeps an eye out as Sgt Thomas leads 1st Squad forward (center, with Cpl White's 3rd Squad at left, 2nd Squad at top left, and the Japanese 4th Squad's base of fire element at top right). But as the Marines hustle across the fields, hoping to escape (the exit is just off camera to top left), they're aware Japanese are in the area to the their front, but as yet unaware of the danger lurking behind them (off camera to bottom right)...
Where the Japanese 1st Squad (bottom center and bottom right) is creeping forward (Marine 1st Squad is at center, just above the crest of the hill, Japanese 4th Squad at top right).
Sgt Thomas' 1st Squad slows up a bit to keep an eye out (bottom center/right) as Cpl Bussey, the sniper (center), Cpl Duncan's mortar team (center top right), and Cpl White's 3rd Squad (just to their right, with 2nd Squad at top right) all dash forward.
And then Cpl Duncan's team gets the mortar set up (bottom left) as Cpl White is able to rush 3rd Squad across the river and into a nearby coconut grove (center top)! 2nd Squad (bottom right, with Sgt Carlson), keeps popping at the Japanese 3rd Squad (top right).
Back in the center, Cpl Brown is apparently taking his sweet time getting the MG into action (center, with Capt Moon to their right), so Cpl Bussey (bottom left) sights in and fires on the Japanese MG team (top center), wounding the gunner.
But as all the Marine attention if focused north (top), the pace is quickening in the southeast (bottom right). The base of fire element (consisting of a rifle, the Type 96 LMG, and the Type 89 knee mortar) of the Japanese 4th Squad moves further up the hill and gets into position (center left, with the Marine 1st Squad at far left).
While behind the US 1st Squad (center top right), the base of fire element for the Japanese 1st Squad moves up into position (far right)...
Cpl Brown's MG team (bottom center, with Capt Moon to their right) finally opens fire, raking the Japanese MG team (top left, with their snipers creeping behind the knoll at top center)...
The assistant gunner is wounded, but the Japanese not only stay in the fight, their gun team leader (far right) stands up, lets out a yell, and returns fire with his pistol! Not hit anything, mind you, but a defiant act nonetheless.
Back in the northeast, the Japanese 3rd Squad's rifle team (bottom right, with the US 3rd Squad in the grove at top center) checks morale and returns fire on Cpl Dishman's 2nd Squad (top left)...
And Pvt Skow (center) is hit in the chest, knocking him out of the fight!
The Japanese 3rd Squad continues laying down fire (off camera to left) on 2nd Squad (top left) as the Japanese 2nd Squad's rifle team dashes forward (left center, from bottom center, with their base of fire element at bottom right)...
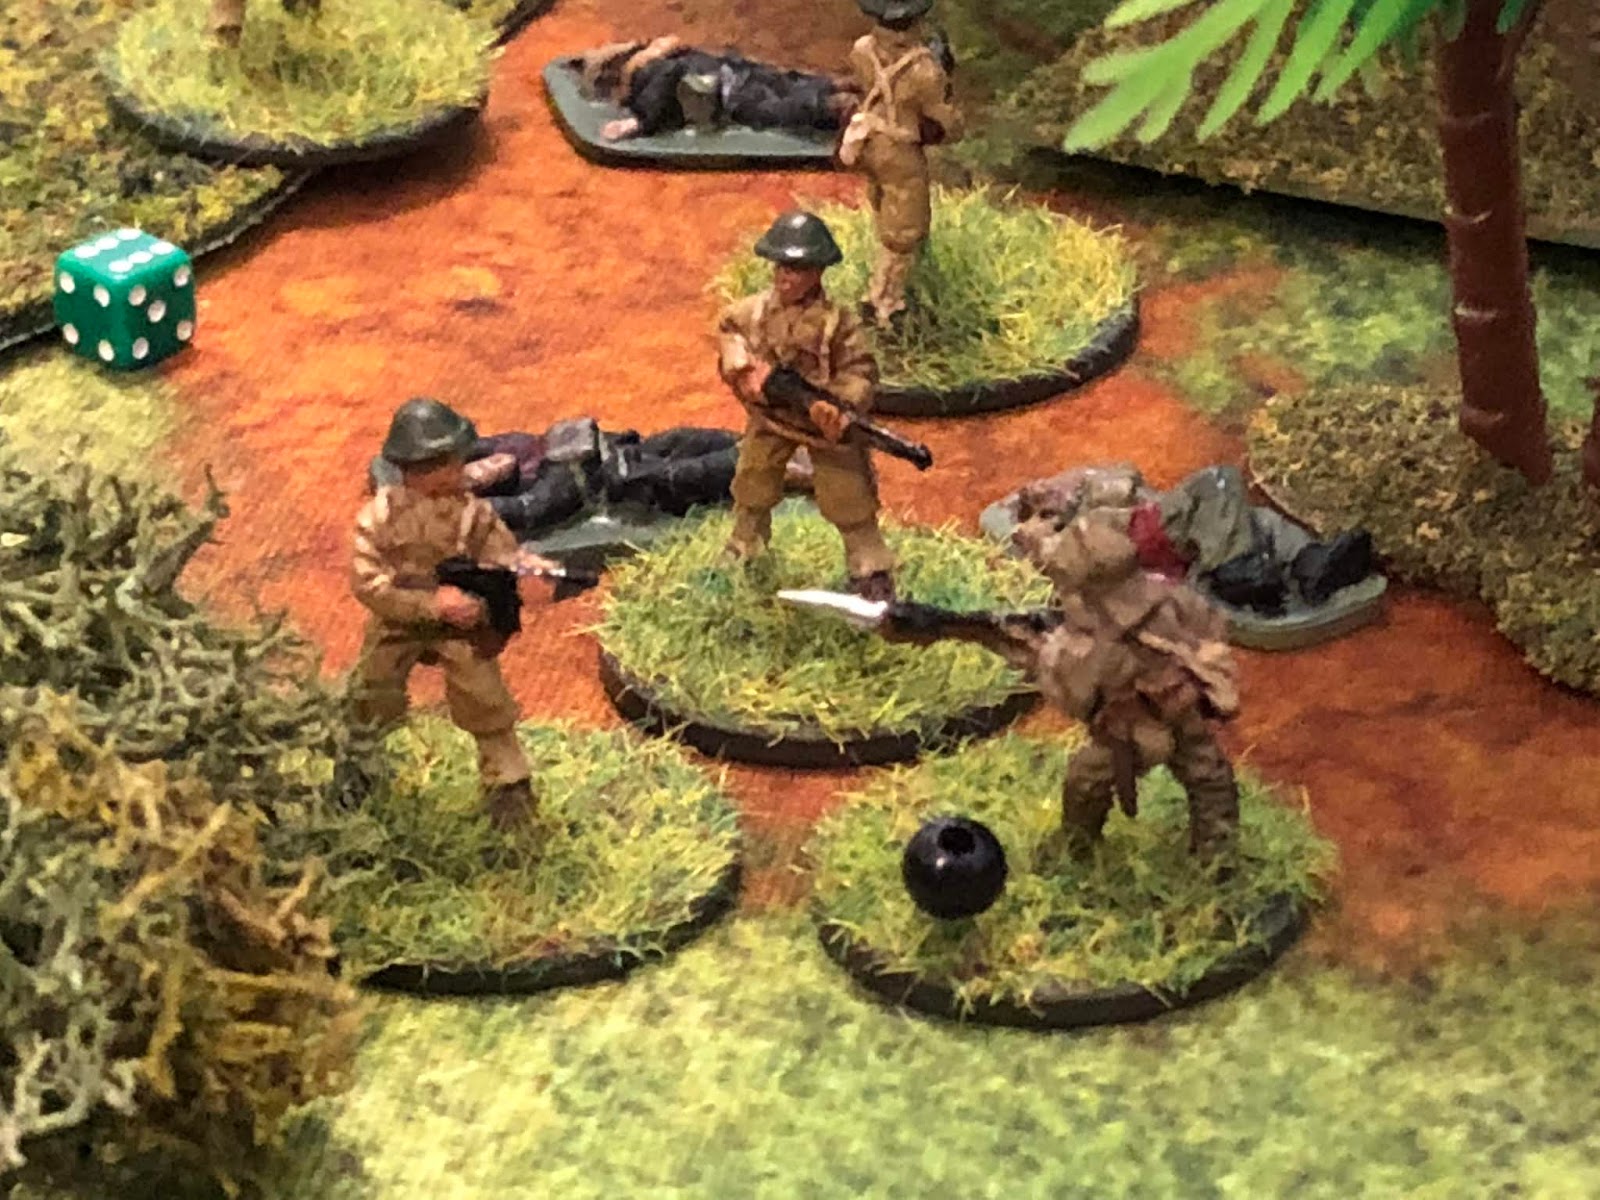
Right into Cpl White's 3rd Squad in the coconut grove!!! The Marines cut loose at point blank range with their Tommy Guns, BAR, and Springfields, and it's devastating!
Three Japanese soldiers go down, and two more are wounded!
*I had an incredible run of luck: all six Marines past the reaction test, no one ran out of ammo/jammed, and every shot but one hit the mark! You see the Japanese have a bucket of morale markers (red beads) to check, but I don't make Japanese check morale in this situation, I let them...
Banzaii!!!!! The three remaining Japanese soldiers stream into the coconut grove, clashing with the Marines!
The Marines manage to subdue two of the enemy soldiers, but a third, though wounded, manages to bayonet Pvt Robertson in the thigh (center right, the green casualty figure), driving Pvt Cofer back (bottom left)!
PFC Jamison and Pvt Jennings charge the remaining Japanese soldier...
And quickly the threat to 3rd Squad is ended!
With 3rd Squad consolidating its position in the coconut grove (center left), Cpl Dishman's 2nd Squad (bottom center) lays into the Japanese 3rd Squad (top right) again...
Wounding another Japanese rifleman (for a total of two, black beads) and dropping one.
2nd Squad apparently hasn't done very well maintaining its weapons, they keep jamming (blue bead). When Pvt Allen's BAR jammed, Sgt Carlson went over and cleared the damn thing for him!
On the Marine right, PFC Kozerski and Pvt Clay (right center) move up as the rest of Sgt Thomas' 1st Squad fires on the Japanese 4th Squad's base of fire element (on the hill at top right), wounding the machine gunner and pinning (stunning) the team.
In the northwest, the Japanese officer begins moving down from his perch (left, from bottom left, with his snipers at top left), to help the beleaguered MG team (center).
While in the southwest, the Japanese 1st Squad's rifle team moves up (bottom center, from left) in trace of their base of fire element (right, watching the Marine 1st Squad, top center, firing on their 4th Squad (top right).
In the southeast, with their base of fire element (left) under fire from the Marine 1st Squad, the Japanese 4th Squad's rifle team moves right, into a saddle (center right, with the Marine 2nd Squad visible at top center).
While in the northeast (2nd Squad is at top left, the Japanese 3rd Squad is at bottom left), the base of fire element for the Japanese 3rd Squad moves up in the bloody wake of its rifle team (center right, just above the coconut grove occupied by the US 3rd Squad). The Japanese 2nd Squad's base of fire element does likewise, dashing forward (far left), through the Marine fire and their own casualties.
Sgt Carlson sees the Japanese advancing on 3rd Squad (center left); he lets out a yell, "Cover me!" then splashes into the river, on his way to help out his Marines.
Back at the tail end of the Marine column, Cpl Bussey, the sniper (bottom center) takes another shot at the Japanese MG team (top center left), stunning the gunner.
And then Cpl Brown (bottom center) turns the MG on the Japanese snipers (top center, with the Japanese MG team at top left), pinning both of them, though they quickly shake it off.
Back in the southeast, things are reaching a slow boil: Sgt Thomas leads the remainder of 1st Squad forward (up to the hedge at center left, from off camera to left) while PFC Kozerski and Pvt Gray (bottom center) lay down fire, trying to deal with the Japanese 4th Squad (rifle team just Visible at top center right, base of fire element just below them atop the hill), while the entire Japanese 1st Squad is coming up behind them (off camera to bottom center).
The Japanese return fire, hitting Pvt Munoz in the groin and putting him out of the fight!
Further north, Cpl White and 3rd Squad are still across the river in the coconut grove, opening fire on the base of fire element for the Japanese 2nd Squad (the bodies lying about are from their rifle team's banzai charge). Again their fire is accurate and devastating, dropping all three enemy troops!
In the southwest, the Japanese 1st Squad is on the move (right, from bottom center, with their base of fire team above them on the hill), coming up behind the Marine 1st Squad (visible at top center right, shooting it out with the Japanese 4th Squad).
In the northeast, a little past where 3rd Squad just eliminated the Japanese 2nd Squad (casualty figure barely visible at top left), the remains of the Japanese 3rd Squad (bottom center left) checks morale: one of their wounded bleeds out, and one of their riflemen has decided he's seen enough and takes off (top right)!
The remainder of the rifle team moves up and joins the base of fire team, just across the river from 2nd Squad (off camera to top left, with 3rd Squad off camera to top center).
*Not sure if this is allowed in the rules or not, but I just joined up two different teams, allowing them to become one team using one Command Dice.
Sgt Carlson, still in the river (center, with 3rd Squad in the coconut grove at top left), spots the enemy coming downhill and orders Cpl Dishman's 2nd Squad (bottom center) to engage.
And again the American gunfire has a telling effect on the enemy, putting three of them out of the fight! I guess 2nd and 3rd Squad's are getting all the good shooting cards, 'cause 1st Squad ain't hit @#$%!!!
Speaking of 1st Squad, they're in trouble (center top, with 2nd Squad at top left, Cpl Bussey at left, and the Japanese 4th Squad at top right). The base of fire element for the Japanese 1st Squad (bottom right, on hill, with their rifle team below them) opens fire on the exposed Marines...
The knee mortar round is a little short (center), but the Japanese light machine gun hits PFC Kozerski in the back, dropping him, and hits Sgt Thomas in the ass! With 1st Squad under siege, the Japanese 4th Squad decides the time is ripe, and so their rifle team (right) breaks cover, launching another banzai charge!
They're hootin' and hollerin' (top center, with 1st Squad just below them) as the Japanese 1st Squad's rifle team decides to join the festivities, launching their own charge (bottom right)!!!
Not to be outdone, across the river in the northwest, the three survivors of the Japanese 2nd Squad launch themselves (center) at Cpl White's 3rd Squad (top center, with Sgt Carlson still milling about in the river at top left)!
Once again bayonets cross in the coconut grove!
And the Japanese are swiftly defeated, with one of their number surviving, wounded, to fall back (off camera to bottom right).
But the he suddenly turns and fires on 3rd Squad!
He (top right) misses, and Cpl White levels his Tommy Gun and returns fire, hitting the Japanese soldier in the right thigh (his second wound of the day)...
A
nd driving him off for good (he ran back up the hill, bottom center, from the explosion at top center)!
With the threat in the northwest taken care of (off camera to bottom, two entire Japanese rifle squads down), Cpl Dishman's 2nd Squad faces about (bottom center) and opens fire on the Japanese 4th Squad (top left), trying to help their buddies in 1st Squad (top center, with the Japanese 1st squad just off camera to top right), dropping one enemy rifleman and wounding another.
Truth be told, the Japanese haven't had a lick of luck with their MG team (far right, with their snipers at bottom center right). The MG team quickly got into place, then got the gun set up, but then has been constantly harassed by the US MG team (top left) and sniper (just above them). The Japanese commander has personally gotten involved, helping to get them rallied and back into the fight, and they are finally ready to get their first burst off. They line the Nambu 7.7mm machine gun up on the US MG team, then squeeze the trigger: a single round erupts, and then silence, a jam!
The Japanese commander is frustrated almost to tears! He's screaming at the gun team, cursing them, kicking them, smacking them with the flat of his blade, until they get the malfunction cleared.
But if we're honest, at least the Japanese MG team got one round off... The US mortar team finally gets the tube set up (center, with 2nd Squad at bottom right, 3rd Squad at top center, the MG team off camera to left, and 1st Squad off camera to bottom center left), and perhaps they'll actually fire sometime during the Dutch East Indies campaign*...
*A little foreshadowing? No, they won't... I told ya there's plenty of friction in these rules!
With the situation in the south rapidly deteriorating, both Sgt Carlson (left, in the field, surrounded by 2nd Squad, he's finally done cooling his buttocks in the river) and Captain Moon (top center) dash that way, hoping to help 1st Squad (top left, with the Japanese 4th Squad just off camera to far left, and the Japanese 1st Squad at top center left)!
1st Squad is in what we, back in my Marine days, called a s--- sandwich, and I'm not at all certain I'll be able to get them out of it.
In the southwest, the Japanese 1st Squad's base of fire element (bottom center/right) continues to lay into 1st Squad (center top, with Japanese above them and at top right, and behind them at center right, Captain Moon and Cpl Bussey at left)...
The mortar round misses left, but the Japanese 4th Squad's rifle team (top right) has really worked themselves into a frenzy...
They charge, taking off across the field at a sprint, looking to crush the Marine 1st Squad!
Cpl Dishman and Pvt McNair (bottom right) of 2nd Squad had crept up the hill a bit, where they have a clear view of the unfolding drama. They both react fire on the charging Japanese (left, with 1st Squad at top left), dropping one and wounding another.
But the rest of the Japanese come crashing through the hedge, right into Sgt Thomas and his beat-up Leathernecks...
Sgt Thomas (center), already shot in the buttocks, kills one Japanese, but is then stabbed in the left thigh, as Pvt Gray (center bottom) is bayonetted in the abdomen and goes down. Pvt Clay is stabbed in the right arm and falls back (bottom left), while Pvt Light (top center) takes down an enemy soldier.
The clash continues...
Pvt Clay is wounded and Sgt Thomas pushed back, but Pvt Light manages to whack another Japanese soldier.
Privates Clay and Light close on the last Japanese rifleman and defeat him, ending the banzai charge, but not their problems...
The three exhausted, bloodied Marines resolve to take as many of the bastids with them as possible...
They open fire on the Japanese 4th Squad's base of fire element, pinning the rifleman.
But the knee mortar rallies and the light machine gunner returns fire, wounding Clay in the right arm, and hitting Light in both legs, dropping him.
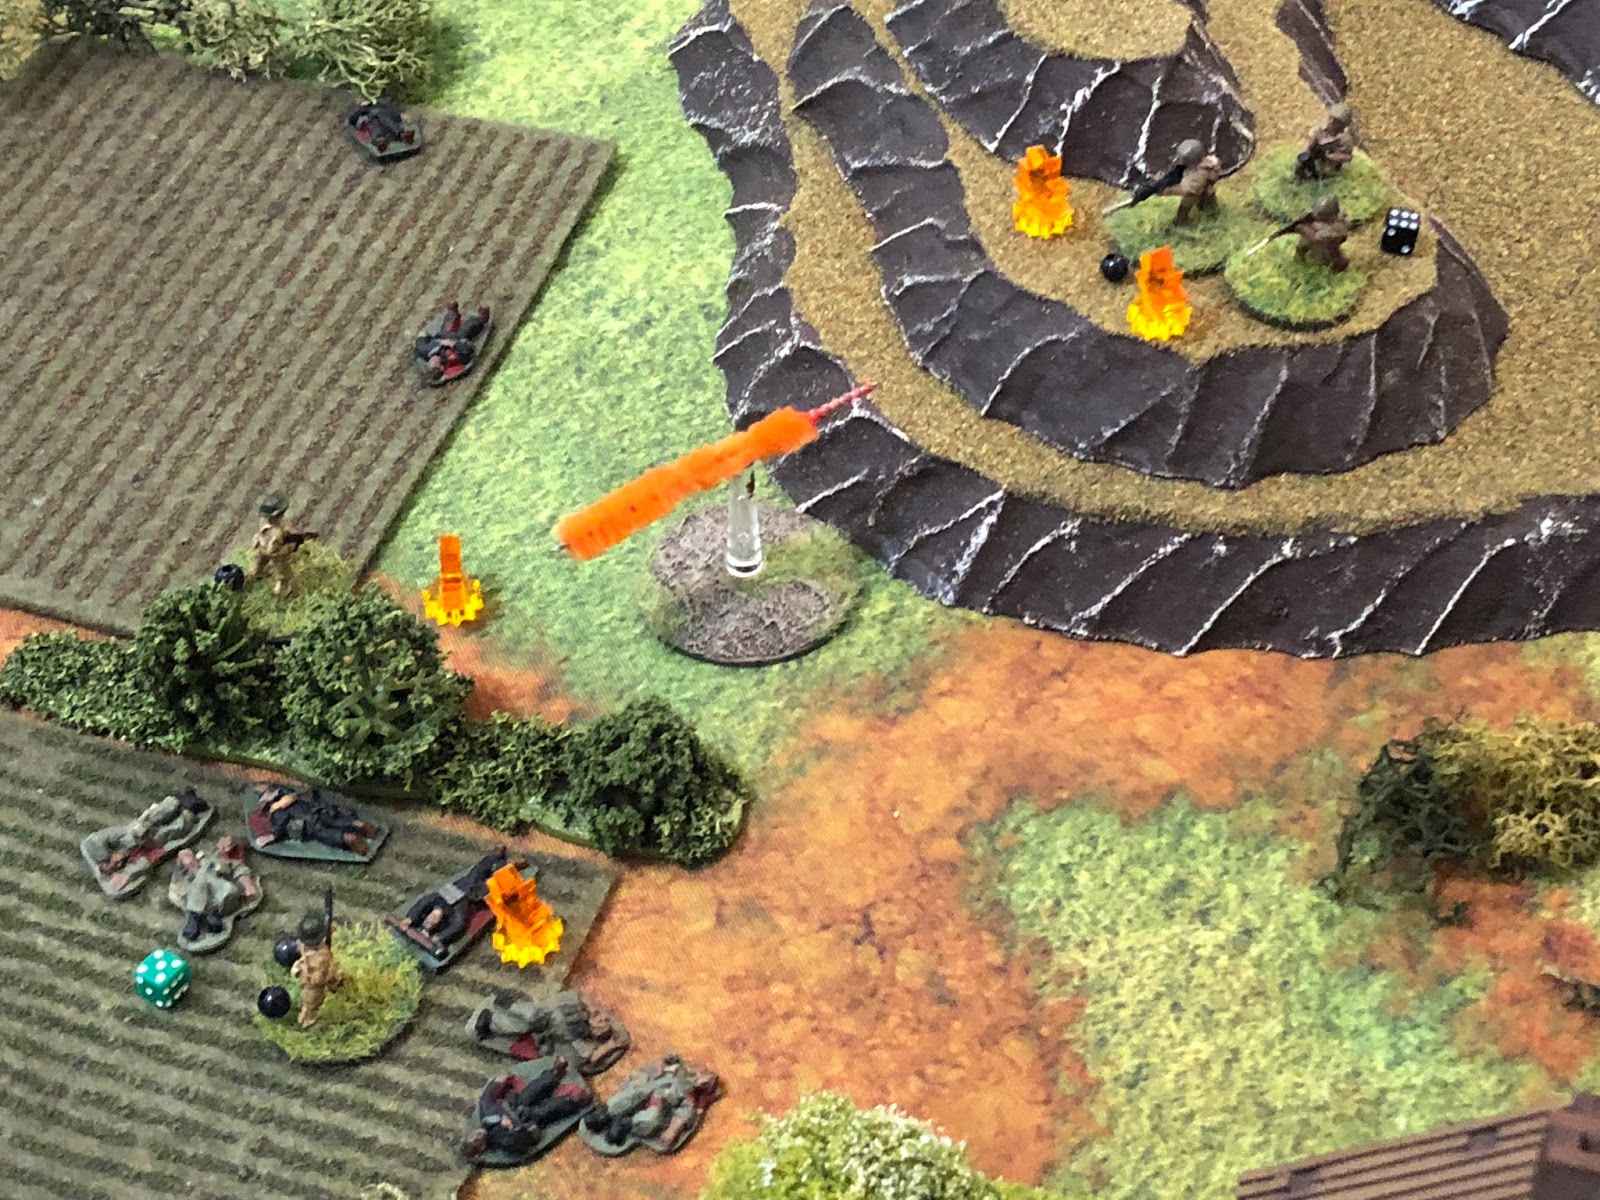
Back in the center, the US MG team (bottom center) fires on the Japanese MG team (top left, with the Japanese snipers at top center).
Dropping the gunner and wounding the assistant a second time!
Then Pvt Mitchell, the ammo carrier (bottom center right) aims and fires on one of the Japanese snipers (top center), wounding him in the right arm!
But while one is hit (far left), the other moves up into position (right, with the Japanese commander visible in the bush just below him).
Cpl White, the 3rd Squad leader, is in a dilemma: we're not accomplishing anything at this point by sitting in the coconut grove (bottom left), so do we fall back across the river to help our comrades in close combat, or do we move up into overwatch to support our comrades by fire? Surely support by fire, we're trying to exit the area via the stream/gap between the ridges (bottom right), he tells himself. So he gives orders to his squad: they pick up their casualty and move up the ridge (center/right)...
And take up overwatch (bottom right): "damn, we're in trouble boys..." he uttered under his breath, looking out at 1st Squad (top left) caught in a vise and the MG and mortar teams (center top), still quite a ways from the exit (bottom left).
Back in the northwest, the Japanese sniper (bottom center, with their MG team to their right) finally begin firing, engaging the US MG team (top center, with the mortar team at top left, still not having fired a single round). The gunner, Cpl Brown, is hit in both legs, out of the fight!
In the Marine center, Sgt Thomas knows there's no way they're getting out of this alive, so he resolves to defeat the rest of the Japanese 4th Squad (top right), then turn around and take as many of the Japanese 1st Squad (off camera to bottom left) with them as they can. The remains of 1st Squad open fire on the remains of the Japanese 4th Squad...
The light machine gunner is immediately knocked out of the fight, while the knee mortar man is hit in the leg and then again in the head, knocking him out, too!
But while that's happening (top center/right), the Japanese 1st Squad's base of fire element (bottom center/right, with their rifle team creeping up behind 1st Squad, at right) pops a knee mortar at the US 2nd Squad (top left), which had been leaning toward moving south (right) to help out their brothers in 1st Squad...
The Platoon Sergeant, Sgt Carlson (center bottom) took some shrapnel in the right leg, while Pvt Irving took quite a bit in both legs, putting him out of the fight (just above Sgt Carlson).
Meanwhile, the LMG gunner opened fire but jammed (blue bead at left), while their rifleman took a shot and missed, but then the knee mortar (bottom center) launched another round at 2nd Squad...
And it was PFC McNeil and Pvt Gibson's turn (center) to eat some shrapnel, lightly wounding each, but pretty much making 2nd Squad combat ineffective at this point.
While further south, Sgt Thomas and Pvt Clay, the only guys from 1st Squad still in the fight, and both wounded, begin climbing the hill, trying to get at the last Japanese soldier left over from their 4th Squad. But being wounded and moving uphill, they don't make it very far before...
The Japanese rifleman from their 1st Squad (bottom center) spot the two Americans (top center right) moving up the hill and fire...
Pvt Clay does down, but Sgt Thomas, out of ammunition, manages to pull himself up and lunge at the last Japanese soldier in the southeast...
To no avail: the brave young Sergeant is takes his third wound and goes down...
But the Japanese soldier that killed him has seen enough and runs (bottom right, from center)!!!
But Sgt Thomas', and the rest of 1st Squad's, actions have put enough of a hurtin' on the enemy to draw their attention and buy the rest of the platoon time to police up their casualties and dash for the exit. Pvt Mathews, the assistant gunner, pulls his sidearm and fires several times through the bolt/bolt carrier, disabling the weapon, and then he and Pvt Mitchell grab the wounded Cpl Brown and begin moving east, passing Cpl Duncan's mortar crew, just as they are pulling the pin on a hand grenade and dropping it down the barrel to destroy the tube that was never fired once in Sumatra, before heading east themselves...
Captain Moon (far left) looks on with tears in his eyes as his Marines, quite a few of them walking wounded, hoist their worse injured comrades and trudge east in the knee-deep water. The platoon is able to take everyone with them except the bodies of 1st Squad, all of whom are dead or soon will be...
So the platoon, having put enough casualties on the enemy to make them quite hesitant to pursue too quickly, manages to escape, carrying its wounded, but with only the clothes on their backs and the weapons in their hands. They continue east, marching nearly all day without break, before laagering once the sun went down. Captain Moon and Sgt Carlson sat quiet for several minutes before the platoon commander finally broke the silence: "Alright Cody, what's the butcher's bill?" Sgt Carlson informed him:
Sgt Thomas, PFC Kozerski, Pvt Munoz, Pvt Gray, Pvt Light, and Pvt Clay were dead or missing and presumed dead. Additionally, sometime during the long march east, Cpl Brown, the MG team leader, died of his wounds. Private Skow was hit in the chest by a round and was totally useless for the foreseeable future, and Pvt Robertson was shot in the thigh and wouldn't be able to walk on his own for a couple weeks.
Once out of this mess, Captain Moon would recommend three members of 1st Squad for awards for gallantry:
Sergeant Eric Thomas would posthumously receive the Medal of Honor
Private Todd Light would posthumously receive the Navy Cross
Private Willie Clay would posthumously receive the Bronze Star w/V
But the war carried on. The Japanese quickly invested the airfields at Palembang and put them to use against ABDA forces. The platoon made it to the coast, then carefully began picking its way south, dodging Japanese patrols as they went. On the night of 19/20 February, ABDA naval forces engaged the Imperial Japanese Navy in the 1st and 2nd Battles of Badung Strait (DEI fights number 8 and 9). As the platoon made its way south, it finally got boxed in by the enemy, their only hope to fight their way through to safety.
Which is the next fight, of course ;)
V/R,
Jack


Very exciting stuff. The marines took a fair few casualties but given the situation, they seemed to do pretty well.
ReplyDeleteThere seems to be a lot of friction in the rules, which is great and the results seem wholly believable. What do you think takes up the time in these rules (i.e. which mechanics take longest to go through? or is it that there are just lots of separate tests to go through?)
John,
DeleteThanks buddy! And yes, quite a tough fight, but such is usually the case when you’re in the run and almost get bottled up.
Friction is off the charts here, though I can’t complain as 1) I like friction, and 2) there are still plenty of decisions to be made.
In terms of what makes the games long... Well, first off, there are a lot of elements on the board (for me), and it’s a bigger area than normal (more time for setup/takedown, and even traversing to reach guys and just studying the table. You lose some time to re-rolling every team’s command dice and reshuffling the two decks of cards, and the rules are platoon level, activating by team, but they are still pretty individualized in terms of tracking individual weapons, status (okay, wounded in left arm, etc...), capability (accuracy, guts, endurance, etc...), carrying out individual actions (a team activates, but they don’t all have to do the same thing), and resolving the action (there’s a shot and a hit, now figure out who got hit, and where they got hit. The cards are faster than die rolls, but it’s a level of detail you don’t see in most Platoon-level rules, which means more time).
To put in perspective, I play reinforced platoon-level fights with 5Core Company Command: one team is one base, activates and acts as a single element, is either okay, pinned, suppressed, or out of the fight. Much quicker, but nowhere near the level of detail.
Both have their place in my realm ;)
V/R,
Jack
ReplyDeleteHey Jack,
Long time lurker. Love your stuff! I am pretty sure I have read darn near every post in here, on black net, and on Cuba libre. Glad to see a fellow devil dog who loves to war game but also makes a point to have a narrative!
Loved the tension in this last battle, a real nail bitter! Are you still planning on using combat patrol for the next one or will you go back to one if Ivan Sorenson’s wonderful set of rules? Or will you be trying something different?
Johnson,
DeleteHey man, thanks for stopping in and commenting, and Semper Fidelis! I’d love to hear your Marine story (when were you in, what was your MOS, who were you with?), and your wargaming story (what periods, what scales, what rules, do you have a blog?).
Awesome, hopefully you enjoyed Cuba Libre and Blackhawkhet; there’s also Sword of Gideon (going through the Arab-Israeli Wars, still working on the War of Independence), and a few games up on the Hakuna-Matata Wars (Modern Africa Imagi-nations in 3mm), but that project ran out of gas...
That last fight really pissed me off, just no way I could save 1st Squad. The games with Combat Patrol have been lots of fun, if a little long, and the next (and probably last) fight will be with Combat Patrol, then I need to play some dogfights and a couple naval actions to close out Dutch East Indies and move on to the Solomons. Got some other surprises in store as well ;)
V/R,
Jack
Just Jack,
DeleteI was in from 09-14, and was a 6842, unit was 1st Intel Ben. Though I am currently awaiting my FINSEL for the Navy. (I know I know, I was selected for SNFO for the navy and would have been too old for the same position in the corps).
As far as periods, really just Sci-if and moderns, 6mm-15mm. Though lately I have been on a kick for modern avaiation, so I have been getting a bunch of 3mm modern planes and using Missle Threat. I love that set of rules as it has everything that I require. I currently don’t have blog, I barely have time to game much less post about them.
My favorite rule sets to use are the 5Core system, for ground and air is Ostfront Publishing’s Missile threat, though if I ever go WW2 I am sure I will get lacquered coffins, as it is published by the same company.
Looking forward to the next marine engagement on the ground! Combat patrol seems like it is a good time, I have a friend who has been wanting to try that or bolt action in 15mm. I did pick up some FoW, paratrooper when they were on sale, maybe it is time to get them out and paint them up..
Johnson,
DeleteExcellent, but Navy??? Just kidding man, good luck. I was in from 94-04, 0331 to 0369. Sci-Fi's not really my thing, unless it's Star Wars, but I haven't figured out a way to game Star Wars, or any game where it's a bunch of heroes that can't die. As you've seen, I'm mostly WWII to modern, though I've got some ACW and Napoleonics as well. I really like 5Core and Lacquered Coffins, which I adapted for modern air-to air (before Missile Threat came out), and I modified both for card activation, just to mix it up (I usually play solo and need some surprises/unpredictability).
Combat Patrol is fun and definitely has its niche, though I'm still in the market for a platoon-level game that plays faster; the answer may simply be to play 5Core Company Command where each stand is a fireteam rather than a squad. I do like Bolt Action's command dice/activation concept, and think it's great if you just use actual T/O&Es and do away with the ridiculously short weapons ranges.
Regarding gaming time, paint up your paras and some Germans and get some platoon gaming in. If your really pressed for time, split each platoon into the three squads, paint one for desert, one for temperate, and one for winter, and you can play the whole war at squad level. It's quick on painting time, gives you incredible flexibility, and the games are quick (45 mins to an hour). And if you do get interested and find time to blog, let me know if I can help you out. It was only a few years ago that I didn't have any idea how to blog or post batreps to forums.
V/R,
Jack
Jack,
DeleteThe sci-fi became my first real foray back into wargaming after I got out. And before I went in used to do 40k but found the rules we always lacking. After I got out I found a set of rules called Tomorrow’s War, and really enjoyed them. Though that rule book is horrendously layed out! After that I got some 6mm modern stuff to do team yankee and a fist full of tows but ended up doing company command. However I Try to have my stands be one to one. So my company command is more like platoon command where each stands is a fire teams. And Thant seems to work really well.
My paras are the ones from 1944 in the winter outfits, part of the reason I got a whole platoon for like 15 bucks, but I may try to just do some olive drab to represent rain gear and call it a day. Lol.
Do you use any of the platoon forward or squadron forward from too fat laddies for any of your story driven stuff? Or is it all on the spot?
Johnson,
DeleteSounds cool man, and I'm definitely going to look at 5Core Company Command using teams rather than squads, just gotta figure out a way to mark individual casualties for my campaigns. Yeah, I think if you're doing northern Europe after D-Day that the overcoats will be fine for the rest of the war. I got a pack of those same dudes from Nobleknight Games.
Regarding Platoon Forward and Squadron Forward, first you need to know Joe Legan wrote those (as well as Flotilla and Grunts Forward), and he's a cool dude, has an awesome blog called "Platoon Forward," just Google and it pops up. He posts a lot of 15mm WWII to Modern batreps, and is the inspiration for a lot of the stuff I game/how I game. He's an Army flight doctor, an O-6 I believe, which I definitely hold against him.
Anyway, I use it when I feel like it and do my own thing (as well as use the 5Core and No End in Sight generators) when I don't. I'm incredibly inconsistent ;) More and more these days I'm doing on the spot, made up stuff, because when a fight ends I usually have an idea of where I want the narrative to go next.
V/R,
Jack
Hello Jack,
ReplyDeleteI do not know how you can spend so long playing a game and still enjoy it :-) I can see how cards would make it faster than die rolls but it is still too long! Although it was a great nail biting exercise and the rules do seem to deliver (on everything but time!). You need to go back to the 30 minute fights. I find it hard to keep up with such a long game! Yes, it is all about me :-)
Oh, and you have too many projects :-)
Shaun,
DeleteYeah buddy, I know what you mean! It's true, I can only take so many long games, and one game taking so (relatively) long. My hat's off to all the guys that play for 3-4 hours at a time, I just don't have time for that, plus writing up detailed batreps.
Honestly, this game could have gone on for another hour, I just 'called it' after 1st Squad got wiped out, and had the Japanese let the Marines grab the rest of their casualties and go. I very easily could have forced the Marine 3rd Squad to cross the river and collect casualties while 2nd Squad covered the withdrawal from the advancing Japanese.
So Combat Patrol is a lot of fun, and I'll certainly continue using it, but 5Core is in no danger of being supplanted as my staple of wargame rules. I'm thinking about going smaller with Combat Patrol, like following a 13-man Marine rifle squad (which is a little bigger than I like to do with 5MIN or 5MAK). We'll see.
V/R,
Jack
Hello Jack
Delete(my original reply was swallowed by Google)
I see your point - much better to play with the similar number of figures that matches more what you play with 5Core. So while the next game of Combat Patrol will be longer than that with 5MiN/5MaK, it will not be 3-4 hours longer!
Shaun,
DeleteHey buddy, sorry about the Google issue! Yeah, Combat Patrol can allow me to go a little bigger than I'm comfortable with for 5MAK. For 5MAK, you roll an activation dice for each guy, and I find it gets to be a bit too much past 7, maybe 8 guys on a side.
I've long wanted to follow a Marine rifle squad of 13 guys, but that's way too big for 5MAK/5MIN, and three fireteams with a leader is just a bit too small for 5Core Company Command. I'll soon know if this is a sweet spot for Combat Patrol ;)
And definitely not 3-4 hours longer! I got four 5MAK fights in this weekend, took about two and a half hours total! How about you, any progress on the tiny WWII stuff?
I want to play your tiny stuff, but I was looking over on TWW and find I'm being bullied into playing 5Core Brigade Commander! ;)
V/R,
Jack
5MaK activation is really great, and I think that is what I settled on when I tried out 5Core Combat Command a few years ago (with one die per platoon). I also have some 15mm SF figures and was all set yo give 5Core Skirmish a go but the game stayed setup for a year so i put them away again. So after owning them for 30 years, they went back in the box. Still want to give them a go.
DeleteI know what you mean about following a full squad and I started that with a 10-person British section with my Comic series of about 3-4 games...until they were wiped out by a series of very unlucky dice rolls :-)
Combat Patrol sounds a little more detailed than I could handle. I like fast and furious still, although fast, not as fast as my streamlined NUTS! or 5Core. if I am playing skirmish with 10 guys 30-40 minutes suits me fine.
i have done the third game with the rules (actually using the same scenario) and the rules are still being tweaked. Hoping for a fourth game this week but depends on if any benches are free in the park opposite work to set the game up on.
Bullied to play Brigade Commander? I am following that thread and if that is bullying I surprised you made it to the second day of Marine training. Of course,if you have said "coerced" I would have completely understood.
Shaun,
DeleteI remember that group of comic reports! Very cool, but yeah, your boys were dropping like flies. It's funny, I tried the same thing against the boy, following a Canadian section in Normandy, and they got shot to pieces on the very first go around...
Combat Patrol isn't bad in terms of what I call 'fiddliness,' but it is a little more detailed than I'm used to. Nothing wrong with that, I think we both just like games that move nice and quick. With the four batreps I'm currently posting (I've posted two so far), I'm worried readers won't like them as they may be a bit too quick!
Hmmm... Well, I take it back! You're not so intriguing if you can't clear a bench to play wargames on! Hell, I figured busting out little toy soldiers would clear the bench! ;)
Regarding bullying and Marine training, I guess I didn't tell you guys, I did Boot Camp via correspondence! ;)
V/R,
Jack