It's noon on 19 January 1942 (yes, we've gone back in time about a month from the seven Killer Pelicans dogfights I just posted), and only days before a squadron of US Army Air Force P-40 Warhawks under Captain Brian Jordan was sent to Makassar on the southwest tip of the island of Celebes, to aid in the American-British-Dutch-Australian (ABDA) defense of the Dutch East Indies (DEI) from the marauding forces of the Imperial Japanese Army and Navy. Captain Jordan and his men with their eighteen sleek, Curtiss Warhawks quickly settled into life on the dusty tropical airfield, happy be in the fight and ready to avenge Pearl Harbor!
As a matter of fact, just yesterday Captain Jordan and three of his pilots took to the air and managed to shoot down three enemy fighters and two enemy bombers, at the cost of only one P-40 damaged! But the Japanese are keen on making Celebes theirs (in the Killer Pelicans games, the enemy aircraft were flying out of Kendari, Celebes), and the Army pilots expect their stay at Makassar to be short-lived as Japanese landing forces are sure to arrive any minute now.
I'm using some amazing, but teeny-tiny aircraft from "Thomaston," whom I met over on The Wargames Website when he posted some pics of what he calls "Tiny Air Combat" (https://www.thewargameswebsite.com/forums/topic/tiny-air-combat/page/3/), and I'm using some simple rules posted by "Tango" over on The Miniatures Page (http://theminiaturespage.com/boards/msg.mv?id=489811). I've also finally got my 9-year old boy in on the act, he's playing the Japanese.
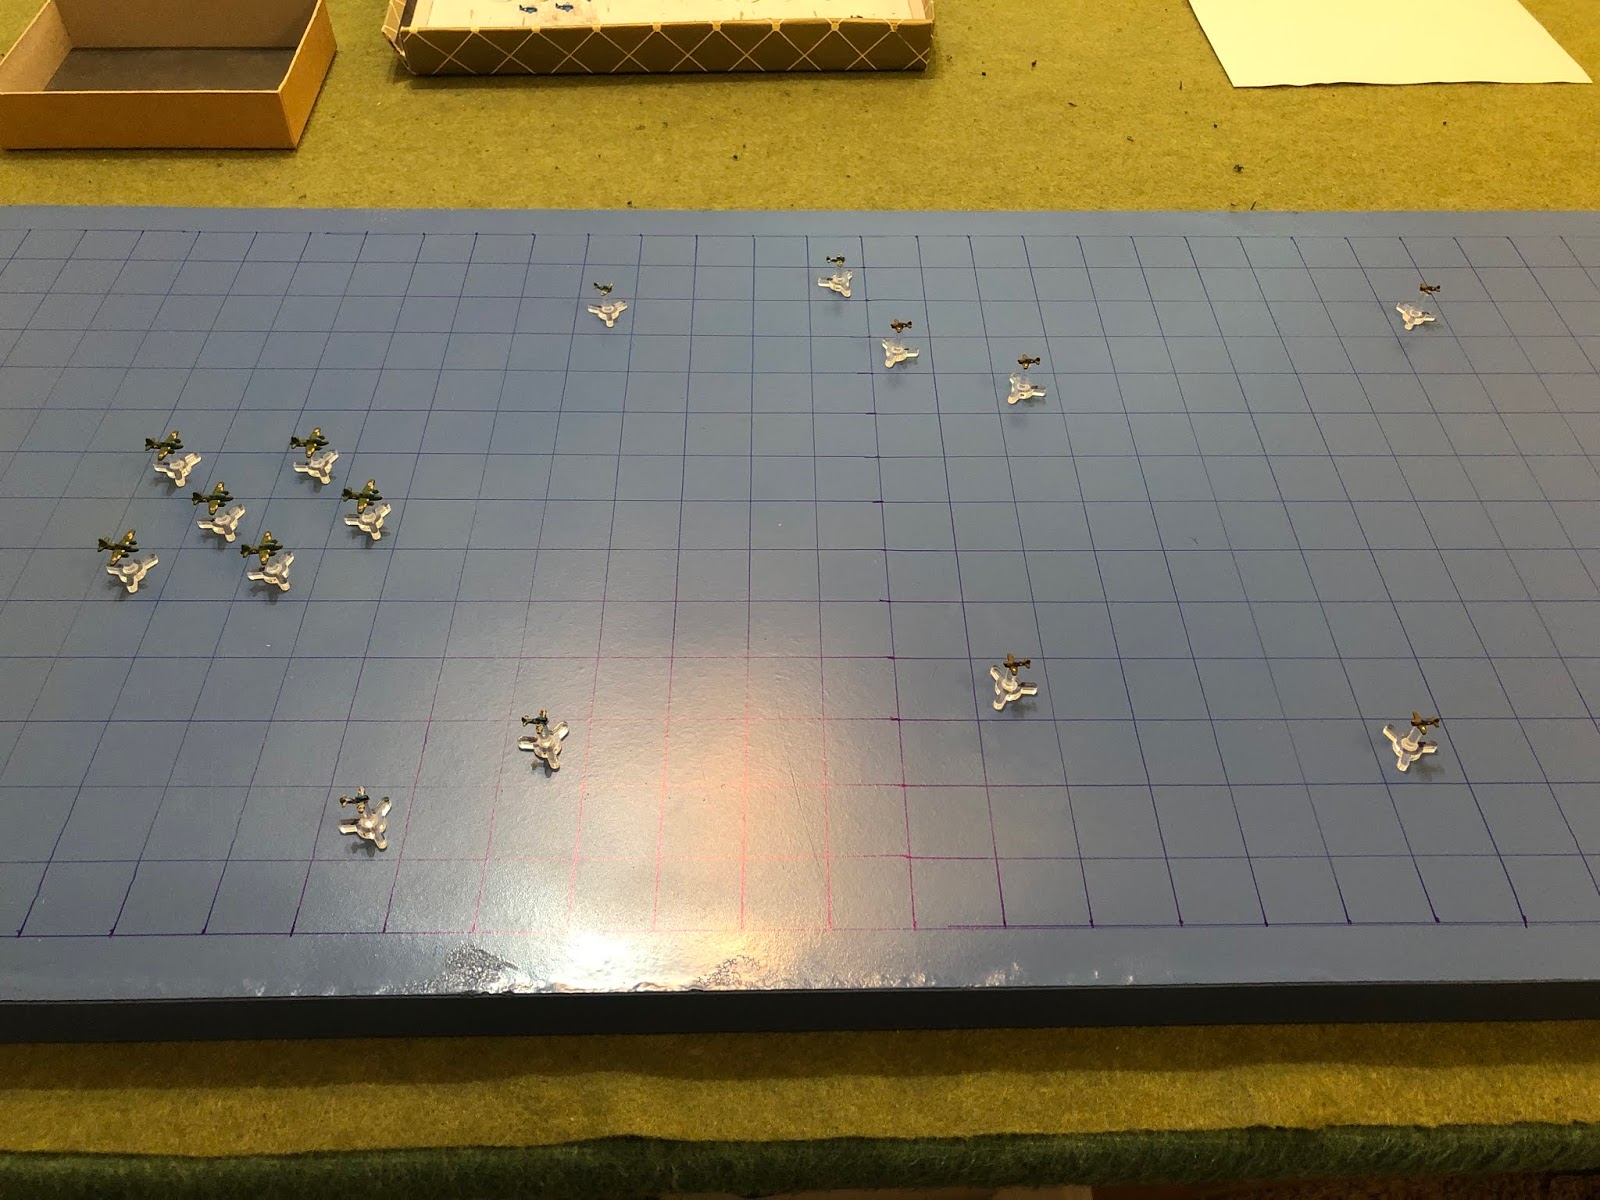
The new setup. North is left, where the Imperial Japanese Army aircraft are, south is right, where the U.S. Army Air Force is. East is up, West is down. The Japanese are charging in, intent on destroying Dutch coastal artillery batteries covering the Japanese Navy's intended landing beaches on Celebes.
The Americans, six P-40 Warhawks, from top to bottom:
Chicken 22: 2nd Lt Macon, his first combat sortie
Chicken 21: 1st Lt Pace, 2 kills in his first sortie
Chicken 23: 2nd Lt McKyer, his first combat sortie
Chicken 52: 2nd Lt Verdin, his first combat sortie
Chicken 51: 1st Lt Potts, his first combat sortie
Chicken 53: 2nd Lt Beach, his first combat sortie
The Japanese, from top to bottom:
Oscar 02
Oscar 01
Left: Helen 06, Helen 04, Helen 05
Right: Helen 03, Helen 01, Helen 02
Oscar 03
Oscar 04
Still using Bettys as Helens, but actually got the Oscars on the table this time.
Turns 1 and 2 bring us to the merge. The sun is giving a nasty glare off the warm, South Pacific waters...
And the dogfight begins: Oscar 02 (top right, from top center) slashes in, 12.7mm machine guns blazing...
Lt Macon's P-40 (yellow bead) is damaged, and the Japanese pilot flashes by (center).
In the west, Oscar 03 and 04 run in, straight and level (center bottom and bottom left).
And then, back in the east (gotta talk to the boy about activating in some semblance of order), Oscar 01 slashes in (top center, from far left, where I'm using the purple bead to show where the aircraft's starting position). The heavy machine guns bark and the tracers meet Lt Pace's aircraft, setting it afire! The cocky pilot with two kills is left wondering what the hell happened as he drifts below his silken canopy, towards the warm waters below...
Damaged and shocked at seeing his flight leader shot to pieces, Lt Macon sputters ahead, straight and level (top left, yellow bead), as Lt McKyer cuts left and fires on Oscar 02 (right, from purple bead at top right).
The American misses and zooms by the Japanese fighter.
In the west, Lt Verdin pushes to pass the Japanese fighters and head for the bombers (far left), as Lt Potts and Beach work to catch up (center bottom).
And the Japanese Helens push south.
In the west, Oscar 04 (bottom left) looks on as Oscar 03 shoots past (top right, from purple bead).
And then Oscar 04 cuts left and fires on Lt Beach's P-40...
Missing and shooting past (top center).
While in the east, Oscar 01 cuts hard right and takes a terrible deflection shot on Lt Macon's wounded bird...
Missing and peeling back left.
As Oscar 02 cuts hard left (far right) behind Lt McKyer's P-40 (center right).
Lt Macon pushes his damaged P-40 (yellow bead at center) towards the bombers, looking to break up the formation.
As Lt McKyer throws caution to the wind regarding Oscar 02 (far right) and jigs right then left to line up a shot on Oscar 01 (far left0. His .50-cals hammer away and the Japanese airplane is damaged.
*It's the boy's first game, so we're not playing with modifiers for damage or pilot skill.
In the west, Lt Beach charges in on the bomber formation (left), firing on Helen 03 but missing.
As Lt Verdin moves up and cuts hard right onto Oscar 03's tail (center top). The .50-cals yammer but the Japanese pilot jinks and the rounds zip harmlessly by! Lt Potts (center right) is looking to pull the same maneuver and jump on Oscar 04's tail (top left)…
And he does (top left), but just like Lt Verdin, Lt Potts misses a tailing shot, too!!!
*The curse of playing with children. Things are really not going my way...
The bombers continue their march, though the formation begins to break up (top left).
In the east, Oscar 02 comes left onto Lt McKyer's tail, perfectly on his 6. It looks like the good Lieutenant's chickens are coming home to roost from going after Oscar 01 (far left) and ignoring his wingman, but apparently Oscar 02's pilot is a bit apprehensive about a mid-air collision and misses his shot!
So he cuts hard left (bottom left), probably not a good idea, turning his tail to Lt McKyer.
And then Oscar 01 (bottom center, yellow bead) goes with him. Looks like their hoping their pair in the south (one, Oscar 04, just visible at bottom left) can come save them.
But Oscar 04 cuts left (top left) and goes after Lt Macon, opening fire...
But he misses, then cuts through the bomber formation (center left) and fires on Lt Beach (bottom left), missing again!
But Oscar 03 (top center) comes to Oscar 01 and 02's (center) assistance, dashing up and getting on the tail of Lt McKyer. The Japanese machine guns chatter...
And Lt McKyer goes down (he was at top left), clearing Oscar 01 and 02's tails. No one saw a 'chute, Lt McKyer rode it in, but it looked like he made a decent water landing, though no one had time to check on him. He's listed as Missing In Action (MIA).
Lt Verdin skirts to the right of Oscar 01 (center, yellow bead), pulling onto the tail (top right) of Oscar 03, and gets his revenge: Oscar 03 goes down in a ball of flames!
And as Lt Verdin scores, so does his flight leader: Lt Potts cuts hard left and goes head to head with the lead Japanese bomber (far left). Lt Potts dodges defensive fire, standing on the trigger...
Helen 01 rolls over and plunges into the water, as Lt Potts continues his charge (center), guns blazing head-to head with Helen 04...
He and Helen 04 (bottom center) miss each other and he cuts right (center left, with Lt Macon at right, with yellow bead), which subjects Lt Potts' P-40 to defensive fire from Helen 03 (top center) and Helen 06 (left), though he somehow pulls his airplane safely through the crisscrossing tracers.
Nearly colliding with Lt Potts (far left), Lt Macon pulls his damaged P-40 hard left, out in front of the bombers (center).
Lt Beach finds himself punch-drunk, with low energy and in the midst of a swarm of enemy bombers (left). A Helen looms in front of him at point blank range and he takes a terrible deflection shot, dodging tracers from Japanese defensive fire, and, to his surprise, the Japanese bomber explodes!
And the Japanese bombers push south, with Lt Macon (center, with yellow bead) breaking up the formation even more. The Americans have four fighters left, the Japanese three, and four bombers are still closing in on their target.
North of the bombers, Oscar 04 finds himself alone with two American fighters. He goes defensive, pulling hard right, in on Lt Beach's left shoulder (bottom left).
In the east, Oscar 05 cuts hard left (top center) and fires on Lt Verdin, missing, while Oscar 01 (bottom center)…
Cuts hard right (center), turning into Lt Macon (far left).
Back in the north, behind the bombers, Lt Beach cuts hard right (center, with Lt Potts above him), in pursuit, but leaving Oscar 04 (bottom left) behind him.
So Lt Potts plays the good wingman and rolls left (center) to protect Lt Beach's tail, firing on Oscar 04...
But he misses and comes left (bottom center), leaving Lt Beach (center) in big trouble.
Oscar 01 (center bottom) had turned into him, but Lt Macon said 'to hell with going head to head,' and he pulled onto Oscar 02's (top center) tail...
Flamed him out (he was at center top), then cutting right (bottom right, with Lt Verdin at top right)!
Lt Verdin (top center) was a little too enthralled by Lt Macon's (bottom right) aerial acrobatics and so he only managed to sputter north a bit...
As the Japanese bombers push inexorably south.
In the north, Oscar 04 is wracked with indecision, finding himself behind TWO Yankee fighter planes. He can't decide which to go after, so he just cuts hard right (left) and waits for things to develop.
*Sometimes those damn maneuver rolls really get ya! The kid was in perfect position to swat somebody from the air, but couldn't pull it off.
The enemy flight leader, Oscar 01, pulls hard left through the bomber formation (center, with yellow bead), onto Lt Macon's tail, intent on making him pay for shooting down his wingman...
The Japanese bullets chew the P-40 to pieces, forcing Lt Macon to bail out as Oscar 01 pulls ahead, escorting the bombers (right). Though wounded, Lt Macon was able to inflate his raft and hang on until picked up by the Dutch Navy and returned to base.
In the center of the Japanese bomber formation, Lt Verdin cuts hard left and takes a terrible deflection shot (center left) on Helen 06, braving defensive fire from Helen 03 (center right). Both miss.
Lt Beach wants to zoom in and shoot down some bombers, but he's also worried about Oscar 04 (far left) on his tail, so he sputters slowly ahead (center, with Lt Potts at bottom left).
But Lt Potts says 'hell with it' and charges ahead, cutting left onto Helen 06's tail. Machine gun tracers extend in each direction, but both fail to find their mark!
As the bombers push south.
Oscar 04 makes up his mind, pulling left onto Lt Beach's tail (center), firing and damaging the P-40.
As Oscar 01 comes left (center left) to re-engage the American fighters.
Lt Potts continues his dogged pursuit of Helen 06, again pulling onto her tail (center right), braving fire from Helen 06 and Helen 03...
Lt Potts' tracers damage Helen 06 (yellow bead at bottom right), but the defensive fire from the two enemy bombers crushes his P-40. Lt Potts is hit and hurt bad, badly managing to bail out. He's picked up by the Dutch Navy, but he's going to be out of action for awhile.
Lt Verdin comes left (bottom center), dodging defensive fire from the bombers that just shot down Lt Potts.
Further north (Lt Verdin is at bottom right), Lt Beach is damaged, alone, and in big trouble. Not knowing what else to do, he cuts hard right (bottom left), trying to escape Oscar 04 (far left).
But it's not to be: Oscar 04 follows him, machine gun bullets tearing chunks out of the P-40...
Lt Beach goes down, bailing out and picked up by the Dutch Navy, lightly wounded. Lt Verdin (bottom right) is the only American still in the fight...
Oscar 01 comes right (top left) for better position, knowing Lt Verdin must go after the bombers.
Lt Verdin gives chase (bottom right), staying as far away from the enemy fighters (top center and far left) as possible.
But the bombers are running away from him.
Oscar 01 turns into him (left), probably a bit too steeply.
And Oscar 04 kicked it into overdrive to catch up (center bottom).
*While he had a couple bad maneuver rolls, the boy rolled an incredible amount of sixes, which really sucked as the Oscar got +2 and the P-40s only got +1. So I was consistently rolling 2s and 3s plus 1, while his fighters were zooming around, 8 blocks at a time.
Lt Verdin's gone into vapor lock, unable to breathe, sphincter clutching the canvas seat, knowing he can't possibly shoot down all the bombers even if he were alone with them, and knowing he's not alone with them, he's got two Japanese fighters on his tail. He sputters ahead, weeping gently, hoping death will be swift.
The bombers near the target area...
And Oscar 04 zooms in to finish off the wounded gazelle...
Lt Verdin was never seen nor heard from again, MIA.
No Americans left on the board.
The Japanese Helens fan out and commence their bombing run, nearly destroying the Dutch coastal batteries (28/32 points)!!!
Well, that was an unmitigated disaster, and the boy is quite full of himself, definitely feeling his oats, at his old man's expense. That's the first time I've ever had a full complement of six fighters shot down; hopefully it's the last. The game was a lot of fun, if long, due to the boy learning the rules. And the rules, while simple, take a bit of brain power, the maneuvering can take quite a bit of thinking to accurately ascertain the tactical situation, come up with the best course of action, and then actually get your aircraft where you want it to go. But lotsa fun, even in an ignominious defeat...
Wow... So flight's 2 and 5 only have one pilot that can actually participate in combat operations, and no aircraft!
Lt Pace: shot down but okay
Lt Macon: shot down, recovered, lightly wounded
Lt McKyer: shot down, missing in action
Lt Potts: shot down, recovered, badly wounded
Lt Verdin: shot down, missing in action
Lt Beach: shot down, recovered, lightly wounded
The Americans did manage to shoot down two Oscars and two Helens, one kill each for: Lt Macon, Lt Potts, Lt Verdin, and Lt Beach, and I'm not tracking the Japanese, but that damn Oscar 04 had two kills, and, of course, their bombers were able to rack up a kill...
The boy and I immediately played another game, so next fight coming right up!
V/R,
Jack


Hey Jack!
ReplyDeleteGreat report, even though things didn’t go your way, seems like great fun! Looking forward to the days where my little one is able to push little planes across the table with the old man (still quite a few years away) but I think it might need to finally pick up some 1/600 ww2. These rules do seem quite nice, and fast playing.
How do you like these compared to lacquered coffins? How do they compare? Since you have quite a few games under your belt with both, which one do you prefer solo vice playing with someone? Which on do you think is easier for junior tacticians? For this most recent set of rules, are you using any house rules?
Johnson,
DeleteThanks man! And no sweat about things not going my way, that's why I play hundreds of games, some are bound to go my way ;)
The day your little one is able to play games with you is closer than you think! I didn't start wargaming until 2009, right after my 2nd child (the boy I played this against) was born. The first time he and I played together was when he was five; very simple stuff, of course, but plenty enough to have fun. And now that he's nine, he's into it, understands the rules, and knows what he's doing.
PicoArmor is absolutely fantastic for 1/600 aircraft. They're cheap (a pack of Bettys, a pack of Zeroes, and a pack of Wildcats will give you enough to play these rules and costs less than $20) and will be on your doorstep in a few days.
I really enjoy Lacquered Coffins (and Bag the Hun, too, for that matter), but neither let me put this many aircraft on the table for a single fight and keep my sanity. I have no problem playing either solo (just add in card activation to Lacquered Coffins to keep unpredictable), it just depends on what type of engagement I'm looking for. If I want a few fighters vs a few fighters I'd stick with Lacquered Coffins; right now I'm looking for larger fights, so these are fantastic.
I think these rules ("Battle of Britain") are easier; squares vs hexes simplifies a little bit, but the big deal is the lack of altitude in the game, which really makes things more simple. I am using some house rules, and intend on more. Right now the only thing I'm doing different to the rules as written is that I've worked in a damage roll (after the 'to hit' roll) to make things a little less bloody, and I intend on working in some pilot quality rules later.
V/R,
Jack
Thanks for the report Jack. Do the high manoeuvre rolls mean that the Oscars move/turn faster?
ReplyDeleteMy pleasure. The way it works is that bombers have a standard move rate (usually four squares) per turn, while fighters roll a D6 and then have a modifier, +1 for Wildcats/P-40s, +2 for Zeroes/Oscars.
DeleteV/R,
Jack