All,
0610 local time
4 June 1942
Midway
It's 4 June 1942, the dawn of the epic "Battle of Midway," a clash of giants, three US carriers vs four Japanese carriers that proved to be the turning point of the war in the Pacific. For more information, both real-life and how I'm running this campaign, please check here:
https://oldleadbreed.blogspot.com/2019/11/battle-of-midway-campaign-plan.html
Yesterday at 0900 a US Navy PBY Catalina spotted Japanese ships 500nm west southwest of Midway; B-17s from the island were dispatched but failed to hit anything. US Navy PBYs continued to shadow the Japanese surface force, and actually attacked at 0100 this morning, scoring a torpedo hit on a Japanese merchant ship. Unbeknownst to US personnel, the Japanese carrier task force, as yet still unspotted, launched its first strike group against Midway at 0430. At 0530, the PBYs spotted the Japanese carriers, and noted their strike group inbound.
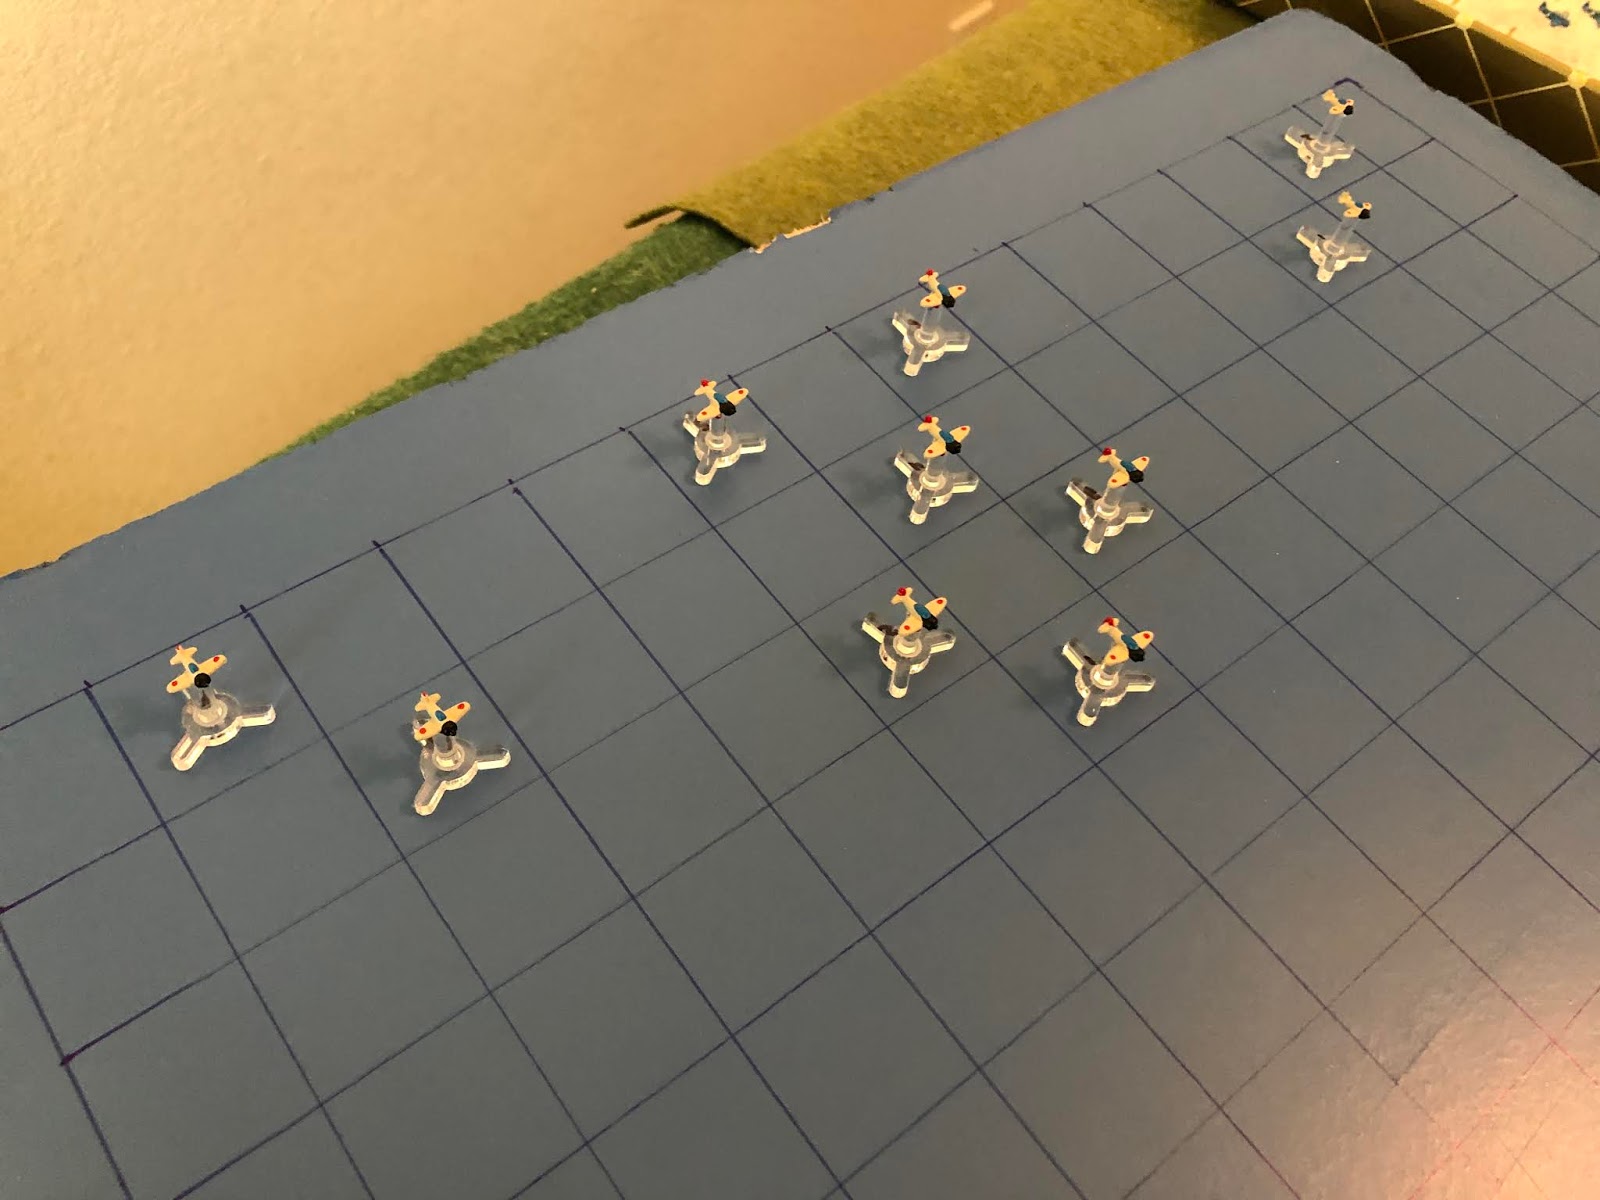
So it's now 0610 and the VMF-343 "Dirt Divers" have scrambled six F4F Wildcats to intercept an inbound group of six D3A "Val" dive bombers escorted by four A6M "Zeros."
This is my arena for aerial combat; simple, yet durable and, to me, beautiful (in a simple, durable way). I'm using tiny aircraft designed by my buddy Thomaston; not sure what size they are, just that they are much smaller than 1/600. They're 3D printed models that I mounted on cut-down bases from Litko, and I'm using a very simple rules system called "Battle of Britain," which I found for free over on The Miniatures Page (I've already played a good 20 or so fights with them). Left is north, with the Japanese strike group there, and the American interceptors at right.
The US CAP, from left to right:
2nd Lt Armstrong, a Rookie on his first combat mission
1st Lt Gardner, a Regular with one kill on three sorties
2nd Lt Cox,
a Rookie on his first combat mission
Capt Tuggle, a Regular with one kill on two sorties
2nd Lt Kampouris,
a Rookie on his first combat mission
2nd Lt Clayton,
a Rookie on his first combat mission
The Japanese strike group, from top right:
Zero 02, a Veteran
Zero 01, an Ace
Val 06
Val 03
Val 04
Val 01
Val 05
Val 02
Zero 03, an Ace
Zero 04, a Veteran
We fast forward through the first three turns in order to bring you straight into the action. Time to fight!
Zero 01, an Ace, comes left, then whips his A6M Zero about, literally flying circles around the green Gyrenes, right in front of Lt Gardner, and already on Lt Armstrong's tail.
As his wingman, Zero 02, enters the fray.
Zero 03 cruises alongside the Vals, determined to see how this shakes out before committing.
And then his wingman, Zero 04, whips past Lt Clayton and takes a front quarter-deflection shot on Lt Kampouris, but misses.
Lt Clayton pushes past him, eyeballing the bombers (top left), but with an eye out for Zero 03 (far left).
But Lt Kampouris is a bit shaken up by his near death experience and only manages to sputter past Zero 04, showing him his tail.
In the center, Captain Tuggle pushes ahead.
And Lt Cox stays right there with him. Go on, Rookie, go get'em.
Up top, Lt Armstrong eyes the Japanese dive bombers (bottom left), but ultimately, with Zero 01 and 01 on top of him, he decides to cut right, defensive.
As his wingman, Lt Gardner comes right and takes a font quarter shot on Zero 02...
The Marine aviator smiles as the Japanese Zero comes apart, and he coasts past, not realizing how deep of trouble he's in with Zero 01 behind him...
The Vals charge south, towards the island of Midway.
Zero 01 decides it would be two easy unsporting even, to kill Lt Gardner (top center), or more likely, he decided Capt Tuggle and Lt Cox presented more of a threat to the Vals (far left), so he leaves the two young Marines at top to swoop in on Captain Tuggle's tail. The Japanese 20mm cannons and 7.7mm machine guns cut loose...
Captain Tuggle's Wildcat bursts into flames and he bails out. He'd soon be picked up by a patrolling PBY, but he was burned badly enough to be out of action for the next 60 days. Meanwhile, Zero 01 immediately cuts right and opens fire on Lt Cox, damaging his aircraft!
Zero 03 cruises straight in, pulling even with Lt Clayton.
As Zero 04 bends it back around on Lt Kampouris.
Lt Cox's Wildcat is belching smoke and his instruments are going bonkers; he might be able to get the aircraft back under control, but first he's gotta get out of the way, so he performs a Split-S to reverse course, disengaging.
Lt Clayton flashes past Zero 03 (far right) and takes a front-quarter shot on Val 05, but misses.
As Lt Kampouris, really caught between a rock and a hard place (or a Zero 03, bottom left, and a Zero 04, right), so he comes right, defensive.
As Lt Gardner comes hard left to get back into the fight.
And Lt Gardner comes with him.
The Vals continue their push south.
Zero 01 jinks over onto Lt Armstrong's tail and opens fire, damaging another F4F Wildcat.
As Zero 03 pulls left alongside Lt Kampouris, calmly stalking him, which frees up Zero 04 (right)...
To leave Lt Kampouris (bottom right) and go chase Lt Clayton (far left).
Lt Clayton cuts sharp right and opens fire on Val 06, as defensive fire comes in from her and Val 05's tail gunners...
Lt Clayton misses, and his aircraft takes several 7.7mm rounds as he pulls onto Val 04's tail, and opens fire, again braving defensive fire from the tail gunner, and this time both sides miss.
*He needed a 4+ and then a 3+ to hit on those two shots he missed...
Lt Kampouris says "damn the torpedoes!'" not worrying about Zero 03 (bottom center), and charges in on Val 01, taking a front quarter shot...
He misses, then kicks left and goes head to head with Val 02. Both pilots stand on their triggers...
Val 02 rolls onto her back, streaming smoke, and glides into the warm blue ocean below! Lt Kampouris pushes forward in his attack, now going head to head with Val 05, dodging tracers as he sends his own out...
Val 05 is shot up, but Lt Kampouris is the loser in this fight! His windscreen is covered in oil and his cockpit filled with smoke, so he bails out. He gets fished out of the water by the same PBY that picks up Capt Tuggle, but just like Captain Tuggle, he's been injured and will miss a couple months of action.
Lt Armstrong's Wildcat is too shot up to continue the fight and so he gets her turned around and heads back to base.
As Lt Cox works on getting his aircraft straightened out and acting right, hopefully before he reaches base.
*This is pure narrative: Lt Cox's aircraft was damaged and I rolled for him to return to base, but, knowing there were more fights coming up, I rolled to see if he could eventually get his Wildcat good enough to get back in the fight, and he could. That will occur in the next fight.
Unperturbed, Lt Gardner cuts around left, ignoring both Zero 01 (top center) and defensive fire from Val 06, as he lines the Japanese dive bomber up in his sights and opens fire...
Grimacing as he misses and pull alongside the enemy plane...
The Vals push south...
Except Val 05, which is damaged badly enough that it needs to return to its carrier.
Zero 01 comes hard left on Lt Gardner; he can't line up a shot, but he's in great shape to get on the Marine Lieutenant's tail.
Zero 04 comes hard right, chasing Lt Clayton's damaged Wildcat (center top).
Then Zero 03, the other Japanese Ace, cuts left and takes a front-quarter shot on Lt Gardner. Lt Clayton (bottom left) screams in anguish as he watches Japanese rounds slam into the cockpit and Lt Gardner slump forward, lifeless...
The Wildcat plunges into the sea and Zero 03 comes right, looking at Lt Armstrong's tail (top right).
But Lt Armstrong is able to open up the distance...
As does Lt Cox.
Lt Clayton is the Marines' last chance, but I roll and his Wildcat is badly damaged he needs to return to base, too.
The three remaining Zeros form up to chauffeur the four remaining Vals to the target.
The Vals fan out to attack Midway, and their attack is pretty damn effective, causing 18/30 damage points. So good, but not good enough, we'll see what the Japanese Kates are able to accomplish in the second wave (wave, not strike, that's a whole separate issue!).
So, not good, not good at all, but about what I've come to expect. It seems like lately every campaign starts out with the Americans absolutely getting the crap kicked out of them, and then it sort of rounds itself back out as the missions go by. Here's to hoping that holds true. Here's how the Marine pilots (in my first use of them with the "Battle of Britain" rules):
Capt Tuggle failed to score, shot down, WIA and out of action for 60 days
1st Lt Gardner killed one Zero, but then he himself was shot down, KIA
2nd Lt Kampouris shot down one Val, but then had on shoot him down, WIA and out of action for 60 days
2nd Lt Armstrong failed to score, was damaged, and returned to base, becoming a Regular
2nd Lt Cox failed to score and had his aircraft shot up, but was ultimately able to get it back into fighting shape, becoming a Regular
2nd Lt Clayton failed to score, was damaged, and returned to base, becoming a Regular
So the Japanese knocked down three Wildcats and damaged the other three, for the cost of one lost Zero, one lost Val, and one damaged Val that had to return to her carrier. Funny enough, it was the three veteran Marines that got shot down and the three rookies that made it through! At least Capt Tuggle and Lt Kampouris will return in time for Guadalcanal...
Next up, Captain Haynes leads a flight of six Wildcats to intercept the second wave of Japanese bombers closing on Midway.
V/R,
Jack


No comments:
Post a Comment