All,
0625 local time
4 June 1942
Midway
It's 4 June 1942, the dawn of the epic "Battle of Midway," a clash of giants, three US carriers vs four Japanese carriers that proved to be the turning point of the war in the Pacific. For more information, both real-life and how I'm running this campaign, please check here:
https://oldleadbreed.blogspot.com/2019/11/battle-of-midway-campaign-plan.html
Yesterday at 0900 a US Navy PBY Catalina spotted Japanese ships 500nm west southwest of Midway; B-17s from the island were dispatched but failed to hit anything. US Navy PBYs continued to shadow the Japanese surface force, and actually attacked at 0100 this morning, scoring a torpedo hit on a Japanese merchant ship. Unbeknownst to US personnel, the Japanese carrier task force, as yet still unspotted, launched its first strike group against Midway at 0430. At 0530, the PBYs spotted the Japanese carriers, and noted their strike group inbound.
At 0610 the VMF-343 "Dirt Divers" scrambled six F4F Wildcats to intercept an inbound group of six D3A "Val" dive bombers escorted by four A6M "Zeros," but were roughly handled, having three Wildcats shot down and the other three damaged, as the Japanese lost one Zero and one Val. The Japanese aerial attack caused 18/30 damage points.
So it's now 0625 and the Dirt Divers have scrambled another six F4F Wildcats to intercept an inbound group of six B5N "Kate" torpedo bombers escorted by four A6M "Zeros."
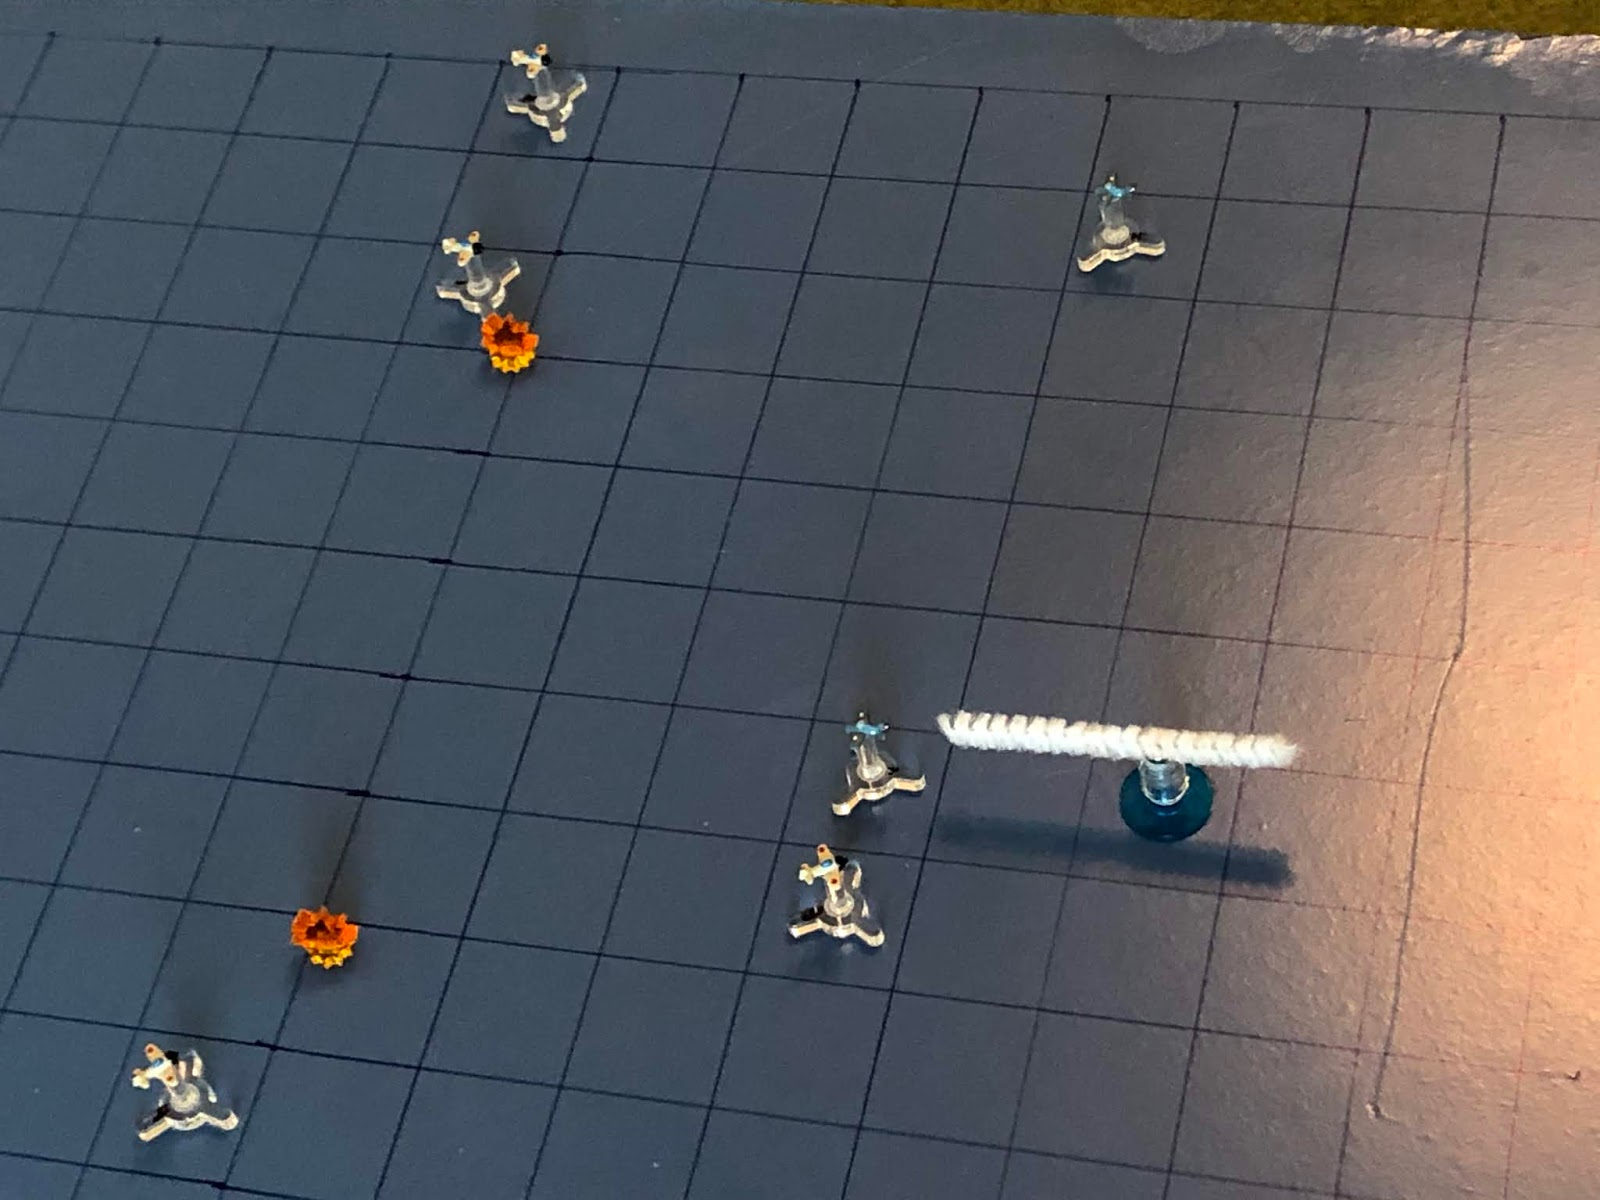
This is my arena for aerial combat; simple, yet durable and, to me, beautiful (in a simple, durable way). I'm using tiny aircraft designed by my buddy Thomaston; not sure what size they are, just that they are much smaller than 1/600. They're 3D printed models that I mounted on cut-down bases from Litko, and I'm using a very simple rules system called "Battle of Britain," which I found for free over on The Miniatures Page (I've already played a good 20 or so fights with them). Left is north, with the Japanese strike group there, and the American interceptors at right.
The US CAP, from left to right:
2nd Lt Oliver, a Rookie on his first combat mission
1st Lt Rison, a Regular with one kill on three sorties
2nd Lt Duper, a Rookie on his first combat mission
Capt Haynes, a Regular with one kill on two sorties
2nd Lt Cox, a Regular with no kills on his second sortie*
2nd Lt Kirby, a Rookie on his first combat mission
*This was the issue I discussed last game, where Lt Cox's Wildcat was damaged but he got it back in fighting shape after disengaging, so he made it into this fight. We'll see how that turns out for him.
The Japanese strike group, from top right:
Zero 02, a Rookie
Zero 01, an Ace
Kate 06 Kate 03
Kate 04
Kate 01
Kate 05
Kate 02
Zero 03, an Ace
Zero 04, a Veteran
We fast forward through the first three turns in order to bring you straight into the action. Time to fight!
The Japanese rookie, Zero 02, stays outside, defensive.
But his wingman, an Ace, runs straight in on Lt Rison, and the two pilots open, fire, though the Marine comes off the worst for it, his Wildcat sporting some new 20mm holes.
And then we get a shot from our combat correspondent, as Zero 03 comes left and takes a front quarter shot on Captain Haynes. The Zero's guns thunder and blaze...
Captain Haynes' Wildcat is damaged (bottom left), and Zero 02 scootches on past, lining up a shot on Lt Duper.
Meanwhile, Zero 04 manages to come all the way around on Lt Cox's tail, lining up a perfect, zero-deflection shot. The Zero's pilot opens fire...
And comes right at Captain Haynes as Lt Cox's Wildcat plunges into the ocean! His comrades reported seeing a parachute, but PBYs dispatched to the scene later were unable to find him, so he's listed as "Missing in Action."
Lt Rison's bird is damged, but he checks his gauges and everything is okay, so he stays in the fight, coming left to line up a front quarter shot on Kate 01...
He misses, then comes right, going head to head with Kate 03. Both pilots fire, but both pilots miss!
Captain Haynes, also damaged, checks his bird: the engine is running a little rough, but he resolves to continue to lead his Marines in battle! Capt Haynes charges straight in, dodging defensive fire as he goes head to head with Kate 01...
A wing comes off and Kate 01 rolls into the sea, as Captain Haynes pushes forward, straight into Kate 04, where again both pilots open fire...
Captain Haynes quickly racks up his second kill of the die, hammering Kate 04 into pieces that fall like confetti into the warm, blue ocean below!
Lt Kirby sputters ahead...
As does Lt Duper. But at least Lt Duper has a reason, he's got Zero 03, a Japanese Ace, right on top of him.
Lt Oliver figures he'd better sputter ahead, too, wouldn't want to be the only rookie acting aggressively.
The Japanese bombers move up, and suddenly Lt Rison finds himself with Kates in front and Kates behind. He opens fire on Kate 06, as Kate 06 returns fire and Kate 03's tail gunner gets in on the action...
All three hit!
What does that mean? That means the Japanese torpedo bombers shot down Lt Rison, while Lt Rison shot down Kate 06! Lt Rison bails out of his stricken fighter and is picked up a couple hours later, he's okay.
Zero 01 loops in and takes a shot at Lt Oliver, but misses.
And then the Japanese rookie, Zero 02, runs in head to head with Lt Oliver. Both pilots fire...
B
ut we avoid any rookie-on rookie violence when both rookies miss, and Zero 02 comes right, in behind Lt Duper, but kinda getting in Zero 03's way.
Forcing Zero 03 to come right to avoid a collision.
But then Zero 04 is able to come left onto the tail of Captain Hayne's wounded Wildcat. The Japanese veteran of Pearl Harbor and Coral Sea opens fire...
The 20mm cannon rounds begin knocking big pieces off of the stubby Wildcat, and Zero 04 cuts right as Captain Haynes opens the cockpit. He took some shrapnel in the shoulder and so it's a real struggle to hoist himself out, but he manages, and tumbles over the wing before his parachute opens. He's able to struggle out of his harness once he hit the water, then get his life raft inflated, the hardest part being to haul himself into it. He was picked up a couple hours later.
Lt Kirby comes right and opens fire on Kate 02, but he misses.
As Duper sputters past Zero 02. He's a dead man, there's no way Zero 02 doesn't come right and flame his ass...
Lt Oliver, pretty much nose to nose with Zero 01, also throws caution to the wind, ignoring the Japanese Ace to come left and fire on Kate 03...
He misses and flashes past, now taking defensive fire from Kate 03's tail gun as he opens up on Kate 05...
He lets out a triumphant scream as he gets his first kill of the war, splashing Kate 05!
The Kates, now down to two, push south.
As predicted, Zero 02 cuts right onto Lt Duper's tail...
And puts him in the drink before cutting left. Lt Duper was picked up, but he was wounded and will miss most of the next two months, just like Capt Haynes.
And then Zero 03 pulls right, sliding in behind Lt Kirby. The 20mm guns roar at long range, joined by the 7.7mm MGs when he reaches close range...
Lt Kirby rides his stricken Wildcat into the water, killed in action.
Zero 01 pulls a lazy right, scanning the skies for Yankee Imperialist Sky Pirates, finding only Lt Oliver (center left) still in the fight.
And Zero 04 pulls hard right, maneuvering to get on his tail.
Lt Oliver pulls the only move left to him, pulling into a power dive to pick up speed and disengage, living to fight another day.
The Japanese Zeros form up to escort the two remaining Kate torpedo bombers the rest of the way in. The Japanese attack pilots are not, of course, carrying torpedoes, they are carrying iron bombs, which they drop from level flight at medium altitude, which is not really they're forte, so they don't score much damage on the shore installations of Midway, only 8 points, bringing the total to 26/30.
Another ass-whooping for the Marines, following my normal campaign pattern. And it was ugly: the Marines lost five of six Wildcats, with one pilot KIA, one MIA, and two badly wounded, failing to knock a single Zero out of the sky, though they did get four of six bombers. Here's how the pilots did:
Capt Haynes killed two Kates, but was shot down, WIA, out for 50 days
1st Lt Rison killed one Kate, but was shot down by a Kate
2nd Lt Oliver killed a Kate, becoming a Regular
2nd Lt Duper failed to score and was shot down, WIA, out for 50 days
2nd Lt Cox didn't score, and really wishes he didn't get his plane back in operating condition as he was shot down and is now MIA
2nd Lt Kirby was killed in action, making his first mission his last mission
So, those were the attacks by the Japanese carrier air groups on Midway. Just like real life, they did a lot of damage, but were unable to destroy the shore installations, which then caused their strike commander to recommend the launching of a second strike, which would have catastrophic consequences for the Japanese carriers.
But that's all in the future: for now, the Americans on Midway are attempting to strike back at their tormentors! When word of the Japanese raid was broadcast, the Americans launched all the aircraft stationed on Midway, to avoid them being destroyed on the ground. But three groups of those aircraft actually set out to attack the Japanese; the attacks were not coordinated, so the Americans ended up piecemealing them into the fight, but that's where we're headed next: Major Chandler, the squadron commander, is leading a flight of Wildcats escorting six TBF torpedo bombers going for the Japanese carriers.
V/R,
Jack


No comments:
Post a Comment