All,
1130 local time
16 May 1942
New Guinea
Greetings all, having just wrapped up the Coral Sea battles, I figured it's time to head back to my U.S. Army Air Corps fighter squadron, the 565th Tactical Fighter Squadron, better known as the "Chickenhawks." The last we saw of the Chickenhawks was back in February of 1942; they'd started out fighting the Japanese over the Dutch East Indies before falling back to Australia and becoming embroiled in the fighting over Darwin. After things quieted down there, they ended up moving over to Brisbane, where they had a quiet period of daily patrolling to bring in replacements and get them trained up. But they got word at the end of April that they'd be moving soon, and immediately after the Battle of Coral Sea they packed up and shipped out, heading up to Port Moresby on New Guinea, making Kila Kila Airfield, AKA "3 Mile Drome," their new home on 11 May 1942. They only had a couple days before they were called to action.
On 13 May, Captain Cotton led six P-40s against four Zeros and six Bettys. One Zero and one Betty were downed at the cost of three P-40s and 25/30 damage points on the New Guinea Harbor Facilities.
On 14 May, Captain Goode led a depleted flight of only four P-40s up against four Zeros and six Bettys, and it was an unmitigated disaster. All four US fighters were shot down, with Captain Goode and Lt O'Brien killed in action, while the enemy didn't lose a single aircraft! The Japanese bombers quickly finished off the Harbor Facilities, and pounded the Marshalling Area (22/30 damage points).
Now, it's 16 May. The weather was bad yesterday so the Chickenhawks had a bit of a reprieve, but this morning the skies were clear and the Japanese were at it again, filling the skies with twin-engine bombers. Major Jordan, the Squadron Leader, leads six P-40s aloft to face six Bettys escorted by four Zeros.
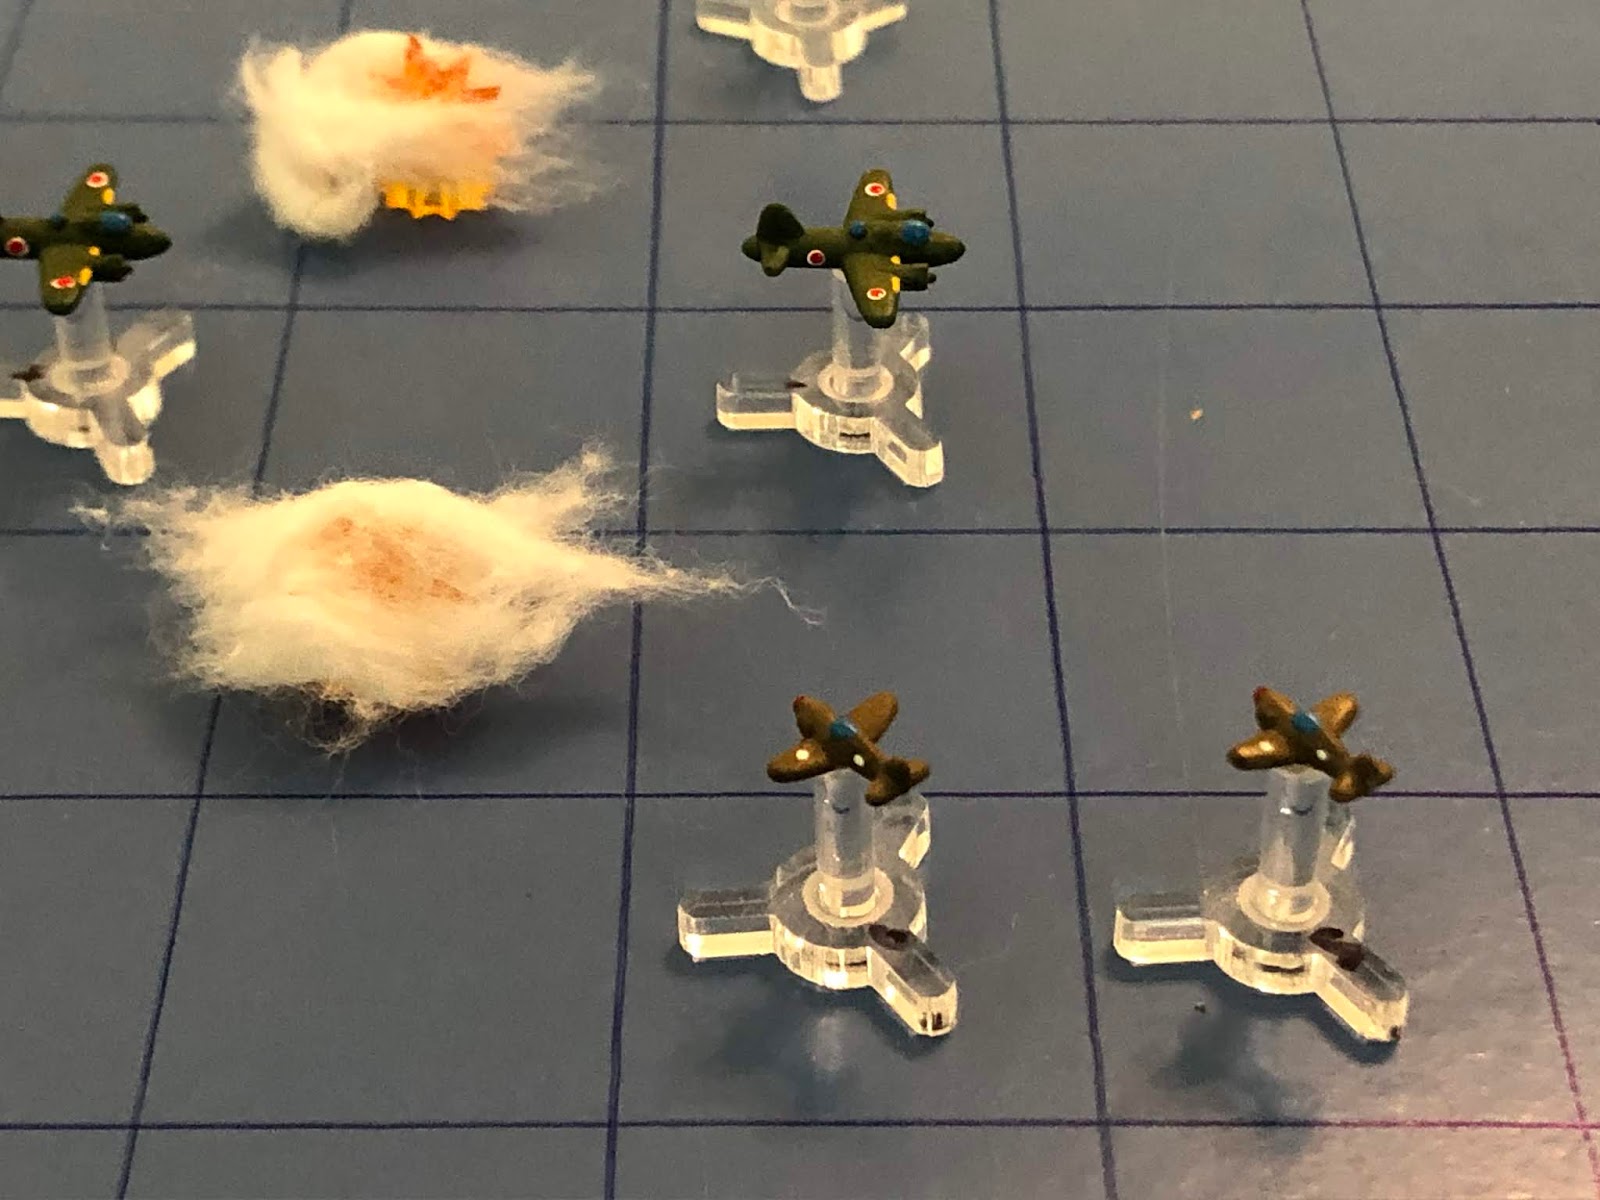
This is my arena for aerial combat; simple, yet durable and, to me, beautiful (in a simple, durable way). I'm using tiny aircraft designed by my buddy Thomaston; not sure what size they are, just that they are much smaller than 1/600. They're 3D printed models that I mounted on cut-down bases from Litko, and I'm using a very simple rules system called "Battle of Britain," which I found for free over on The Miniatures Page (I've already played a good 20 or so fights with them). Left is north, with the Japanese strike group there, and the American interceptors at right.
The US interceptor group, from top:
2nd Lt Sweeney, a Rookie
1st Lt Daniel, a Regular
2nd Lt Clifton, a Rookie
Major Jordan, an Ace
2nd Lt Byrd, a Rookie
2nd Lt Lewis, a Rookie
The Japanese strike group, from top:
Zero 02, a Veteran
Zero 01, an Ace
Betty 06 Betty 03
Betty 04 Betty 01
Betty 05 Betty 02
Zero 03, an Ace
Zero 04, a Regular
The Japanese are targeting the following locations for destruction this week:
1. Harbor Facilities - Destroyed!
2. Allied Marshalling Area - 22/30 pts damage
3. 3 Mile Drome - 0 pts damage
*Each target can take 30 points of damage before being destroyed.
Of course, the fight starts with me missing a photograph, so we're hopping straight in. You didn't miss anything, what happens is I 'fast-forward' though the first couple turns, and bring you in where the action starts. Well, we're here: Lt Byrd loops in on Zero 03 and takes a shot and misses.
He (far left) is immediately followed by his wingman, Lt Lewis, who runs straight in, head to head, on Zero 04. Both pilots squint and let out a scream as they close with the enemy and squeeze their triggers...
But both pilots miss and they flash past each other.
As the Bettys push south.
Up top, Zero 02 cruises, straight and level, past his flight leader.
And the flgiht leader, Zero 01, pulls to the right, where he lines up a shot on Major Jordan and opens fire...
The American Squadron Leader's P-40 absorbs several hits as the Japanese Ace swerves to avoid a collision.
Zero 03, the other Japanese Ace, cuts hard left, in behind Lt Byrd (left), but turning his tail to Lt Lewis (bottom center).
Zero 04 cuts left, too, following his section leader.
Lt Sweeny pushes straight in at Zero 02, but doesn't end up close enough for a shot.
As Lt Daniel cuts left and goes at the bombers.
Lt Clifton cuts left, in behind Major Jordan (red bead at far left)...
But the Major's bird is too damaged to continue the fight, so he wheels it around and heads for home!
*I tried cheating; I had to re-roll that damn dice five times before he finally passed the roll. That's what we call a sign, so I let the failure stand and he's heading home, despite being an Ace...
Lt Lewis cuts right and heads at the Bettys.
And Lt Byrd comes with him. This is part of the Chickenhawks bold new strategy to ignore the Japanese escorts and go straight at the enemy bombers. A bold strategy, Cotton, let's see how that works out for them.
The Bettys push south...
But as they do, Betty 03 runs straight into Lt Daniel's waiting .50-cal MGs...
And the Japanese bomber spirals into the green hell below.
While on the bottom, Betty 02 runs into Lt Lewis' guns...
Splash a second Japanese bomber!
*That was some incredible dice rolling, rolling two 6s in a row!
The remainder of the Bettys move up.
But all is not well: up top, Zero 02 rolls hard right and gets perfectly onto Lt Daniel's tail. He presses the triggers and 20mm tracers reach out...
But somehow the Japanese pilot misses, and pulls right, now with some potential trouble with Lt Sweeney (top right) able to get on his tail. If the rookie is up to it.
And down at the bottom, Zero 01 whips all the way around, lining up a perfect tail shot on Lt Byrd's P-40...
20mm cannon rounds pummel the P-40 until Lt Byrd is forced to bail out, as Zero 01 smiles to himself and coasts left. Lt Byrd was quickly scooped up by friendly forces and ushered back to 3-Mile Drome.
While Zero 03 comes right and goes head to head with Lt Clifton...
But both pilots miss, and flash past each other.
Zero 04 comes left and makes his own run on Lt Clifton, opening fire...
The P-40 is damaged and the Zero zooms past. Lt Clifton does a quick check of his instruments and control surfaces, and everything is okay, so...
He kicks it in the ass and comes right, where he lines up a perfect, no-deflection shot on Zero 01. The .50-cals thunder, but not a single round finds its mark!
*Every damn time a Rookie gets a perfect tail shot on an NBK or Ace, he blows it!
Major Jordan escapes to safety and sets his wounded bird down.
Lt Sweeney is able to do it! He comes left onto Zero 02's tail and opens fire at point-blank range.
And the Japanese fighter comes apart, falling like confetti into the lush green jungle below. Meanwhile, Lt Daniel (bottom left) has just downed a Betty, but finds himself unable to line up another shot on an enemy bomber without doing some pretty wild maneuvering.
He pushes ahead, taking defensive fire from Betty 06...
It misses, and then he rolls over and pulls in behind Betty 01 for a perfect tail shot! He opens fire, squinting as tracers flash past from Betty 01's tail gunner and Betty 04's nose gunner! The Japanese miss, while Lt Daniel manages to damage Betty 01.
At the bottom, Lt Lewis is in much the same position; he comes hard right and works to get onto Betty 01, worried about Zero 01 (bottom center, with Lt Clifton behind him) jumping him, hoping Lt Clifton can give him a hand.
The Bettys push south, and Betty 01 falls into Lt Lewis' sights. He opens fire...
But misses and they continue past.
*Lt Daniel (left) also took a shot, as did Betty 04 (center, twice actually) and Betty 05 (bottom left), but everyone missed.
As feared, Zero 01 cuts hard right and gets onto Lt Lewis' tail, where he opens fire. Enemy tracers slam into the American fighter...
Lt Lewis grimaces as his aircraft is damaged, and Zero 01 curses as he only damages the American, then pulls right.
Zero 03 comes all the way around left (from Zero 04's position at bottom right) to get onto Lt Sweeney's tail, but the maneuvering must have been too much as it caused him to miss the shot!
And with Zero 03 doing his thing (top center), Zero 04 pulls around all the way left to get onto Lt Clifton's tail...
But he misses, too, and comes right!
*Wow, quite a sequence there. The pics don't do justice to how good those moves were, how much ground both Zeros covered to get into those tailing positions, only to have both of them miss.
Having just gotten shot up, Lt Lewis feels his engine running rough, sees manifold pressure dropping, and he thinks he smells smoke, so he pushes the P-40 into a dive to pick up speed and disengages.
Lt Sweeny (center top, with Zero 03 right behind him) is not damaged, but he's in really bad shape. The Rookie got a kill, but wants to be able to live to tell about it, and he's not sure he can shake Zero 03 in a dogfight...
So he also dives away to disengage, leaving the fight!
At the bottom, Lt Clifton (bottom center), who's aircraft is damaged, looks over to starboard and spots Zero 04's pilot giving him the stinkeye...
Disengaging seems to be the cool thing to do at this point, so Lt Clifton dives away to safety.
But Lt Daniel says hell with that, and runs straight in on Betty 04's tail. He pitches left and right to avoid the enemy defensive fire as he makes his firing run...
Riding the triggers until Betty 04 comes apart!
*This is Lt Daniel's 2nd kill of the day, but his 5th kill of the war, making him an Ace!
Lt Daniel continues pushing ahead, now finding himself on Zero 01's tail! He mashes the trigger again...
And the enemy Ace's Zero explodes!
Lt Daniel's P-40 is buffeted by debris, but when he emerges on the other side, he's directly on Betty 01's tail! The enemy tail gunner spots him and opens fire just as he begins sending tracers out...
And Betty 01 streams fire and crashes into the jungle, giving Lt Daniel his 4th kill of the day!
He smiles to himself and looks over each shoulder to see who's left...
But the Japanese are turning away!
Lt Daniel calls out to all the chickens that abandoned him to let them know the coast is clear, they can come out now, smiling as a chorus of "aww, c'mon man, don't treat me like that, that Jap was right on my tail!" came across the radio. But he was floating, happy as can be as the flight re-formed and headed for the barn. After the turmoil of the first two missions, they were greeted as heroes, and indeed, they were.
A single US fighter was shot down, while the Japanese lost two Zeros and four Bettys, and not a single bomb fell on an Allied target as the remaining two Zeros and two Bettys jettisoned their bombs and headed for home without reaching the target area. For his actions in this engagement, 1st Lt Daniel was awarded the Distinguished Flying Cross.
2nd Lt Sweeney got a kill and became a Regular
1st Lt Daniel got four kills, won the DFC, and became an Ace
2nd Lt Clifton survived to become a Regular
Major Jordan had his aircraft damaged and had to return to base
2nd Lt Byrd was shot down but is okay
2nd Lt Lewis got a kill and became a Regular
No Japanese bombers made it to the target area, so the Marshalling Area is still barely hanging on. But the Americans, feeling their oats, have something a bit more offensive in mind. Coming right up.
V/R,
Jack


No comments:
Post a Comment