All,
1130 local time
18 May 1942
New Guinea
Greetings all, having just wrapped up the Coral Sea battles, I figured it's time to head back to my U.S. Army Air Corps fighter squadron, the 565th Tactical Fighter Squadron, better known as the "Chickenhawks." The last we saw of the Chickenhawks was back in February of 1942; they'd started out fighting the Japanese over the Dutch East Indies before falling back to Australia and becoming embroiled in the fighting over Darwin. After things quieted down there, they ended up moving over to Brisbane, where they had a quiet period of daily patrolling to bring in replacements and get them trained up. But they got word at the end of April that they'd be moving soon, and immediately after the Battle of Coral Sea they packed up and shipped out, heading up to Port Moresby on New Guinea, making Kila Kila Airfield, AKA "3 Mile Drome," their new home on 11 May 1942. They only had a couple days before they were called to action.
On 13 May, Captain Cotton led six P-40s against four Zeros and six Bettys. One Zero and one Betty were downed at the cost of three P-40s and 25/30 damage points on the New Guinea Harbor Facilities.
On 14 May, Captain Goode led a depleted flight of only four P-40s up against four Zeros and six Bettys, and it was an unmitigated disaster. All four US fighters were shot down, with Captain Goode and Lt O'Brien killed in action, while the enemy didn't lose a single aircraft! The Japanese bombers quickly finished off the Harbor Facilities, and pounded the Marshalling Area (22/30 damage points).
On 16 May, Major Jordan led the squadron aloft to intercept six Bettys escorted by four Zeros, but Lt Daniel was the star of the show. The Americans lost a single P-40, but they knocked down two Zeros and four Bettys, with Lt Daniel knocking down four of those aircraft and winning the Distinguished Flying Cross. The remaining two Japanese bombers jettisoned their bombs and returned to base, so no bombs fell on the Allied Marshalling Area (still 22/30).
Now it's 18 May, with bad weather yesterday putting a stop to flight operations, but today is sunny and so the Americans are not only flying, but they're playing offense! 1st Lt Pace is leading a flight of four P-40s, which are escorting six B-25 Mitchells. They're plan is to cross the spine of the island and strike enemy installations on the northern coast of New Guinea. First up are the Japanese POL storage areas, then the Warehouse Yard, and finally the airfield at Wewak.
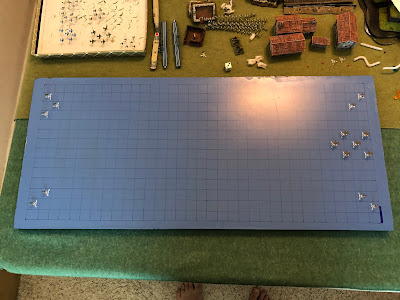
This is my arena for aerial combat; simple, yet durable and, to me, beautiful (in a simple, durable way). I'm using tiny aircraft designed by my buddy Thomaston; not sure what size they are, just that they are much smaller than 1/600. They're 3D printed models that I mounted on cut-down bases from Litko, and I'm using a very simple rules system called "Battle of Britain," which I found for free over on The Miniatures Page (I've already played a good 20 or so fights with them). Left is north, with the Japanese interceptors there, and the American strike group at right.
2nd Lt Moore, a Rookie
1st Lt Beach, a Regular
B-25 02 B-25 05
B-25 01 B-25 04
B-25 03 B-25 06
1st Lt Pace, a Regular
2nd Lt Nagle, a Rookie
Bomber targets are:
POL Storage
Warehouse Yard
Wewak Airfield
How 'bout them Mitchells? First time I've had them on the table. Let's hope they're a good omen.
The Japanese interceptors, a bit understrength because of previous battles, and a bit shocked at the temerity of the Yankee imperialists. From top:
Zero 03, a Regular
Zero 01, a Natural Born Killer
Zero 02, a Veteran
Zero 04, a Veteran
Zero 05, a Regular
We fast forward through Turns 1 and 2; hell, actually, through Turn 3 as well, these American escorts are slacking...
Time to fight!
Lt Beach comes right to help protect the bombers.
But that throws Lt Moore off, and he just kinda sputters right.
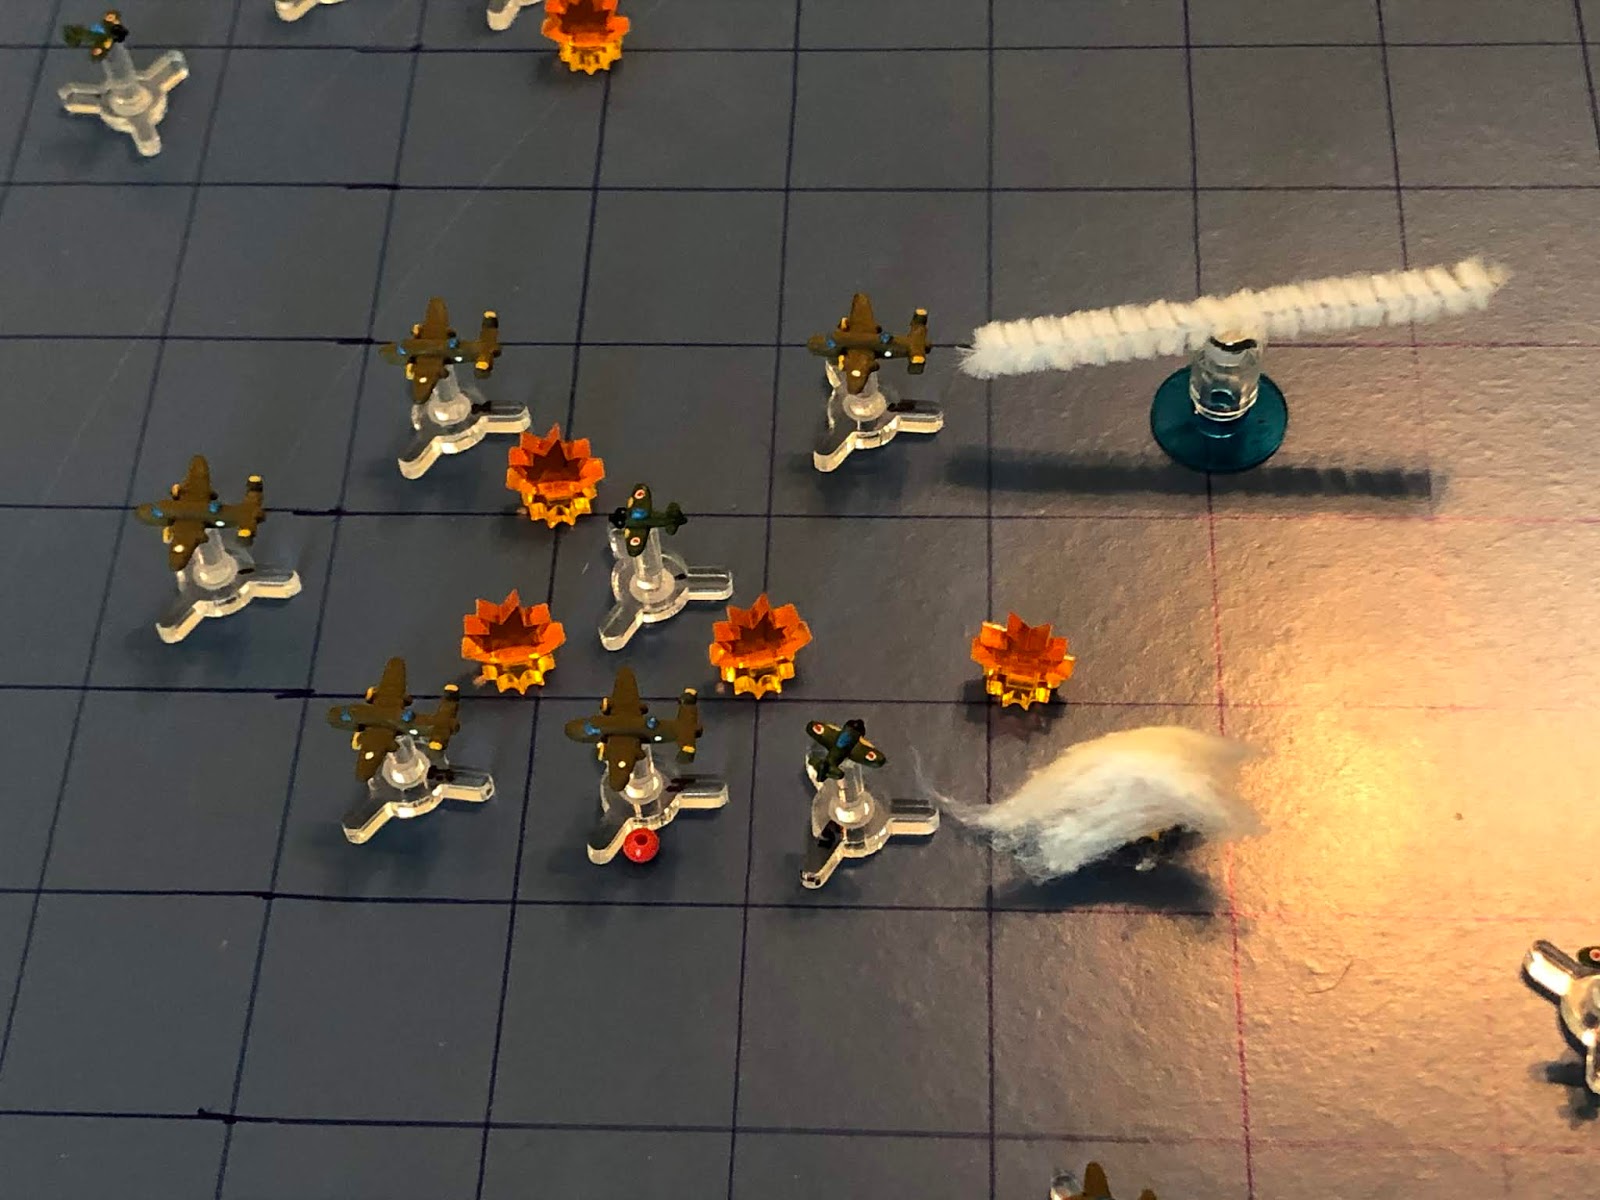
While at the bottom, Lt jinks over and goes head to head with Zero 05! Both pilots grit their teeth and stand on the triggers...
And the next thing you know, Lt Pace is floating to earth beneath a silk canopy! And if that wasn't bad enough, he got hit by a shell splinter that will keep him out of action for the next couple months.
With Lt Pace down (bottom left), Lt Nagle jinks over to get closer to the bombers.
Feeling his oats after downing Lt Pace (at bottom left), Zero 05 really kicks it in the ass, pulling left to take a frontal aspect shot on B-25 01, though he misses.
While Zero 04 runs straight in, a bit wary of Lt Nagle (far right).
While up top, Zero 02 is chilling...
And Zero 03 comes right, chilling too.
But Zero 01 isn't. He jinks over and into Lt Beach, lining up a shot and firing...
Lt Beach's P-40 is damaged, as Zero 01 cuts right and fires on B-25 05, missing.
The US bomber push ahead without incident. There's a bunch of defensive fire on enemy Zeros, and Zero 05 even gets a shot at one of the bombers, but everybody missed.
Lt Beach's aircraft is badly shot up, so he pulls it around and heads for home, leaving the two rookies, Lieutenants Moore and Nagle, to carry the bombers the rest of the way.
Lt Moore immediately gets to work, coming left and fires on Zero 03...
But he misses and flies past.
While the other rookie, Lt Nagle, is very unsure of himself, with Zero 05 above him (center left, in the bombers) and Zero 04 below him, so he just kinds sputters along, not even realizing the big threat to him is Zero 01 (top right).
Zero 04 slides past Lt Nagle, free to go after him or the bombers, as he pleases.
And Zero 01 says hell with Lt Nagle (bottom left), and goes after the bombers. He cuts right and opens fire on B-25 06's tail...
The B-25's left wing separates from the body and the bomber slams into the jungle as Zero 01 pulls right onto B-25 04's tail and opens fire...
He damages B-25 04 (red bead), then flashes past onto B-25 01's tail, continuing to fire...
But he and both sets of defensive gunners miss!
Until the US bombers move up and B-25 02's
(top left) and 03's (bottom left) gunners get into the mix, and the tracers converge on Zero 01 and knock him out of the sky!
Lt Beach escapes to safety in his damaged P-40.
Lt Nagle comes right onto Zero 05's tail and opens fire, but misses.
While Lt Moore comes left, defensive.
Zero 05 is a bit astounded at the outnumbered Americans continuing to fight, much less get on his tail, so he comes right, defensive.
while his section leader, Zero 04, cuts left and makes a high-side pass on Lt Nagle, but misses.
Up top, Zero 03 cuts hard right onto B-25 05's tail. He and their tail gunner open fire...
*I forgot to put the explosion marker down to show the firing.
They both miss, then Zero 03 pushes ahead, onto B-25 02's tail, opening fire as he takes fire from B-25 02 and B-25 05...
B-25 02 bites the dust.
As Zero 02 comes right and fires on B-25 05...
He misses and continues right, onto B-25 03's tail, where he braves defensive fire to press home his attack, damaging B-25 03.
The US bombers push north.
*I've been testing to see if the damaged bombers stay or go home, but I've had much better luck with bombers staying than fighters, for both the Americans and the Japanese.
Lt Moore comes left, hopefully helping the bombers but not really accomplishing anything.
And Lt Nagle sputters ahead, not sure what to do with Zeros 04 and 05 all over him.
*That was truly horrible dice rolling.
Zero 03 pushes ahead, straight onto B-25 05's tail. The American tail gunner opens fire as the Japanese pilot shoots...
And B-25 05 is damaged, but its tail gunner is the one that scores! He sees his rounds hit and the Japanese pilot slump forward in the cockpit before the Zero rolls over and dives into the jungle below!
*Two kills for the bombers!?
Zero 02 pulls right and braves defensive fire to take a shot at B-25 05...
Both miss, and the Japanese pilot pulls left, doing the same thing with B-25 04...
But this time another American bomber goes down.
He then makes a run on B-25 01 (far left), but both miss and he comes off right.
Zero 04 pulls hard right, even with Lt Nagle.
As Zero 05 pulls an Immelman to move right in behind him.
The three American bombers continue their journey north, with B-25 05 having to come left to avoid colliding with Zero 02.
But no matter, Lt Moore immediately pulls in behind Zero 02...
And smokes him!!!
Lt Nagle pulls hard right, defensive, somehow holding his own against Zeros 04 and 05, at least for the moment.
Zero 05 is aggravated as hell with the impudent American, then remembers he was not supposed to be dicking around with a fighter, he was supposed to be going after the bombers, so he cuts left and begins catching up.
While Zero 04 continues his macabre dance with Lt Nagle.
And the American bombers push north.
Lt Moore comes left to protect B-25 05 from the approaching Zero 05 (bottom right).
While Lt Nagle breaks hard right, away from Zero 04 (right), with an eye on Zero 05 (top left).
As Zero 04 comes hard left.
And Zero 05 is unsure how best to press home his attack, so he waffles a bit.
Which gives the American bombers more space to press for the target area.
Lt Moore isn't exactly sure what to do: does he go right and stay with B-25 05, or does he go left to confront Zero 05. He can't decide, so he does neither, just cruising straight and level, waiting to see what the enemy pilot does.
As Lt Nagle cuts hard right, back into Zero 04.
*These two are completely out of the fight, just dueling to see if anyone can gain the upper hand.
But Zero 04 finally decides he's had enough of Lt Nagle's game (bottom right), so he opens up the throttle and comes left, joining his wingman.
Who immediately cuts left to go after B-25 05 (far left).
As the bombers keep running.
B-25 01 has entered the target area and begun his bombing run, with B-25 03 right behind him.
Lt Moore comes right, looking to keep Zero 05 off B-25 05. And then the completely unexpected happens!
Zero 04 was completely confident that he had put Lt Nagle well in his rear view mirror, the quick, nimble Zero easily leaving the P-40 in its dust. The first clue he had that that wasn't true was when his aircraft began shuddering from the impact of Lt Nagle's bullets!
And Lt Nagle let out a whoop as he shot the Zero down! His wingman, Zero 05 (far left), let out a shriek of rage...
Then jinked over onto B-25 05's tail. Tracers flew out from the tail gun and the Zero's cannons...
And the American bomber came apart, cartwheeling into the trees.
As B-25 03 begins his bombing run.
Lt Moore jinks over onto Zero 05's tail to get revenge, but he only damages the enemy plane.
As Lt Nagle comes left to assist.
Zero 05 pushes for safety, but is it enough?
No, it's not, as Lt Moore presses the attack...
And downs the last Japanese fighter! The two P-40s loiter while the bombers make their runs.
Then re-form for the flight home. "How'd you guys do back there?" Lt Moore asked the bomber flight leader. "Man, we killed it, put them pickles right in the barrel, it was a virtual inferno, probably just won all of New Guinea for the ground-pounders!" "No kidding, I can't wait to get back and tell everyone." But when they got home they grabbed a quick bite to eat and headed for debriefing, where aerial reconnaissance reported Wewak was barely touched (6/30 points on the POL storage area)
2nd Lt Moore scored two kills and became a Regular
1st Lt Beach had his aircraft damaged and returned to base
1st Lt Pace was shot down and wounded, will be out for 70 days
2nd Lt Nagle scored a kill and became a Regular
So, in the overall scheme of things, that was a successful mission in that the Chickenhawks held their own and delivered at least a couple bombers to the target, despite how poorly the bombardiers scored. The Japanese lost all five of their Zeros, though two of those kills went to the bomber crews, while the Chickenhawks lost one P-40 and had four of their flock shot down.
Next up, a couple two-ship patrols run into each other over No Man's Land, coming right up.
V/R,
Jack


No comments:
Post a Comment