All,
1010 local time
4 June 1942
Midway
It's 4 June 1942, the dawn of the epic "Battle of Midway," a clash of giants, three US carriers vs four Japanese carriers that proved to be the turning point of the war in the Pacific. For more information, both real-life and how I'm running this campaign, please check here:
https://oldleadbreed.blogspot.com/2019/11/battle-of-midway-campaign-plan.html
Yesterday at 0900 a US Navy PBY Catalina spotted Japanese ships 500nm west southwest of Midway; B-17s from the island were dispatched but failed to hit anything. US Navy PBYs continued to shadow the Japanese surface force, and actually attacked at 0100 this morning, scoring a torpedo hit on a Japanese merchant ship. Unbeknownst to US personnel, the Japanese carrier task force, as yet still unspotted, launched its first strike group against Midway at 0430. At 0530, the PBYs spotted the Japanese carriers, and noted their strike group inbound.
At 0610, the VMF-343 "Dirt Divers" scrambled six F4F Wildcats to intercept an inbound group of six D3A "Val" dive bombers escorted by four A6M "Zeros," but were roughly handled, having three Wildcats shot down and the other three damaged, as the Japanese lost one Zero and one Val. The Japanese aerial attack caused 18/30 damage points.
At 0625, Captain Haynes led six Wildcats to intercept an inbound group of six B5N "Kate" torpedo bombers escorted by four A6M "Zeros." Again it was rough: the Marines lost five of six aircraft, with one pilot KIA, one MIA, and two WIA, while the Japanese lost four of their six torpedo bombers, which did light damage to Midway's shore installations (26/30, total).
At 0645, Major Chandler led four Dirt Divers in escort of a flight of six TBF torpedo bombers to attack the Japanese carriers, running right into the Japanese CAP of six Zeros, and it was a debacle: the Americans lost one Wildcat and five TBFs, the last being damaged and forced to return to base without even spotting the Japanese carriers. Oh, and the Japanese did lose two Zeros, but they were both to the TBFs!!!
At 0715, 2nd Lt Herman led a flight of four Wildcats in escort of six SBD Dauntless dive bombers from Marine Scouting-Bombing Squadron 241 (VMSB-241), up against six Zeros of the Japanese Combat Air Patrol. The mission was sort of a success: five Zeros were downed (two by SBDs!) and the sixth was shot up, no Wildcats were lost, only three Dauntlesses were lost, but no hits were scored on the enemy carriers.
At 0800, Major Chandler is led a flight of four Wildcats on an escort mission for four US Army Air Corps B-26s specially modified to carry torpedoes. The Marines lost two Wildcats and had another damaged, and two B-26s, with another damaged, while the Japanese lost all four CAP Zeros, though one was shot down by a US bomber. The lone B-26 to reach the Japanese fleet missed on its torpedo run and, to add insult to injury, Major Chandler was one of the Marines shot down, and he was badly wounded.
It's now 1010, and LtCmdr Case, the Ace squadron leader of the Killer Pelicans and winner of the Medal of Honor, is leading a flight of four Wildcats in escort of six TBD Devastators (that look a lot like TBF Avengers because I don't have any TBDs) hoping (against history) to put some torpedoes into the Japanese carriers. They will face six Zeros flying Combat Air Patrol for the Japanese fleet.
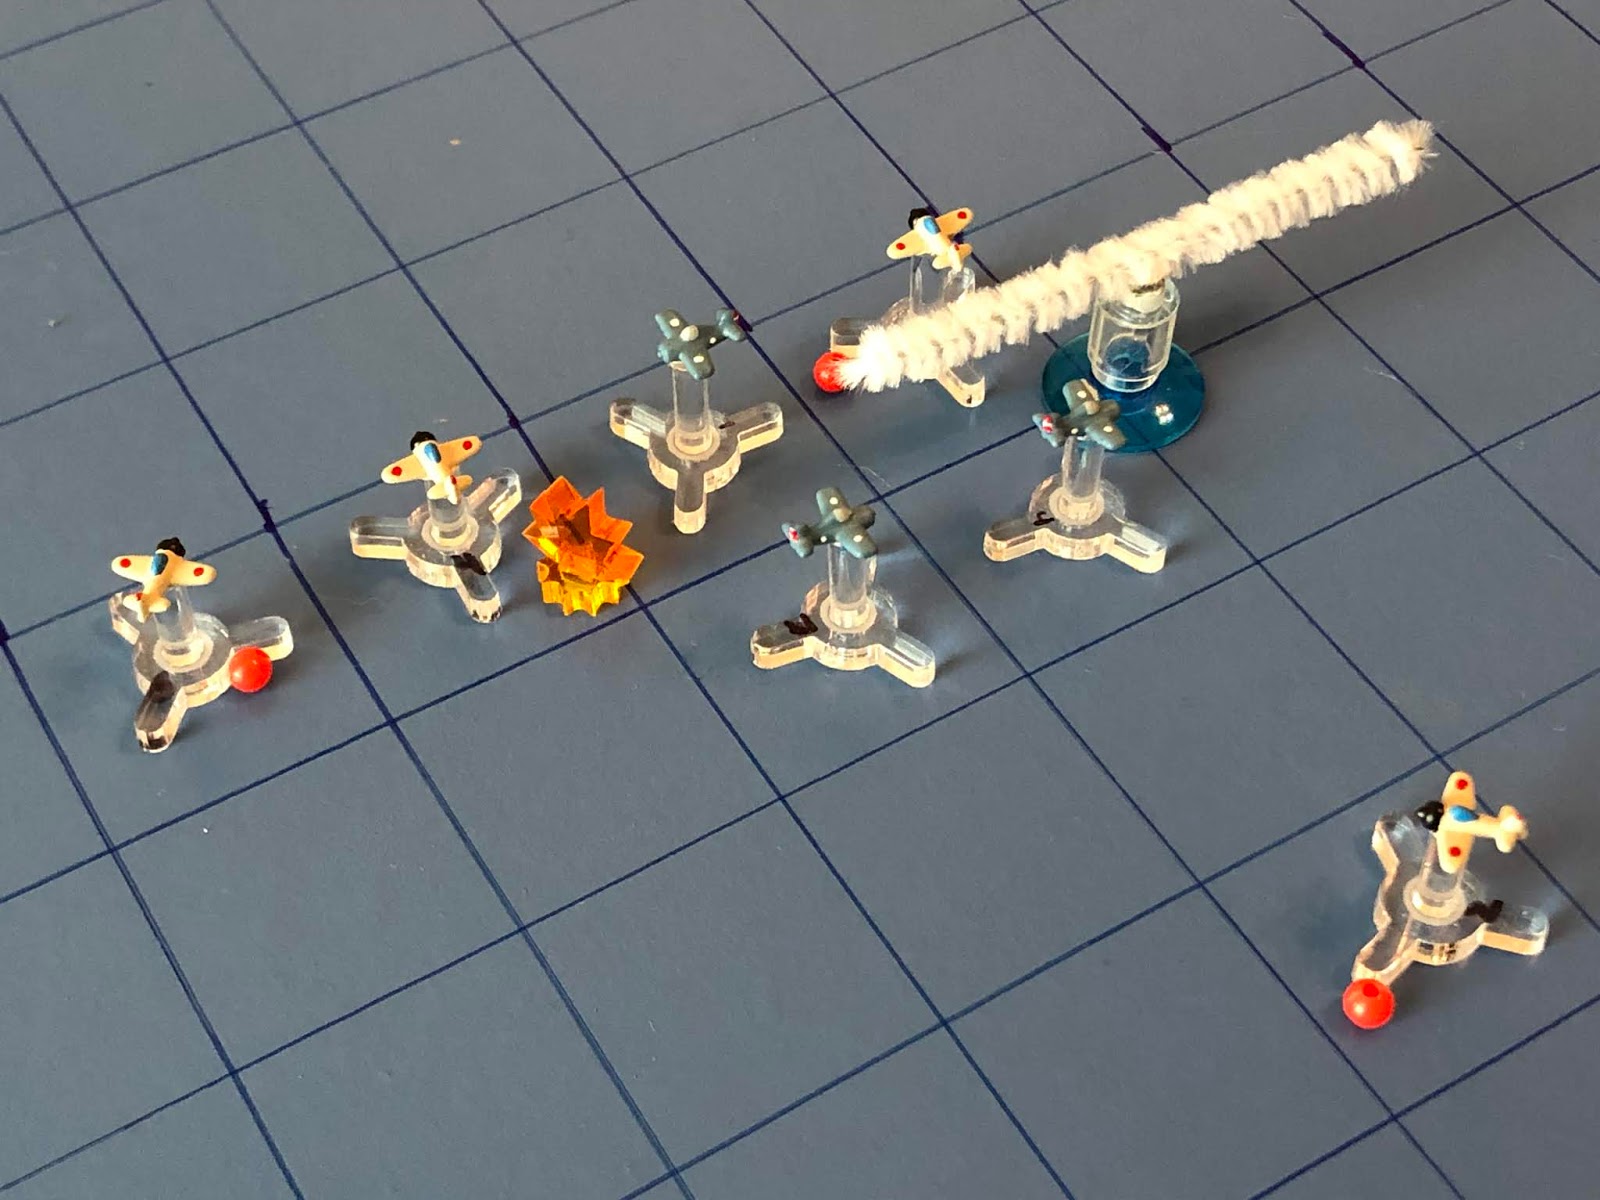
This is my arena for aerial combat; simple, yet durable and, to me, beautiful (in a simple, durable way). I'm using tiny aircraft designed by my buddy Thomaston; not sure what size they are, just that they are much smaller than 1/600. They're 3D printed models that I mounted on cut-down bases from Litko, and I'm using a very simple rules system called "Battle of Britain," which I found for free over on The Miniatures Page (I've already played a good 20 or so fights with them). Left is north, with the Japanese CAP there, and the American strike group at right.
I've really gotta do better about getting my damn feet out of the photo. I'm sorry...
The US strike group, from top left to bottom right:
Ensign Warren, a Regular with no kills on two sorties
LtCmdr Case, an Ace and Medal of Honor winner with ten kills on five sorties
TBD 02 TBD 05
TBD 01 TBD 04
TBD 03 TBD 06
Lt (jg) Dahlgren, a Regular with two kills on four sorties
Ensign Didier, a Regular with one kill on two sorties
The Japanese CAP, from top right to bottom left:
Zero 03, a Regular
Zero 01, a Veteran
Zero 02, a Veteran
Zero 06, a Regular
Zero 04, a Veteran
Zero 05, a Veteran
We fast forward through the first three turns in order to bring you straight into the action. Time to fight!
And the fight begins with LtCmdr Case, the hero of the Dutch East Indies, acting out in his characteristically aggressive manner: the American Ace pushes his Wildcat ahead and cuts right, taking a high-deflection shot on Zero 02.
The Zero shudders under the impact of the .50-cal rounds, damaged, as LtCmdr Case flashes past.
And the US torpedo bombers push north.
Zero 02 jinks over, looking to go head to head with the torpedo planes, maybe split their formation.
As Zero 01 runs straight in on Ens Warren and fires, missing.
Zero 03 loops around, looking to get in shape on the torpedo bombers or Ens Warren, depending on how things shake out. He's in position but doesn't waste ammo on a full-deflection shot.
At the bottom, Zero 05 pushes past Ens Didier (bottom center) and cuts hard left into Lt Dahlgren (far right).
As Zero 04 pushes ahead and cuts right to take a deflection shot on Ens Didier, but misses.
And Zero 06 streaks straight in at the Devastators.
LtCmdr Case flips around and gives chase to Zero 01 and 03.
As Ens Warren panics and tries to run but doesn't get very far, in big trouble...
Down below, Lt Dahgren runs in for a full deflection shot on Zero 06...
Predictably, he misses, then cuts left, defensive.
As Ens Didier cuts hard right in front of Zero 04, defensive.
The Devastators move up their first step, with Zero 06 taking a shot at TBD 03, missing.
They move up again and Zero 06 gets another shot, this time at TBD 06, but again he misses, as doesTBD 03's defensive fire at him. At top center you can see TBD 02 having to turn right, breaking formation, to avoid Zero 02.
But as the TBDs continue moving up, TBD 05 runs head to head with Zero 02. Both pilots open fire, as does TBD 02's tail gunner (top center)...
And TBD 05 goes down in flames.
Zero 01 comes right and goes head to head with TBD 02...
Both pilots miss, and Zero 01 rolls hard right onto TBD 01's tail. The tail gunner opens fire, as does Zero 01's pilot...
And TBD 01 comes apart, its wreckage and crew tumbling into the ocean below.
Zero 03 comes hard right and takes a high-deflection shot on TBD 02 (with Ens Warren at bottom left)...
He misses, but then rolls his Zero over right and pulls onto Ens Warren's tail, where he immediately begins pumping 20mm rounds into the stubby Wildcat...
Until it bursts into flames and plunges into the sea, though Ens Warren was able to safely bail out and was picked up the next day by a PBY out of Midway.
Zero 06 can't line up a shot, and he's a little nervous about Lt Dahlgren (center), so he pulls right, disengaging.
But the maneuver freaks out Zero 05, who narrowly avoids a mid-air collision with him!
As Zero 04 pulls right, ignoring Ens Didier (bottom left), and runs in on Lt Dahlgren for a high deflection shot...
He misses and flashes past, also nearly colliding with Zero 05!
LtCmdr Case cuts right and takes a full deflection shot on Zero 01, but misses.
And Lt Dahlgren pulls hard right, defensive, snuggling up against Zeros 04, 05, and 06 (right).
Which also clears the way for Ens Didier to pull around right and get straight on Zero 04's tail! The young American opens fire, but only manages to damage the enemy fighter.
The Devastators push north, with one of them taking a shot on Zero 01 but missing.
Zero 04's pilot checks his stricken aircraft, but he's okay (of course he is, passing his 'return to base' check, just like Zero 02 did), so he pulls around hard left and jumps onto TBD 06's tail...
And promptly splashes the hapless Devastator.
As Zero 01 jinks over onto TBD 04's tail and opens fire, damaging it.
As Zero 03 comes right, going after TBD 02 (top right).
And Zero 02 pulls an Immelman to reverse course and get back into the fight.
Zero 06 comes right, giving chase to the remaining TBDs (top center).
**I missed a picture here: Zero 05 runs straight in on the recently damaged TBD 03 and opens fire (top center, the Devastator with a red bead and a Zero right on its tail).
TBD 03 goes down and Zero 05 comes left onto TBD 04's tail. The 7.7mm machine guns again chatter and the 20mm cannons again thump away...
And Zero 05's pilot smiles over his shoulder as he watches TBD 04 strike the surface of the ocean and cartwheel, having killed two Devastators in one run...
The American pilots are hungry for some revenge: Ens Didier swings in on Zero 01's tail and opens fire...
Zero 01 is damaged and Ens Didier pulls right.
**I missed another damn picture: Lt Dahlgren (bottom center) pulls hard left and fires on Zero 04...
But he misses and pulls hard right, in behind Ens Didier.
Dammit!!!! This is despicable.
As LtCmdr Case still cannot get into good position: he pulls hard right and takes a full-deflection shot on the damaged Zero 01...
He misses, flies past Zero 01, then tries again with a bad shot on Zero 04 and misses again.
The last remaining torpedo bomber, TBD 02, pushes north (the US fighters are all at center bottom right).
*Five TBDs and one Wildcat are down, and not a single Japanese fighter is knocked out.
Zero 03 pulls left, dodging defensive fire from TBD 02, and opens fire...
Both miss, and Zero 03 pulls alongside.
But the Japanese fighters swarm: the damaged Zero 01 pulls onto TBD 02's tail, but again both sides miss.
Zero 05 pulls around for a frontal shot and damages the last American torpedo bomber.
Further down, Zero 04 pulls right, defensive.
As Zero 06 comes right, going head to head with LtCmdr Case! Both pilots open fire...
And Zero 06 blows up in mid-air!!!
Zero 02 comes right to see how things develop.
Fresh off his kill, LtCmdr Case comes hard left to go head to head with the damaged Zero 02. Both pilots open fire...
And the American Ace pulls left, damaged, having missed the enemy fighter!!!
Wow...
Ens Didier comes hard left, defensive.
While Lt Dahlgren is the only US pilot to actually jump in the fight and try to save TBD 02; he comes left, onto Zero 01's tail, and opens fire...
But he misses the damaged fighter and cuts left.
TBD 02 pushes north, braving enemy fire, his tail gunner squirting tracers everywhere...
Downing Zero 03!!!
Target in sight, but can he make it with four Zeros still back there?
Zero 05 sputters right, unable to get into firing position on TBD 02 (top left) and unwilling to turn his tail to Lt Dahlgren (bottom right).
But Zero 01 quickly pounces, the veteran Japanese flight leader pushing his damaged aircraft over onto the damaged Devastator's tail. Tracers go out and come in at the same time...
And both planes go down!!! Thus ends the torpedo bomber escort mission, with all of them shot down.
Zero 02 jinks over onto Ens Didier's tail and opens fire, damaging his Wildcat.
As Zero 04, continuing to move defensively.
With no torpedo bombers left and no immediate advantage on the Japanese CAP to press, the three remaining Wildcats break off.
Well, that went about like real life, at least in the sense that the torpedo bombers got shellacked; the issue is that in real life they'd gotten separated from their escorts and had to face the Japanese CAP alone, so it kinda hurts that I couldn't do better than real life, even with escorts! ;)
LtCmdr Case, scored his eleventh kill of the war, and though his Wildcat was damaged, he's still in the fight
Lt (jg) Dahlgren failed to score
Ensign Didier failed to score
Ensign Warren failed to score and was shot down. Having said that, he's okay, bailed out safely and picked up
So that sucked, but the Killer Pelicans are right back in it, escorting the SBD Dauntlesses that did all the damage ("Scratch Four Flattops!") in real life, so let's see how it goes.
V/R,
Jack


No comments:
Post a Comment